Van's Air Force
You are using an out of date browser. It may not display this or other websites correctly.
You should upgrade or use an alternative browser.
You should upgrade or use an alternative browser.
Fitting wheel pants
- Thread starter g zero
- Start date

Carl Froehlich
Well Known Member
Ok - now I’m curious. How to you establish the wheel pant geometry to be exactly rigged to the airframe centerline?
I assume you all have already done the gear leg bolt holes so that alignment to airframe is done. I’d be concerned that the now relatively short measurement arm would translate to a tiny error resulting in a wheel pant with less than perfect rigging.
I’ve fixed wheel pant rigging problems (as in the ball was half out in straight and level flight).
Carl
Roadjunkie1
Well Known Member
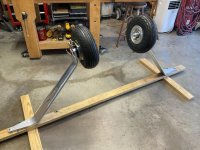
I saw on the front page someone laying on the floor fitting wheel pants …. There’s an easier way . Bolt the leg to the floor and work on it sitting on a stool
I tried that with the RV-4. Made a big mess......

Ok - now I’m curious. How to you establish the wheel pant geometry to be exactly rigged to the airframe centerline?
I assume you all have already done the gear leg bolt holes so that alignment to airframe is done. I’d be concerned that the now relatively short measurement arm would translate to a tiny error resulting in a wheel pant with less than perfect rigging.
Carl
Good question.
I dunno, I didn't write 'em
Seriously, my guess would be that the instructions were originally written for the round taper leg installations. I've never measured, but I imagine the taper leg airplanes do show some difference in pant-to-centerline alignment when loaded and unloaded. The sweepback of the tailwheel models with engine mount gear sockets has to introduce a little torsion in the leg when loaded. If I were doing a new install on a model with a lot of sweep, I'd jack it up to unload the gear, then align the pant in both yaw and pitch. The resulting yaw alignment may not be exactly perpendicular to the axle, but it will be aligned with airflow in flight.
The RV-8 legs maintain the same axle alignment loaded or unloaded, and the bench setup is easy. Just another reason to envy -8 owners.
wirejock
Well Known Member
Alignment
That explains it. I figured the round leg must move a little.
I used Vans instructions. Worked fine but I did have to lay on the floor a lot. Kinder mat works great.
I dunno, I didn't write 'em
Seriously, my guess would be that the instructions were originally written for the round taper leg installations. I've never measured, but I imagine the taper leg airplanes do show some difference in pant-to-centerline alignment when loaded and unloaded. The sweepback of the tailwheel models with engine mount gear sockets has to introduce a little torsion in the leg when loaded. If I were doing a new install on a model with a lot of sweep, I'd jack it up to unload the gear, then align the pant in both yaw and pitch. The resulting yaw alignment may not be exactly perpendicular to the axle, but it will be aligned with airflow in flight.
The RV-8 legs maintain the same axle alignment loaded or unloaded, and the bench setup is easy. Just another reason to envy -8 owners.
That explains it. I figured the round leg must move a little.
I used Vans instructions. Worked fine but I did have to lay on the floor a lot. Kinder mat works great.
Roadjunkie1
Well Known Member
Gear.....
That is what I did on SuzieQ. Did it make any difference? Not sure. It's difficult to get out and look at them when I am flying... It just made more sense to align the pants in the configuration of what they were going to be when it was flying and the airflow pattern was important, not sitting on the hangar floor. I'm not sure the difference would be significant enough to make any difference in the speed. Pressure recovery? Yes, definitely.
Nice, compact cockpit; rudders on each side of the tunnel not nearly touching; cool-looking cowling. Just a few reasons to envy -4 owners!
I imagine the taper leg airplanes do show some difference in pant-to-centerline alignment when loaded and unloaded. The sweepback of the tailwheel models with engine mount gear sockets has to introduce a little torsion in the leg when loaded. If I were doing a new install on a model with a lot of sweep, I'd jack it up to unload the gear, then align the pant in both yaw and pitch. The resulting yaw alignment may not be exactly perpendicular to the axle, but it will be aligned with airflow in flight.
That is what I did on SuzieQ. Did it make any difference? Not sure. It's difficult to get out and look at them when I am flying...
It just made more sense to align the pants in the configuration of what they were going to be when it was flying and the airflow pattern was important, not sitting on the hangar floor. I'm not sure the difference would be significant enough to make any difference in the speed. Pressure recovery? Yes, definitely. The RV-8 legs maintain the same axle alignment loaded or unloaded, and the bench setup is easy. Just another reason to envy -8 owners.
Nice, compact cockpit; rudders on each side of the tunnel not nearly touching; cool-looking cowling. Just a few reasons to envy -4 owners!
Yes, the RV8 gear appears to be easier this way.
On my 4 I jacked it up and leveled the plane and aligned everything from the center line that way.
Yes it was tedious and a PITA but it certainly worked perfect. Gained 6 to 8 mph and no more ball 1/4 off in cruise.
Tim
On my 4 I jacked it up and leveled the plane and aligned everything from the center line that way.
Yes it was tedious and a PITA but it certainly worked perfect. Gained 6 to 8 mph and no more ball 1/4 off in cruise.
Tim
hgerhardt
Well Known Member
.......... Gained 6 to 8 mph and no more ball 1/4 off in cruise...........
You gained 6 to 8 mph over what? No wheel pants and leg fairings or from replacing your original old one-piece Van's wheel pants?
Pilot135pd
Well Known Member
You gained 6 to 8 mph over what? No wheel pants and leg fairings or from replacing your original old one-piece Van's wheel pants?
I don't know to what he was referring but I can tell you I lost about 14-15 mph when I removed the wheelpants on my RV-8.
You gained 6 to 8 mph over what? No wheel pants and leg fairings or from replacing your original old one-piece Van's wheel pants?
yes, only replaced the old style wheel pants for the new PR wheel pants. Nothing else changed.
206 to 208 mph
We get clver too slow and old too fast
This method makes a lot of sense to me. Wish I have thought of that. With the builds I have done, I have done the spats before adding the wings. Then I could sit there on my workshop chair and work on it which was much easier on my bad back.
I have a flying RV7A now with spats not so well aligned and might have to redo them. I also have a friend with a bent RV7A leg in his hangar.
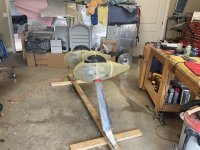
I might clamp that leg in the correct position (as mentioned it is only the axle that really matters ) and then transfer my spat bracket and wheel to this setup on the bench to do the work.
Any suggestions that it might not work is welcome
This method makes a lot of sense to me. Wish I have thought of that. With the builds I have done, I have done the spats before adding the wings. Then I could sit there on my workshop chair and work on it which was much easier on my bad back.
I have a flying RV7A now with spats not so well aligned and might have to redo them. I also have a friend with a bent RV7A leg in his hangar.
I might clamp that leg in the correct position (as mentioned it is only the axle that really matters ) and then transfer my spat bracket and wheel to this setup on the bench to do the work.
Any suggestions that it might not work is welcome
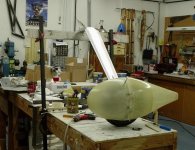
...or just do it on the bench.
.
Or do both at the same time so they mirror each other.
Attachments