In search of someone that can help me install electric flaps on my 4. I have all the parts for it. It seemed to be very complicated when I opened the floor boards to started to work on it and was frustrated that the plane was not flying for over a month ( for other upgrades). The reason I need to get this done is because I am having a very hard time using manual flaps. First notch is easy, the second one is a nightmare (I have tried different speeds- I also need to go to the gym), it either doesn’t lock fully and slips mid flight or I am unable to even get to the second notch. Due to this, I have landed at 1 notch or zero flaps couple of times. I have also bent the handle once while pulling it too hard. Pls help. Houston based willing to travel if needed. (I will be paying for your time/help)

Van's Air Force
You are using an out of date browser. It may not display this or other websites correctly.
You should upgrade or use an alternative browser.
You should upgrade or use an alternative browser.
Electric flaps upgrade
- Thread starter Ssaqibsiddiqui
- Start date

Not being critical but wondering what speed you are attempting to deploy the flaps? I had manual on my first 4 (I didn't build it) and loved it. Never found it too difficult to pull once slowed down a bit. Second notch around 75 kts. It was always nice to dump the flaps once on the ground.
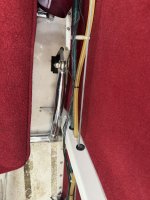
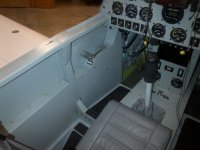
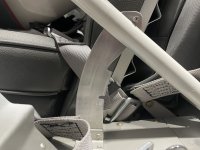
Below is a pic of the actuating arm for the electric install in my 2nd 4. Don't seem to have any other pics unfortunately. Of the 2 my preference is the manual flaps.

Below is a pic of the actuating arm for the electric install in my 2nd 4. Don't seem to have any other pics unfortunately. Of the 2 my preference is the manual flaps.
Im told that manual ones are the best ones but not sure why I am unable to use it at ease. I have tried below 75 as well
Same here, few hours on -4s, and keeping the speed at < 70KIAS first notch, and around 65 short finals works perfect for me.Not being critical but wondering what speed you are attempting to deploy the flaps?
Has the handle been modified vs plans?
Looking at the thread title, and IMHO, I'd rather call it a downgrade...
I added an extension to my -4 flap handle to give more leverage. It is a simple steel tube (I can't remember the diameter: that was a LONG time ago! Probably something I had around the hangar), made oblong to fit over the original handle, a tab welded to the end to give it something to help push it forward and back, and a slot for the screw (secured to the original handle) to slide through as it was extended. JUST long enough to clear the spar bolts when retracted and flaps up. Amazing how that 4 inches of length helps with the last 20 degrees of flaps! AND, yes: go to the gym!  Electric flaps are fine but add complexity, down time to install, possible failure point and the manual flaps retract INSTANTLY when you want them to.
Electric flaps are fine but add complexity, down time to install, possible failure point and the manual flaps retract INSTANTLY when you want them to.Attachments
I’ll try this and let you knowI added an extension to my -4 flap handle to give more leverage. It is a simple steel tube (I can't remember the diameter: that was a LONG time ago! Probably something I had around the hangar), made oblong to fit over the original handle, a tab welded to the end to give it something to help push it forward and back, and a slot for the screw (secured to the original handle) to slide through as it was extended. JUST long enough to clear the spar bolts when retracted and flaps up. Amazing how that 4 inches of length helps with the last 20 degrees of flaps! AND, yes: go to the gym!
I will need to look at the plans and seeSame here, few hours on -4s, and keeping the speed at < 70KIAS first notch, and around 65 short finals works perfect for me.
Has the handle been modified vs plans?
Looking at the thread title, and IMHO, I'd rather call it a downgrade...
I agree with you but it seems Vans has universally gone to electric flaps such that any newer models no longer have a manual option. I assume the market has spoken, and I can't help but think the market is wrong.Looking at the thread title, and IMHO, I'd rather call it a downgrade...
If you will go back far enough in history, you'll find that Van's original recommendations were; Fixed pitch prop, manual trim, manual flaps, and tailwheel.I agree with you but it seems Vans has universally gone to electric flaps such that any newer models no longer have a manual option. I assume the market has spoken, and I can't help but think the market is wrong.
Everything else has been market driven!
You probably have 20x plus my flight experience, and your opinions are based in that experience, but it will be a cold day in hell before I own a plane with a fixed pitch prop. I get it - it's light, simple, and cheap - but the speed range of an RV should have a CS prop, and they are way better for XC or IFR. I hear they're better for formation, too.If you will go back far enough in history, you'll find that Van's original recommendations were; Fixed pitch prop, manual trim, manual flaps, and tailwheel.
Everything else has been market driven!
I get both the attraction to manual trim and manual flaps, but with giving modern autopilots the ability to set trim, I at least understand the move to electric. Still wish there was a mechanical connection to the cockpit. I'm uncomfortable with the idea that an electric servo I can't reach could run away and get stuck, with no way to dial it back after cutting power to the system. It's not an ideal design.
Last edited:
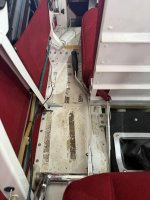
I have a 6A that had identical problems as what you are describing. I finally disassembled the flap handle to inspect the inner workings. It wasn't designed exactly to plan, but the bolt that goes into the notch had backed out and was scraping against the inside of the handle. This prevented the spring from snapping it into the notch. I cleaned up the inside of the flap handle, and remedied the problem, along with a new spring from Vans. It works flawlessly now. My flaps didn't work at all beyond one notch before. The electric flaps will be nice and it sounds like that's where you're going, but I wanted to share my experience.
Was it impossible on the ground too?I have a 6A that had identical problems as what you are describing. I finally disassembled the flap handle to inspect the inner workings. It wasn't designed exactly to plan, but the bolt that goes into the notch had backed out and was scraping against the inside of the handle. This prevented the spring from snapping it into the notch. I cleaned up the inside of the flap handle, and remedied the problem, along with a new spring from Vans. It works flawlessly now. My flaps didn't work at all beyond one notch before. The electric flaps will be nice and it sounds like that's where you're going, but I wanted to share my experience.
NoWas it impossible on the ground too?
Mine worked better on the ground, but my belief is that if it doesn't work there's a reason. It isn't very hard to take it apart and see what's going on inside the handle.Was it impossible on the ground too?
If it is not free and easy on the ground then something is binding. Maybe the UHMW blocks have been tightened up too much and are putting pressure on the actuator bar. I would check the system out to see where the binding is. Your flap handle looks about the same as mine was.Was it impossible on the ground too?
And I'll add, anything else adds weight and slows the plane downIf you will go back far enough in history, you'll find that Van's original recommendations were; Fixed pitch prop, manual trim, manual flaps, and tailwheel.
Everything else has been market driven!

Keep the manual flaps

I "upgraded" my -7 with manual flaps.Same here, few hours on -4s, and keeping the speed at < 70KIAS first notch, and around 65 short finals works perfect for me.
Has the handle been modified vs plans?
Looking at the thread title, and IMHO, I'd rather call it a downgrade...
Interested in looking at the pictures. Building a 7I "upgraded" my -7 with manual flaps.
I built my -4 with the electric flaps, and I understand the passion of the ma ual flap guys....but I am a total fan of the electrics. I have mine wired to pushbuttons on the stick grip along with my trims, which are also electric, so I never have to take my hand off the stick..really nice in a go around to be able to have hand on throttle and stick. Also, big plus for back seater foot room, no interference issues there. I completely enclosed my weldments and pushrods with side panels as well. As long as you have the new weldment, it's not that hard to install it all.
Attachments
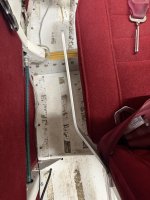
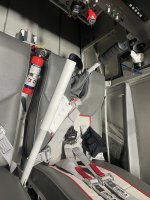
It should be pretty obvious from your pics that all you need to do is remove the old worn stop blocks and put new ones that aren’t all chewed up.Adding pictures
The stop blocks should be beveled slightly on the top edge so they capture the handle as a stop, yours are just sliding sideways off, due to wear.
Takes less than half a day to pull the front seat back, remove, fabricate new blocks and install…
Electric flap is days worth of effort.
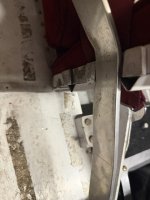
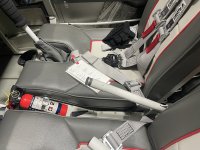
All - seems that the culprit has been found. My friend (Todd) came over to look at the flaps to see if he can find anything and sure enough he sees there is bolt that was blocking the second notch to go in place. It was due to the opposite orientation. (Bolt that goes on the weldment holds pushrod for flap). In hindsight this might have been put back together wrong when it was initially removed for electric flap conversion but don’t remember it. It’s way smoother and easier to put the second notch and can see nothing is blocking and see that the treads from the bolts are acting as stop points on the floorboards for it to no go further down. Sigh!


This looks awesome. Thank you.
Was this the area that was causing problems? Include pictures, if you have them! Curious minds want to know..............All - seems that the culprit has been found. My friend (Todd) came over to look at the flaps to see if he can find anything and sure enough he sees there is bolt that was blocking the second notch to go in place. It was due to the opposite orientation. (Bolt that goes on the weldment holds pushrod for flap). In hindsight this might have been put back together wrong when it was initially removed for electric flap conversion but don’t remember it. It’s way smoother and easier to put the second notch and can see nothing is blocking and see that the treads from the bolts are acting as stop points on the floorboards for it to no go further down. Sigh!

Attachments
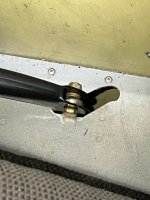
Yes exactly. Both sides have opposite orientation of boltsWas this the area that was causing problems? Include pictures, if you have them! Curious minds want to know..............
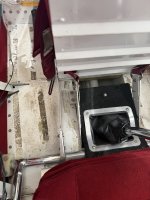
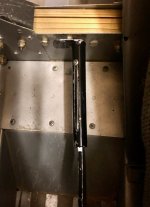
Hmmmmmmmmm........ The flap mechanism (black in my picture) should just touch the hole at the forward end. That should leave enough distance from the bolt to the floor that the bolt doesn't hit the floor itself, again, as in my picture. Is your bolt hitting the floor? They should be installed head in, nut out. (Remember: out, back and down.....) That being said, I would measure several things:Yes exactly. Both sides have opposite orientation of bolts
1) make sure the flap actuating rod that goes from the weldment to the flap is the correct length per -4 plans. Which means you will have to take the rod off of both the flap and the weldment. It should be inspected anyway to make sure the rod end bearings are moving correctly and in good shape (might as well lubricate them while they are off), jamb nuts are tight, and that the rods themselves are in good shape; ie, not bent cracked or otherwise damaged. Taking them off will allow the flaps to drop so you can inspect and lubricate the flap hinges, something that is occasionally (nay, often) ignored in a condition inspection. You do NOT want to suddenly have one flap down and one flap up because of a broken rod; bad things can happen.
2) measure the degrees of deflection of the flaps themselves from 0 degrees (up) to 20 degrees (one notch) to 40 degrees (second notch). The length of the rod (and rod end bearings) will determine the deflection of the flaps.
Looking at the pictures of the stops on the seat side: I think those actually look OK. You should have to slightly lift up on the flap handle to retract your flaps.
IMHO; just some thoughts...............
Awesome, I will look into this in detail when I get some time next week, great info. I appreciate itHmmmmmmmmm........ The flap mechanism (black in my picture) should just touch the hole at the forward end. That should leave enough distance from the bolt to the floor that the bolt doesn't hit the floor itself, again, as in my picture. Is your bolt hitting the floor? They should be installed head in, nut out. (Remember: out, back and down.....) That being said, I would measure several things:
1) make sure the flap actuating rod that goes from the weldment to the flap is the correct length per -4 plans. Which means you will have to take the rod off of both the flap and the weldment. It should be inspected anyway to make sure the rod end bearings are moving correctly and in good shape (might as well lubricate them while they are off), jamb nuts are tight, and that the rods themselves are in good shape; ie, not bent cracked or otherwise damaged. Taking them off will allow the flaps to drop so you can inspect and lubricate the flap hinges, something that is occasionally (nay, often) ignored in a condition inspection. You do NOT want to suddenly have one flap down and one flap up because of a broken rod; bad things can happen.
2) measure the degrees of deflection of the flaps themselves from 0 degrees (up) to 20 degrees (one notch) to 40 degrees (second notch). The length of the rod (and rod end bearings) will determine the deflection of the flaps.
Looking at the pictures of the stops on the seat side: I think those actually look OK. You should have to slightly lift up on the flap handle to retract your flaps.
IMHO; just some thoughts...............
Jjackh10
Well Known Member
Not to drift the thread but what is the preferred lubricant for items like this?might as well lubricate them while they are off and lubricate the flap hinges
What do I use or what is the preferred lubricant?Not to drift the thread but what is the preferred lubricant for items like this?
I race bicycles (time trial is my main ride!) and I need something that will put up with hard use, dirt/dust, water and lubricates well that I don't have to keep reapplying all the time. My two go-to lubricants are: Boeshield T-9 made under license from Boeing Aircraft; TriFlow which is also a great lubricant that leaves a Teflon coating on bearing surfaces. Been using them for decades. Amazon or your favorite local bicycle shop!For hinges I will pull the pins out and run them through a lubricant-soaked rag. Otherwise, any lubricant applied can drip through and cling to the hinge surfaces, especially on the flaps.
A lot of people use the LPS 2 spray lubricant. I like it for some things, but it is a spray and can go a lot of places I would rather it not go. The abovementioned lubricants come in plastic bottles and are easily placed EXACTLY where I want them to go.
Last edited:
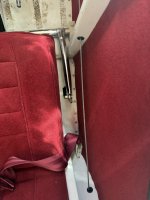
Your flap lever looks very similar to mine. It looks like yours, like mine, may have been torquing (twisting) a little. That made it difficult to get the flap lever locked into the catch on the seatback angle. Mine had a doubler (see pic), but it wasn’t enough. I drilled out the 1/8” thick doubler seen in the picture and made a new one that was much longer - it went all the way back to the attach point. In the picture, I was in the middle of moving my front seatback aft almost three inches. This mod required rebuilding the sidewall support structure supporting the newly relocated roll bar/seatback support. This also affected the manual flap lever notches on the seatback angle. Since it was now 3” closer to the flap lever fulcrum, I only had room for one notch instead of two, so I had two flap settings: flaps up, and flaps down. It worked great though, and with that long lever, extending the flaps was not difficult.Adding pictures
Attachments
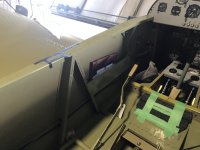
Love the handle you made and the doublerYour flap lever looks very similar to mine. It looks like yours, like mine, may have been torquing (twisting) a little. That made it difficult to get the flap lever locked into the catch on the seatback angle. Mine had a doubler (see pic), but it wasn’t enough. I drilled out the 1/8” thick doubler seen in the picture and made a new one that was much longer - it went all the way back to the attach point. In the picture, I was in the middle of moving my front seatback aft almost three inches. This mod required rebuilding the sidewall support structure supporting the newly relocated roll bar/seatback support. This also affected the manual flap lever notches on the seatback angle. Since it was now 3” closer to the flap lever fulcrum, I only had room for one notch instead of two, so I had two flap settings: flaps up, and flaps down. It worked great though, and with that long lever, extending the flaps was not difficult.
Very similar to my RV6 with manual flaps, except I only have three notches vs your four notches. I have flaps up, half flaps, and full flaps. The modification I made to mine is to allow me to use a “flap lever extender” (pvc pipe) to make it easier to select the full flap setting. Since the pipe covers up the push button, I eliminated the requirement to do that. I just have to pull the lever up when in the mid position until it clicks into the full flap notch. After making that selection I slide the pipe off and set it aside in case I need to go around. If I make a half flap landing, air loads hold it in that position. If I don’t don anything else with the flap lever after landing, the flaps will “self extend” to the full down position when air load and prop blast ceases.
Attachments
I do 38° max to avoid possibility of the "gap skin" popping out. Then I divide by 3 to get "roughly" 0°, 13°, 26°, & 38°. 13° is close enough to 15°.You can cut notches for as many flap settings as you like, me-0° 15° 25° and 40°. The 15° setting matches full down aileron.
I encourage you to contact Vans Builder Support.
Who.....?I encourage you to contact Vans Builder Support.
I built a 4 with electric flaps. They worked flawlessly. I would install them and not look back. Normally I would agree with manual but the room is limited in a 4 and trying to get a passenger to move his or her foot out of the way is a pain. I now have an RV3 with manual and a Rocket with electric. The RV3 with manual works perfectly but I don't have to get someone to move a leg to operate them. I wouldn't change a thing on my Rocket either, the flap switch is on my stick grip and when hauling passengers its just easier.
Manual flaps ARE the best.. for a Cessna!! But in RVs, where space is limited, I believe electric flaps and electric trim are the better way to go..Im told that manual ones are the best ones but not sure why I am unable to use it at ease. I have tried below 75 as well
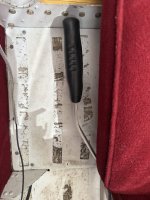
Quick update- I replaced the aluminum handle with 304ss and added a rubber bicycle grip and it works like a charm and didn’t have to go to the gym. Thanks everyone for the inputs. Couldn’t be happier.
Attachments