Van's Air Force

The definitive Van's Aircraft support community! Buying, building or flying an RV? Join our exclusive family of mentors and enthusiasts!

Electric Flaps install RV4 - Looking for someone who has done it!

I am installing the electric flaps with the kit from Vans. Got the install instructions. Would love to get in touch with someone who has done the install and perhaps see pictures! Would be great to have a good visual understanding before starting the project!

Endre
 
I am installing the electric flaps with the kit from Vans. Got the install instructions. Would love to get in touch with someone who has done the install and perhaps see pictures! Would be great to have a good visual understanding before starting the project!

Endre
Can't help you with installation only I wish I had manual flaps on my RV-6A.
But my luck and desires vary FIXIT
 
Sorry, no pictures. I remember it not being a hard install but a bit tight fit overall. Lay out the pieces on the floor to get a visual sense.
 
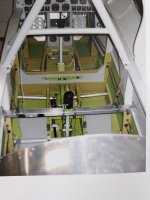
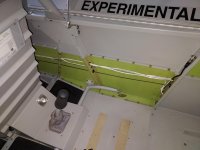
I put them in during my RV-4 build, so it was very easy. If you aren't a "builder", It may be challenging, as it's not a bolt in operation. The R/H tunnel web has to be modifiied and cut, you will need the entire center floor removed, and the VANs supplied weldment/control arms require a second set of nylon pivot blocks located/installed. There will be a hole through the belly skin for the bellcrank arm pivot bolt and brackets for the actuator. While not complicated, it's got quite few moving pieces. There are quite a few RV-4's with a homebrew much simpler retrofit which installs the actuator vertically in the R/H sidewall and ties into the existing weldment, but the VANs kit is less intrusive to the passenger environment. I have my flap control buttons on my stick grip along with aileron and elevator trim...I LOVE the HOTAS system and never have to reach for anything on the panel. I also built close-outs for all the interior areas that have moving parts, and here is no flap handle for passenger foot fouling. You can see most of the parts in the pictures. I probably have some better shots in my build book, but it's not with me at the moment.
 

Attachments

  • RV-4 center section.jpg
    RV-4 center section.jpg
    1.5 MB · Views: 95
  • Flap weldment.jpg
    Flap weldment.jpg
    209.6 KB · Views: 92
  • footwell.jpg
    footwell.jpg
    1.3 MB · Views: 93
Excellent points fixnflyguy!
If I were installing E-flaps today, I would go the old school route and install the motor diagonally on the right side.
I have seen this on several early -4s. Much easier to install, lighter, and easier to maintain.
I also believe that you can fit a modern non-Vans motor easier than modding the under floor setup for one.
Perhaps someone with this motor arrangement will post an actual pix.IMG_2822.jpeg
 
Last edited:
Back
Top