What's new
Van's Air Force

Don't miss anything! Register now for full access to the definitive RV support community.

Designing a new panel

Hello,

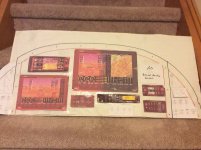
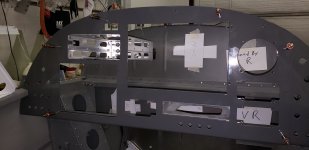
I am in the process of designing a new panel for my RV10. I’ve already bought the blank panel from Vans and I’m at the process of laying everything out. I woukd like to place scale paper cutouts of my equipment on the blank to play with different orientations. I know this should be a simple process but I’m having a heck of a time finding simple software that will let me print out scale rectangles and circles. one example, I need a rectangle that measures 7.5 x 6.565 inches.

Thanks
 
not exactly what youre asking, but hangarflying.com has a panel planner that lets you start with a panel blank and then click and drag stuff around. They have all the vans panels and just about all the common boxes, switches, breakers etc. already loaded and easily selectable.
 
Most install manuals have full scale drawings of their equipment (at least I know Dynon does). The trick is to make sure you print out full scale on your printer.

Cut them out and move them around like paper dolls. Prop of the blank aluminum panel on our work bench and stare at it like you would if it was in the plane. Move them around to try something else. For a one off, this is a fraction of the work compared to digital.

If you like, we can discuss the ease of using the bottom apron (the part that stays in the plane) for all “non avionics” stuff, like breakers and switches. The RV-10 stock panel design is perfect for building a fully removable panel.

Carl
 
Planning where you will install any remote components behind the panel is also helpful. SteinAir offers acrylic cutouts so you can plan that layout as well.
 
Most install manuals have full scale drawings of their equipment (at least I know Dynon does). The trick is to make sure you print out full scale on your printer.

Cut them out and move them around like paper dolls. Prop of the blank aluminum panel on our work bench and stare at it like you would if it was in the plane. Move them around to try something else. For a one off, this is a fraction of the work compared to digital.

If you like, we can discuss the ease of using the bottom apron (the part that stays in the plane) for all “non avionics” stuff, like breakers and switches. The RV-10 stock panel design is perfect for building a fully removable panel.

Carl
Thanks Carl. That is exactly what I want to do, unfortunately some of my avionics do not have full scale drawings. I guess I can measure and cut on blank paper, I was hopping an easier solution existed. i think all of the Garmin stuff has the full scale in the install manual as you sugessted.
 
not exactly what youre asking, but hangarflying.com has a panel planner that lets you start with a panel blank and then click and drag stuff around. They have all the vans panels and just about all the common boxes, switches, breakers etc. already loaded and easily selectable.
Wow, what a cool website. Thanks for sharing.
 
Planning where you will install any remote components behind the panel is also helpful. SteinAir offers acrylic cutouts so you can plan that layout as well.
I find figuring out how to mount remote stuff to take more time than the panel itself. The key point here is to make a lot of room for the associated module D connectors, and verify that you can actually attach or detach the connectors with the module installed.

For planning , I did the same paper doll approach as the panel. The photo is the current ride (RV-8). There is a lot more room in an RV-10!

Carl
 

Attachments

  • IMG_0509.jpeg
    IMG_0509.jpeg
    1 MB · Views: 23
  • IMG_0484.jpeg
    IMG_0484.jpeg
    1.4 MB · Views: 20
  • IMG_0680.jpeg
    IMG_0680.jpeg
    545 KB · Views: 24
  • IMG_0697.jpeg
    IMG_0697.jpeg
    1.6 MB · Views: 23
Lots of good recommendations/resources already. To get to your original question, a couple of ideas if you're just tying to get to dimensionally accurate print-outs.
  1. PowerPoint - I know, seems weird, but if you have access to it, you can open a blank presentation, go to Design --> Slide Size --> Custom Size and make the width/height your paper size you're printing on. Then just go to Insert --> Shapes, drop in the shape(s) you need, and then you can dimension them by selecting the shape, clicking the 'Shape Format' tab, and then entering in the width/height.
  2. Word - Nearly the same drill as PowerPoint - I prefer PowerPoint over Word for pure image placement though, as Word will try to format and you have to mess around with Image wrapping a bunch.
  3. Image Editor - Photoshop, Paint, GIMP, etc. All of these will let you do raw drawings and have rulers on screen to make it (reasonably) easy to create scaled shapes
  4. Fusion 360 - There's a hobbyist license you can acquire, and then you can create dimensioned drawings in here. Fair warning - it's a much steeper learning curve that PowerPoint or Word to do - however, if you already know how to use Fusion (or any other modern CAD program that allows for scale drawings) you can use those. Just don't forget you'll need to set your scale to 1:1 else you may have some printing errors.
Also, especially for options 1-3 (you can do it on Option 4, but it's less straightforward), you can always paste an image of the instrument you're looking to size over the shape you dimensioned. (Could be helpful for when you have a manufacturer doesn't have a scale drawing already created - you can just resize that image up/down to fit your dimensioned shape).
Exactly what I was looking for. Thank you and everyone else who responded.
 
Back
Top