

Hi All,
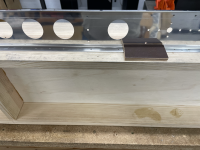
Deburring holes is no biggy when you can get a square-on approach to the hole with your tool. However, when it comes to tight areas, there's no way to get a square-on approach. I'm working on deburring the holes in elevator C-channel front and rear spars. It's clear that when creating the holes, the tool (punch, router) entered the spar from the outside, and leaves a small burr on the inside (figures!). I located a vendor that sells cloth-backed aluminum oxide sandpaper, 1-1/2" wide, sold by the foot. I made 1-1/2" X 3" 1/4" ply blocks, and secure the sandpaper (400 grit) to the block with two-sided tape. A few passes over the holes removes the burr. Follow-up is with maroon Scotch Brite pad. A downside of this technique is that the grit loads up with aluminum powder pretty fast. Using a vacuum removes some of it, but it's a short life.
I like the results, but I'd like the community's feedback on this technique, as well as other close-quarter deburring technique(s).
Thanks!
Attachments
Last edited:


")


