Van's Air Force

The definitive Van's Aircraft support community! Buying, building or flying an RV? Join our exclusive family of mentors and enthusiasts!

Cracks when dimpling R-912

ReidW

Member
Hello,

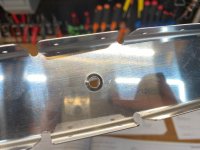
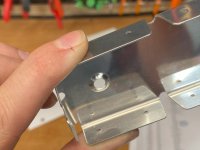
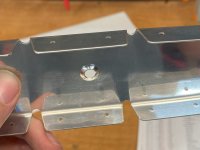
Ran into an issue tonight. I'm on page 07-04 step 10 where it says to dimple for the AN509 screws that hold down the rudder counterweight. Prior to this I drilled these holes to #12 like instructed and deburred. During dimpling I got a crack on both holes. The guide of the dimple die fit in hole, and I confirmed I'm using the correct die from cleaveland. Confirmed not a LCP. Anyone else have this problem?
 

Attachments

  • IMG_8021.jpg
    IMG_8021.jpg
    2.2 MB · Views: 138
  • IMG_8022.jpg
    IMG_8022.jpg
    1 MB · Views: 138
  • IMG_8023.jpg
    IMG_8023.jpg
    1.1 MB · Views: 138
Larger dimples are the most susceptible to cracking, so it could just be a slightly harder batch of metal, assuming prep and deburr. I’d order a new piece, but if you want to test, drill a few more #12, and dimple those in this piece. If they crack too, it could confirm it’s the metal. Assuming if you test another piece of scrap you have, you don’t get cracking. If you do it could be the die.

I’ve also heard to put a bit of boelube or a little oil on the dies on these larger dimples.
 
Last edited:
FYI I just looked at my log and I reamed to a #10, as it’s a 10 screw. I had a note the die was not fitting in the #12 hole.
 
Thank for the quick reply. Just tried it on a different piece of scrap of the same thickness using the same procedure. No crack. Must be the metal
 
It also looks like they have changed the part slightly, as all three of my rudder 912s (don’t ask, it was lcp) do not have the flanges cut, they are solid. So that also points to a possible metal variance, as it’s a different batch all together. Don’t ask me why they changed, or you’ve grabbed the wrong part, so double check that just in case.
 
I agree they changed this part. The original R-912 that came in my kit had a scratch in it so I replaced it, but it had a more dull finish and no relief cuts in the flanges. When I called them, I was told they've updated the part number to R-00912-1 which is what I got. The old R-912 is what I just dimpled and it didn't crack. I wonder if they changed material with the new part and it's more brittle.
 
I agree they changed this part. The original R-912 that came in my kit had a scratch in it so I replaced it, but it had a more dull finish and no relief cuts in the flanges. When I called them, I was told they've updated the part number to R-00912-1 which is what I got. The old R-912 is what I just dimpled and it didn't crack. I wonder if they changed material with the new part and it's more brittle.
From my understanding when the part is dull like that, it’s been heat treated (which softens the metal a little basically). If the new one was shiny, it looks like yes to me. Drill a new hole and Dimple the -1 and see if it cracks, and be sure to let support know what’s going on. Try the #10 as well on the -1, again it could be the difference with just a little less stress.
 
Last edited:
I always rub some boelube over the drilled holes before dimpling, both sides. It only takes a few seconds to do a row of rivet holes, and lubrication aids in allowing the metal to stretch more easily.
 
Vans has guidance on cracks like this. You can file out the crack up to a limit which I can't remember. Dig around for that spec or talk to Vans support.

These dimples are not in a scary location, so I'd personally be comfortable repairing and using this part, assuming you can do what Vans suggests.
 
Thanks for the replies. I wasn’t able to find guidance on filing the cracks away, but I’ll see if Vans can point me in the right direction when I call them. I wish I had known that before I drilled additional holes in the part to experiment with.

I was able to produce dimples without cracking on the -1 part only when drilled up to #10 and with a little oil on the dies. On the old part I can consistently dimple with no cracks by just putting some oil on the dies. I did get a crack when dimpling dry on the old part though, so the problem is at least partially technique. Regardless, 2 new R-00912-1’s are on the way, hopefully I can get two dimples in one of them with no cracks.
Your cracks are too big, the guidance is in section 5-09 (modified in 2023, look in service information for updated sections https://www.vansaircraft.com/service-information-and-revisions/5/), which is 1/3 height of the dimple. Your cracks are more like halfway down the dimple, so don’t feel bad about testing that part. Your testing is getting results, and will help you in the future.
 
Update: New part on the way, in the meantime I was able to put 10 dimples in a row in the -1 part without cracking. Drill #12, ream to #10, deburr (really good), then dimple with a bit of boelube. Between the two R-00912-1's I ordered I ought to be able to get one of them dimpled without cracks when they arrive. Lesson learned.
 
Back
Top