What's new
Van's Air Force

Don't miss anything! Register now for full access to the definitive RV support community.

Cracked stabilizer spar

Phantom165

I'm New Here
I inspected my rear stabilizer spar. It is cracked in multiple places . I need to replace the rear spar. I also have an old horizontal stab I built years ago that I could install. Trying to match the new stab to the airplane is a scary thought. What is easier? New rear spar or new stab? Any thoughts?
 
Hi Steve,
I think the challenging aspect associated with replacing the HS will be match drilling the four attach points on the forward HS spar (HS-810).

Given the the HS is matched drilled, replacing the spar would be a lot of work, but very doable. Drilling the rear spar attach points should be straight forward.

The following link details the process of replacing the HS spar in an RV-3, which isn't matched drilled. Lots of good tips.

https://www.youtube.com/watch?v=u4nM6rv1omo

Good luck with your project.
Mike
 
I've removed HS rear spars a few times, and its straightforward. I would probably go with this option if I was in your shoes. The rivets are mainly skin rivets which are easy to drill. Be careful drilling the pulled rivets that fix the middle ribs to the rear spar, there isn't much scope to upsize these holes if a mistake is made.

But - if you haven't yet done the front spar SB and were planning on doing this at the same time, then I would just build a new HS. My opinion only, of course!
 
The ease of drilling out the large number of skin rivets depends a lot on how it was painted. Someone use body filler and hide all the rivets... oh boy!

You can expect paint damage regardless.

I've just done a full replacement on an older 6. Which was a non-prepunched HSTAB. Some gotchas... elevator mounts aren't at consistent spacings, so that has to be dealt with. New HSTAB means recheck / reset of the HSTAB angle. Like mentioned above needing to drill up from the fuselage into the HSTAB forward spar is tricky (understatement). All of this then affected the fit of the fiberglass fairing, and also the elevator stops had to be adjusted.

Also as mentioned above, the SB for the HSTAB front spar hadn't been done, and that was a big driver towards building an entire new HSTAB.

Some of these difficulties should be no factor in a newer model.
 
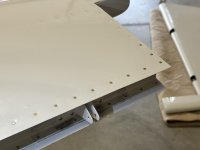
Although I built my RV-8, it's been a long time since I drilled, bucked, squeezed and removed rivets. During my annual condition inspection, I found a crack around a rivet on my HS (SB-00036).

In order to prepare to apply the SB-00036 fix I spent a few days practicing removing and setting rivets on an old RV-6 HS that I built.

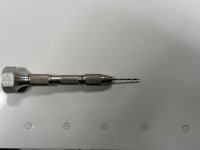
To start I opted to enlarge the rivet dimple with a #50 hand held drill. I then followed up with a #40 drill with a stop. The stop allowed me to drill to the depth of the flush head, and no more.

I was fortunate that the painter did not lay down a heavy coat of paint. In most cases I could still see the dimple in the middle of rivet. I found that if I proceeded slowly and carefully I could remove and set rivets on my painted HS with minimal/no paint damage.
 

Attachments

  • IMG_3950.jpg
    IMG_3950.jpg
    118.7 KB · Views: 88
  • IMG_3963.jpg
    IMG_3963.jpg
    137.2 KB · Views: 97
Thanks for all the great advice!It looks like the consensus is fix the stab on the airplane to avoid the redrilling of a new stab. Unfortunately I do have bondo on the rivets. I have already drilled a lot of the rivets out using a small scotchbrite wheel in a Dremell to reveal the rivet head. Anyone have any better techniques to get through the bondo?
 
Scotchbrite clean and strip discs work well on Bondo, but I'm not sure how hard they'll be on the aluminium skin.. could be worth a try though?
 
Back
Top