
Van's Air Force
You are using an out of date browser. It may not display this or other websites correctly.
You should upgrade or use an alternative browser.
You should upgrade or use an alternative browser.
Convert to manual flaps
- Thread starter gassman
- Start date

Don’t do it. Stay with electric flaps. I have converted my last two rv6’s from manual to electric. The problem is the angle of pull. If you have a passenger onboard, the last notch of flaps is difficult to get without hitting your passenger in the chin with your elbow.
Jpm757
Well Known Member
My RV-6 had manual flaps and I loved them. Installed them on my -7 at my son's request. The biggest hurdle will be sourcing an RV-6 flap weldment and handle parts, (button, spring & rod).
Get a set of RV-6 plans and install accordingly. The RV-7 weldment attaches behind the rear spar bulkhead, whereas the -6 setup mounts ahead of and through the bulkhead. Additionally since the floor in a -7 is lowered you will need to fabricate a mount to raise the base plate to the proper height. Took a day to engineer, and another to install. Great system, don't know why it was discontinued. I'll take manual flaps any day over electric.
Get a set of RV-6 plans and install accordingly. The RV-7 weldment attaches behind the rear spar bulkhead, whereas the -6 setup mounts ahead of and through the bulkhead. Additionally since the floor in a -7 is lowered you will need to fabricate a mount to raise the base plate to the proper height. Took a day to engineer, and another to install. Great system, don't know why it was discontinued. I'll take manual flaps any day over electric.
My -6 has manual and I love the ability to (almost) instantly raise flaps if I'm landing in gusty conditions... Really sticks the airplane to the runway. Can't do that with electric, they don't come up fast enough. Never had an issue deploying flaps in flight. Easy pull right to full flap, just don't try to do it all at once... One notch at a time and slow down between each one.
Sam Buchanan
been here awhile
I really like being able to control the electric flaps with my hand on the throttle, the switch is just below the throttle.
I built my RV-6 with manual flaps then converted to electric a couple of years later.....over twenty years with totally reliable electric flaps and have never wanted to go back to manual.
I built my RV-6 with manual flaps then converted to electric a couple of years later.....over twenty years with totally reliable electric flaps and have never wanted to go back to manual.
I don’t think the OP needs convincing nor is his post intended to be a discussion on merits between the two. There are lots of prior threads on manual vs electric if you wish to search. I’ve flown both and they each have their pluses and minuses. Vans standard is electric for a reason, and you rarely see anyone go from electric to manual so there isn’t much documentation available.
I believe the plans show the weldment in some detail for the 6. They should be available from Vans. If not, let me know and I will dig them up.
I believe the plans show the weldment in some detail for the 6. They should be available from Vans. If not, let me know and I will dig them up.
Sam Buchanan
been here awhile
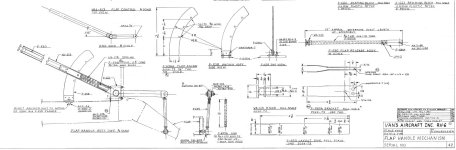
RV-6 Drawing 42 shows detail of the manual flap mechanism. I haven't seen feedback from anyone who has reverted to manual from electric so can't offer suggestions. Post #3 may be the best info you will find.

As much as I love manual flaps in other planes like the old Cessna, I don’t like them on RVs. If you want to be able to retract flaps after landing, wire up a latching flap switch and controller so you can click it up and they’ll retract all the way (you need a controller or micro switches to shut power after fully retracted to keep the motor from running after they hit the stops.)
If you are good, you can also flip the retract switch in the flare to make the plane settle, but I don’t recommend it.
If you are good, you can also flip the retract switch in the flare to make the plane settle, but I don’t recommend it.
Av8torTom
Well Known Member
I like the fact that I can activate the flaps while my hand is on the throttle.My hand isn’t leaving the throttle. Seen one too many bent gear legs and prop strikes when the bottom dropped out!
Doesn’t matter what system you have.
Yes, see KareTakerAero’s YouTube channel.
If you are going to fly most of your time with someone that exceeds the capacity of the seat cushion, you will find that electric flaps are easier to operate.Has anyone changed the flap mechanism from electric to manual? Thinking I should have stuck with kiss concept. -7 still in project form
If you want and enjoy manual flaps, there are a few hacks that make the RV6 manual flaps much easier and faster to use. I modified mine over 20 years ago with four changes and have never regretted it. It's now not even a real issue if I have an XXL passenger.
You can use your existing flap weldment if you can't find a manual one. Send me a PM if your are interested in the change to manual flaps.... It doesn't get any simpler.
******************* No PM needed. All info is in post 19 of this thread***************************
Last edited:
I'm sure we'd all love to hear what these hacks are!...there are a few hacks that make the RV6 manual flaps much easier and faster to use.
Hmmmm......Subject drift but this has me curious as to how and when the 'bottom' would 'drop out'. SuzieQ is an RV-4: My application of manual flaps (which I really like, by the way!) takes probably one potato, the first notch on downwind when not much else is happening. The second notch (of two) is on base or final depending on what else is happening, another one potato, and are left there until I touch down and am firmly planted, then they come up...one potato...and firmly plant the main gear on the ground. Especially handy with a stiff crosswind.My hand isn’t leaving the throttle. Seen one too many bent gear legs and prop strikes when the bottom dropped out!
Doesn’t matter what system you have.
Go around before touchdown with two notches: full throttle which also pushes the carb heat in, and my hand is momentarily done with the throttle, enough I can slowly drop the two notches of flaps in about two potatoes then back on the throttle. And, in the -4, the throttle hand (left) is not too far from the flap handle.
SO, I guess my question is: how and when does the 'bottom fall out' enough to bend gear and props? I need to know so I can avoid doing such a thing! Curious minds want to know!
I too would like to know what the hacks are that make the manual flaps easier to operate. I have an RV6 with manual flaps and prefer that over the electric ones I had in my first -6.If you are going to fly most of your time with someone that exceeds the capacity of the seat cushion, you will find that electric flaps are easier to operate.
If you want and enjoy manual flaps, there are a few hacks that make the RV6 manual flaps much easier and faster to use. I modified mine over 20 years ago with four changes and have never regretted it. It's now not even a real issue if I have an XXL passenger.
You can use your existing flap weldment if you can't find a manual one. Send me a PM if your are interested in the change to manual flaps.... It doesn't get any simpler.
I wrote a big long response then deleted it as it has nothing to do with manual flaps. I probably misinterpreted what was being said. Anyway, believe it or not, there are folks who don’t keep their hand on the throttle during critical times near the runway!Hmmmm......Subject drift but this has me curious as to how and when the 'bottom' would 'drop out'. SuzieQ is an RV-4: My application of manual flaps (which I really like, by the way!) takes probably one potato, the first notch on downwind when not much else is happening. The second notch (of two) is on base or final depending on what else is happening, another one potato, and are left there until I touch down and am firmly planted, then they come up...one potato...and firmly plant the main gear on the ground. Especially handy with a stiff crosswind.
Go around before touchdown with two notches: full throttle which also pushes the carb heat in, and my hand is momentarily done with the throttle, enough I can slowly drop the two notches of flaps in about two potatoes then back on the throttle. And, in the -4, the throttle hand (left) is not too far from the flap handle.
SO, I guess my question is: how and when does the 'bottom fall out' enough to bend gear and props? I need to know so I can avoid doing such a thing! Curious minds want to know!
I received many responses to my post. So I thought it is best to post the hacks here for future reference.
Here is how I improved my manual flaps in 2006 and have enjoyed them for 18 years.
************************************************************************
The button as it comes from Van's is designed to stop at contact with the tube. This is OK until you age and your thumb starts to get pinched between the head of the button and the end of the tube. I removed the button and filled in the space between the guide and the head using some Epoxy putty. I then belt sanded down the head and epoxy to the same diameter as the guide... This does two things, 1. the button now pushes further into the tube for more release clearance. And 2, it can no longer pinch your thumb.
The hose clamp in the photo is holding a nylon bushing in place to allow the handle to slide up and down without contacting the front of the slot.
Zoom in on the flap anchor..... notice the second notch is ramped up on the top of the notch.
I did that to allow the second notch of flaps to be extended without pushing the button.... just grab and pull. You do not want to do that with the bottom notch, only the notches between the bottom and the top... Most RV's have two notches of flaps.
I re-made the the flap anchor and placed the the notches where I could lower the handle and have just enough room to get my hand around it.
If you are making this change to a 7, you will need to layout your flap brace using the radius of your flap weldment because the weldment is mounted behind the bulkhead. (mounted in front on the 6). You will need to figure your flap degree locations on the flap anchor as they have changed due to lowering the handle.
I installed a small screw and nylock at the top of the flap anchor for piece of mind.
The biggest change was to make my seatbacks the same width as used on the RV4....
12 inches. This made it possible to reach behind the passenger seat during flight. It gave me more elbow room for my left arm.... My arm rests are only 1/2 as wide as stock, and still work great. BUT THE BIGGEST change the eight inches between the seats made was elbow room when pulling the flap handle.
Does the shorter flap handle make it harder to apply the flaps....No!! If you slow to flap speed, the flaps pop right down.
This configuration is far better than the stock RV6 flaps. It is a shame they gave up on manual flaps, they work soooo good without the extra cost and issues that electric flaps have. They will never fail you.
In the picture attached, the total length including the button is 11 inches.
Attachments

Last edited:
Warren,
Thanks for the post and for the email you sent me - no need to reply to that unless there’s something else you have relative to the manual flaps. These are all great ideas. I’ve already incorporated the stop at the top of the flap anchor, which was necessary in my airplane. The steel stick epoxy is a great idea that I will use because of the many times I’ve pinched my thumb in that button gap. I also really like the second notch tapered slot to make a sort of ‘speed brake’ option for that phase of flight. I like it.
Thanks for those excellent suggestions.
Karetaker
Well Known Member
Howdy everyone. I have some old, manual flap hardware I can part with. If anyone is interested, I can send pictures. From memory, I believe I have the large "Y" shaped handle weldment, the curved, notched piece and maybe the push button/spring set up. Weldment and first video in my mechanical flap series shown here:
Jpm757
Well Known Member
That's exactly what the OP needs.Howdy everyone. I have some old, manual flap hardware I can part with. If anyone is interested, I can send pictures. From memory, I believe I have the large "Y" shaped handle weldment, the curved, notched piece and maybe the push button/spring set up.
Karetaker. Pm sentThat's exactly what the OP needs.
Don't know about you guys, but I noticed having yet another flaps position on my ship... on the ground, handle stowed to the floor with the knob latched, the flaps lower inner skins butt again the fuse. And are also nicely lined-up with the ailerons and wing tips.
Once in cruise, I can push on the release knob and then lower the handle another say 3/4", and observe the flaps move up by about (too windy for me to get out and measure) 1/2". The handle, though not locked, will stay in that position, and now the reflexed flaps usually result in a speed gain of 10kts")
PS
Sorry guys, my keyboard's playing games... hope that now works, let's see: 0.01kts.
Once in cruise, I can push on the release knob and then lower the handle another say 3/4", and observe the flaps move up by about (too windy for me to get out and measure) 1/2". The handle, though not locked, will stay in that position, and now the reflexed flaps usually result in a speed gain of 10kts
PS
Sorry guys, my keyboard's playing games... hope that now works, let's see: 0.01kts.
Never tried that, but next flight I will and see if I can get that extra 1/100th of a knot. If the flaps moved up 1/2”, was it no longer aligned with the aileron/wingtip ?
My "work" bird has airbrakes that the NFP extends upon touchdown, the newer bird has auto airbrakes, old, old bird had "Lift Dump" (75 degree flap extension) so you get the same effect as raising flaps. I see it especially important in a cross wind as my girl has a negative dihedral wing. So I personally would try to install a manual flap for an homebuilt if feasible; I think especially if she was a taildragger.
correct.no longer aligned with the aileron/wingtip
In all seriousness I doubt of any effect on a non-laminar wing, but who knows

You can do the same thing with electric flaps.. right before touchdown, you flip the flap up switch to up. No it’s not instantly retracted, but you can keep your hands and eyes working to control the plane. I LOVE manual flaps on Cessnas, but the lower seating on RVs isn’t ideal for manual flaps. I’ve landed my -4 in winds 40+ gusting to 50+ knots.My "work" bird has airbrakes that the NFP extends upon touchdown, the newer bird has auto airbrakes, old, old bird had "Lift Dump" (75 degree flap extension) so you get the same effect as raising flaps. I see it especially important in a cross wind as my girl has a negative dihedral wing. So I personally would try to install a manual flap for an homebuilt if feasible; I think especially if she was a taildragger.
