What's new
Van's Air Force

Don't miss anything! Register now for full access to the definitive RV support community.

Construction Sequence....

YME

Well Known Member
Will be ordering my RV-12is kit in the upcoming weeks. Have been reading a great deal on the forum and have read some builders refer to certain installs would have been easier if done in a previous step. Example was installing the step and then having to remove it to install something else.

Has anyone started a "sequence log" of some sort that could be added to, from other builders, helping in the ease of their construction?
 
Vans has written about this on their website. I’d go with their recommendation.

Following the order in the instructions would serve you well, it has worked for me.
 
Something I’ve mentioned on this subject before is regarding the canopy. I found it easier to work on the canopy fairing with the fuselage laying on the floor, on padding, of course, as it was easier to reach the center than if it had already been on its gear. If you’re tall, might not be so much of an issue for you.
 
Another Option

Think about what will make it easiest to get your kit completed. I have the fuselage in the garage where I can work on it any time. The wings are at my hangar but that’s miles away. I shuffle parts and it’s definitely more convenient than driving to the hangar every time I want to work on the plane.

Out of order? Yes but I’m getting it done.
 
I will be building at home in 2 car garage as I do not have a hanger yet. I am sure I will be fine but was just wondering, as the build proceeds along, are there certain items builders have found would have been easier to accomplish in another section. I plan to read the plans thoroughly and read ahead of the section that I will be working on.

Just thought someone might have started a page/list where builders could go and enter any steps that they took to accomplish an item install that might be easier than called out in the plans.

Thanks for everyone input.
Tom
 
Several "gotchas" have been found in the RV-12 plans over the years, some of which may remain unaddressed by Vans, for various reasons. One recent example was with the gun-drilled gear legs where the plans had you install the legs and then attempt to install a brake line fitting - which was impossible to do. I believe that one has been fixed. However, I would also recommend installing the brake line itself to that fitting before attaching the leg. You also have to install the fitting to the bottom of the leg before the wheel goes on.

Joe Gores (Mich48041) has posted a lot of tips and hints, but his build was 10 years ago. https://vansairforce.net/community/search.php?searchid=61792794

Unfortunately, I am not aware of any up-to-date single source of hints and tips. Just have to do a lot of searching and reading. Google search with site:vansairforce.net at the end is very useful.

This is a personal preference, affected by individual circumstances, but I also built in a two-car garage and I'm glad I chose to build the wings last. They are massive and just get in the way. I had no problem building the wings in the garage while working around an otherwise mostly complete plane. However, if you can gut your garage of anything unrelated to your build, then you have more flexibility to plan ahead for wing storage, whether in a cradle against a wall, hung on the walls, or hung on the ceiling. I for one, did not want to give up that real estate during the entire rest of my build.

One of the biggest lessons I learned was it pays to be about 10x more obsessive and meticulous about organization than you think you need to be. Label everything! Make cheat sheets for torques and hardware codes to hang on the wall.

Also, it's advisable to add a signature to your posts that includes which plane you're building as many readers use "Today's Posts" or "New Posts" from the home page and may not notice which forum you're posting in. For the same reason, it can be helpful to add "RV-12iS" to the title of your posts when you really want to weed out non-12 responses.
 
"Follow the sequence in the plans" is generally good advice, but there are some key caveats to that.

The main one is that the sequence in the plans includes notes like this from section 12:
NOTE: The completion of this section must be postponed until just prior to Section 32 since the
F-1294A and F-1294B are shipped in the Finish Kit.

It is "the sequence in the plans" not "the plans in sequence".
 
BobbyY, Thiggins, Sawtooth, Bobby Lucas and MechaSteve:

Thanks for all the input with great hints/steps were taken. Seems like organization of everything will allow for a somewhat smoother build and "the sequence in the plans" makes sense.

Again thanks and I will update my signature to reflect what I am building.

Tom
 
I'm only a few hundred hours into building a -12, but would add that if you're going to install a VOR antenna in the tail, that should begin right away when building the vertical stabilizer, and then when you put the tailcone together -- rather than waiting for Section 42, when the whole airplane is closed up.

--CTCole
 
CTCole...

This is the type of info that I want to hear about and will keep that in mind.
 
I added a VOR/ILS to my ELSA about 2 years after I got it licensed. I drilled out the blind rivets on the top of the vertical stab fairing and installed #6 nut plates on the stab top. I mounted the antenna on top of the stab, and after cutting two notches in the fairing for the cat whiskers I reattached the fairing with screws in place of the rivets.
 
And don't drill your pitot tube! There is no need for it and it only increases the risk of a leak, whether you drill too deep or just tighten the retaining screw a bit too much into the drilled divot. (Ask me how I know) The pointed retaining screw is more than enough to keep the already tight pitot from spinning. In fact, it will make its own divot just fine.
 
BobbyLucas,
Does anyone install the pitot in the wing and what would the advantages be?

JwWright57,
When would you order extra bolts, nuts, etc. if you don't know what you need?

Thanks to all.

Tom
 
BobbyLucas,
Does anyone install the pitot in the wing and what would the advantages be?

JwWright57,
When would you order extra bolts, nuts, etc. if you don't know what you need?

Thanks to all.

Tom

I've seen discussions about installing heated pitot tubes, but not sure if anyone has actually done it.

One small benefit of not having a through-prop pitot, if you're going EAB, is that you could get a "regular" Sensenich prop with their Pitch Pin Indexing System, which would make pitch setting and adjustment much easier. But how often does one really adjust their ground-adjustable prop?
 
I asked the same question (about wing-mounted pitot) a couple months ago, and got several useful replies -- you can search for the thread using "heated pitot".

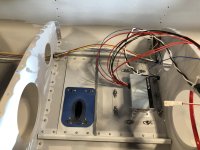
I think I just uploaded a photo of what I then did. Two J-channel rails between the ribs of the stall warn switch bay, bridged by a backing plate (0.025 or 0.030 2024-T3, with a flange fluted to match the wing skin curvature) to mount a mast from Aircraft Spruce. Controller is mounted on the inspection panel. The DAR approved.

--CTCole
 

Attachments

  • Pitot & controller mount.jpg
    Pitot & controller mount.jpg
    252.7 KB · Views: 88
I asked the same question (about wing-mounted pitot) a couple months ago, and got several useful replies -- you can search for the thread using "heated pitot".

I think I just uploaded a photo of what I then did. Two J-channel rails between the ribs of the stall warn switch bay, bridged by a backing plate (0.025 or 0.030 2024-T3, with a flange fluted to match the wing skin curvature) to mount a mast from Aircraft Spruce. Controller is mounted on the inspection panel. The DAR approved.

--CTCole

CTCole, Is there an advantage putting the pitot tube on the wing (I like though) Also, why did you buck some of the rivets on the J-channel.
 
I wanted to be able to use a heated pitot, which led to mounting on the wing. I squeezed the rivets that could be reached with the 3" yoke (through the inspection hole) and pulled the remainder.

--CTC
 
I wanted to be able to use a heated pitot, which led to mounting on the wing. I squeezed the rivets that could be reached with the 3" yoke (through the inspection hole) and pulled the remainder.

--CTC

Ok. As I have not yet received my first kit was just wondering why squeezed and not pulled. We are on a long learning curve.
 
Tom what you will find in MOST cases if rivets can be reach with a squeezer the plans will call out the use of solid rivets. Otherwise the pulled rivets are king! This is why builders talk about getting a powered rivet puller. It will get a workout.
 
Tom what you will find in MOST cases if rivets can be reach with a squeezer the plans will call out the use of solid rivets. Otherwise the pulled rivets are king! This is why builders talk about getting a powered rivet puller. It will get a workout.

Patrick,

Is there a need for a pneumatic squeezer? Any idea how many rivets need to be bucked/squeezed.


Thanks
 
Patrick,

Is there a need for a pneumatic squeezer? Any idea how many rivets need to be bucked/squeezed.


Thanks

Hundreds, if not thousands. Almost all the nutplates use squeezed rivets. Plus the dimpling for the nutplates. In my book, the pneumatic squeezer is a must.
 
Just another opinion here, but I have an alternative viewpoint on the pneumatic squeezer. I bought one (when I was building a -10) and almost immediately sold it. It was heavy, awkward, hard for me to control, and very expensive. For me, there are not enough solid rivets on the -12 to warrant anything other than a manual squeezer.* I have tried a couple and I absolutely love the Cleaveland Main Squeeze with its cam action. (Of course some people don't like it, so ymmv) If I had money to blow I would consider the Numatx squeezer, but again really not necessary imo.

*P.S. My build, and the squeezing of all those rivets, was spread out over 3 years. If you plan to build like it's a full-time job and get it done in 6 months then maybe the hand squeezing could seem more tedious?
 
Last edited:
+1 Bobby, you nailed it on all counts in my humble opinion.
I also value the Main Squeeze highly and used it for most squeezed rivets except a few locations where the Rivet Gun was needed.
Joe (FlyingDiver) mentioned the pneumatic squeezer for Nutplates. Fair point if you have the free cash. I made do nicely by mounting the Main Squeeze on the bench in a simple horizontal cradle so I could push down the squeeze handle with just one hand while holding the work piece with other hand.

Again just my opinion, but I felt there was a safety concern regarding my fingers and toes (don't ask) using a Pneumatic Squeezer, not that I've ever squeezed the wrong thing, or drilled thru my own finger or someone else's, I'm sure no one else has either LOL.

YMMV, my 3-cents and all that ;>)
 
Last edited:
Ok...I'll jump in on the other end of the squeezer spectrum. I did most of my build with a standard pneumatic squeezer, then upgraded to the Numatx about 2/3 of the way through. I love the Numatx and wish I had got it sooner. IMO, it's not only a luxury to use, but having both hands available to hold things and no need to mess with levers or handles results in better quality work.

Downside is the cost, and a little more space since most people setup some kind of platform for the pedal and accumulator.
 
Sounds like a good approach Nate, and safer with better quality since the squeezer is mounted and you have both hands free.
Great info for folks beginning or still building!
Good luck with your inspection!
 
Moderator, perhaps it would be appropriate for some of this thread to be moved or duplicated under a new RV12 topic relating more to "tools" or "squeezers"?
 
Wow a lot of info for first time builder.

Dave, N8DAV8R, Bobby, and FlyingDiver. Not knowing what we (my girl and I) are getting into cost is always a factor. I looked at the Numatx and it prices between $800 - $1000. A little much for us. In all likelihood we will stick with the Main Squeeze.

With both of us retired, we would be looking at a year to complete the build in a perfect world without delays. Just received crating date for empennage kit April 24 to June 24, 2023.
 
Tom, we were in similar constraints. Good thing is you can buy part of it at a time and stretch out the cost while you wait for the rich uncle…you know…important thing is to make some progress each day to stay engaged and ask for help/advice here anytime!
All the best,
Dave
 
The Main Squeeze will work just fine! Biggest time saver will be to use 1 or 2 pneumatic or electric puller for the pop rivets (13,000) of them vs a couple hundred of the squeezed. (Please…no one count them), a good bench grinder with Scotch Brite wheel, a hand held motor for a small scotch brite wheel, and at least 2 of certain hand tools like the Cleco Pliers because the one you need is always on the other side of the fuselage/shop/wing, etc. ��
 
The Main Squeeze will work just fine! Biggest time saver will be to use 1 or 2 pneumatic or electric puller for the pop rivets (13,000) of them vs a couple hundred of the squeezed. (Please…no one count them), a good bench grinder with Scotch Brite wheel, a hand held motor for a small scotch brite wheel, and at least 2 of certain hand tools like the Cleco Pliers because the one you need is always on the other side of the fuselage/shop/wing, etc. ��

Dave,

Good advice about doing a little bit each day and asking for help.

We will probably get the Milwaukee puller and the pneumatic one from Harbor Freight. Is there a particular Scotch Brite wheel to use and when you say hand held motor, I assume something like a Dremel.
 
+1 Bobby, you nailed it on all counts in my humble opinion.
I also value the Main Squeeze highly and used it for most squeezed rivets except a few locations where the Rivet Gun was needed.
Joe (FlyingDiver) mentioned the pneumatic squeezer for Nutplates. Fair point if you have the free cash. I made do nicely by mounting the Main Squeeze on the bench in a simple horizontal cradle so I could push down the squeeze handle with just one hand while holding the work piece with other hand.

Again just my opinion, but I felt there was a safety concern regarding my fingers and toes (don't ask) using a Pneumatic Squeezer, not that I've ever squeezed the wrong thing, or drilled thru my own finger or someone else's, I'm sure no one else has either LOL.

YMMV, my 3-cents and all that ;>)

Dave,

Do you have a pic of the cradle you made for the Main squeeze?
 
+1 Bobby, you nailed it on all counts in my humble opinion.
I also value the Main Squeeze highly and used it for most squeezed rivets except a few locations where the Rivet Gun was needed.
Joe (FlyingDiver) mentioned the pneumatic squeezer for Nutplates. Fair point if you have the free cash. I made do nicely by mounting the Main Squeeze on the bench in a simple horizontal cradle so I could push down the squeeze handle with just one hand while holding the work piece with other hand.

Again just my opinion, but I felt there was a safety concern regarding my fingers and toes (don't ask) using a Pneumatic Squeezer, not that I've ever squeezed the wrong thing, or drilled thru my own finger or someone else's, I'm sure no one else has either LOL.

YMMV, my 3-cents and all that ;>)
Dave,

Do you have any pics of the mount you made for the Main Squeeze?
 
Is there a particular Scotch Brite wheel to use and when you say hand held motor, I assume something like a Dremel.

Tom,
A lot of builders use the 6-inch 3M CP-7AM Scotch-Brite wheel, which is sold by Van’s and Cleaveland Tools. Cleaveland also sells 1-inch and 2-inch CP-7AM wheels. Both require a 1/4-inch mandrel, so you can’t use them with most Dremel tools, but they work great with a die-grinder. I have both sizes, but greatly prefer the 1-inch wheel. The smaller diameter lets you use it in places where the 2-inch wheel won’t fit. The 1-inch wheel is also wider than the 2-inch wheel.

Mark,

Thanks for the information and did not know that the Dremel would not take the 1/4" mandrel. Was going to buy a Dremel but will look at a die grinder you mentioned. Any specific brand. I saw that HD has a Husky die grinder, straight and angled. Any preface.
Thanks,
Tom
 
Hi Tom,

I have an air-powered Ingersoll Rand right-angle die grinder that’s worked well for me. I bought it over 20 years ago, so I doubt if the model I have is still available. You might start a new thread asking for air-powered die grinder recommendations from people who have bought one in the last few years.

I recently bought a cordless Milwaukee 1/4-inch right angle die grinder that uses the same batteries as my Milwaukee riveter. I really like using it because it is cordless, but it blows through batteries much faster than the riveter. So far, it’s been great for small jobs, but I’m reluctant to recommend it until I gain experience using it for long periods of time.

https://www.amazon.com/Milwaukee-2485-20-Right-Angle-Grinder/dp/B07XZMMD1V
 
Last edited:
Hi Tom,
I don’t think I used my Dremel for mor than 1/2 hour during my build. The small Dremel grinding wheels load up VERY quickly and become useless.
I used the 6-inch(?) wheel supplied by Cleavland mounted on a bench grinder (happened to be from Sears) that had a speed control on it which came in handy. I was never comfortable with the full speed setting.
YMMV (which is becoming my new standard sign-off, although I thought “3-cents” was OK too)��
 
Oh…and I just used a standard straight air die-grinder with 1-in Scotch-brite wheels. Used about 4-5 over the build. I have a right angle grinder also but seemed to have better control with the straight one one whenever access wasn’t an issue, e.g.hold a wing rib with one hand on the workbench and the die-grinder with the other to polish lightening holes.
3-cents and YMMV <grin>
 
Hi Tom,
I don’t think I used my Dremel for mor than 1/2 hour during my build. The small Dremel grinding wheels load up VERY quickly and become useless.
I used the 6-inch(?) wheel supplied by Cleavland mounted on a bench grinder (happened to be from Sears) that had a speed control on it which came in handy. I was never comfortable with the full speed setting.
YMMV (which is becoming my new standard sign-off, although I thought “3-cents” was OK too)��

Dave, RV9builder,

Thanks for the info and I just started a new thread for air die grinder recommendations.

Did not know all the tools I need and I still have not called Cleveland for their Rv-12 tool kit.

PHEW

Tom
 
Just one person’s opinion, but I’d have to say a die grinder is at best a ‘nice to have, but far from necessary’ tool for an RV12 build. In my entire (rather long) build, I have never needed one. In fact I never even wished I had one. I’ve had a fair bit of use out of my dremel, especially when working on fibreglass. Remember we’re only working with aluminium, not tool steel. Also die grinders eat air, so you will need a good compressor.
I’d say exactly the same thing about a pneumatic squeezer. I’ve loved the Main Squeeze. Great tool. And I’ve had no problems with my cheap pneumatic puller. One thing a lot of people do is to run too much pressure on the rivet puller. After a lot of trial and error, I found best results at about 30-40psi. Eliminates the recoil so the skins love it.
Cheers DaveH
120485
 
Last edited:
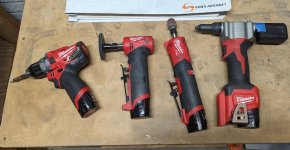
If you're getting the M12 rivet puller...
PXL_20230425_014315954.MP.jpg

I've been really happy with my M12 drill. I have a nice Sioux air drill, but the M12 is what I reach for almost every time. The cordless convenience wins out over the slightly better performance. (If you do go the M12 drill route, it's worth it to spend the extra money for the brushless FUEL version. It spins a little faster and has a nicer chuck on it.)

I also have the straight and 90 degree die grinders. (I do agree with others here, that die grinders aren't required to build a 12. But for me this is how I do the majority of my deburring.) The 90 degree die grinder is always equipped with the 3" version of a roloc disc mentioned previously. The straight die grinder has a 1" Scotch-brite* wheel.

*- I got my 1" Scotch-brite wheels from here:http://www.surplussales.com/Tools-Accessories/T-Aabrasives.html. These are the 5AFN version, instead of the typically used and more expensive 7AM. These are softer, so you will go through them faster. But at $15 for 50, I don't feel bad about throwing them away. (The 5 is for the density, so it's not as dense as the 7. The "A" stands for Aluminum Oxide. And the "FN" is for fine, instead of "M" medium.)
 
Back
Top