Van's Air Force

The definitive Van's Aircraft support community! Buying, building or flying an RV? Join our exclusive family of mentors and enthusiasts!

Completely destroyed a rivet head

BenBruin

I'm New Here
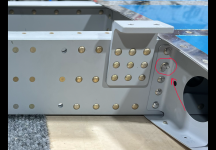
While working on the HS (riveting the front spar to the innermost inspar ribs) I completely mashed the factory head of a 470 4-7 rivet. I was using the double offset for the first time, and the gun slipped off the rivet head. These rivets proved difficult to set anyway, and I was paying attention to the shop side of the rivet.

The end result is that I need to clean this up and remove what is left of the rivet, hopefully without damaging anything. Any tips from the hive???
 

Attachments

  • IMG_0118.png
    IMG_0118.png
    6.1 MB · Views: 411
Yup. That one's pretty gnarly looking. 1) It looks like it's in a bad spot to try to drill out 2) It will be hard to find center 3) That's a thick piece underneath it all, making drilling difficult. In all honesty, I'd consider leaving it as is. One bad rivet won't make the plane fall out of the sky, and Van's will say something along those lines as well. It's not visible and your other riveting work looks exceptional, so you have to ask yourself if you may do more damage trying to execute a "do-over".

Now with that said, all of my experience is with 6's and 7's and my lack of familiarity with the 10 may prove me to be off base. But you'll likely get plenty of input here.
 
Nasty!
I would carefully measure the rivet spacing on those rivets close to it. Mark estimated center as close as you can. Center punch and drill through the Factory Head only. With a sharp chisel, tap (do not hammer) & pry the factor head remnants off if it didn’t come loose from drilling. Knock the shank out with a punch.
Inspectors (in Canada anyways) would snag that rivet if they saw it.
 
to be replaced, no discussion about it.
Use an angle drill following the normal rivet replacement techniques (some super YT vids available). Use back riveting or an offset rivet set to install the new one.
 
What Ralph said, I suggest using a pencil grinder with a ball bit, play Dentist and shape the spectacular glob into something mostly flat that you can center punch and start drilling with a small pilot bit (think 1/16" or so), then up size bits to weaken the factory head until a sharp chisel can shear off the remains OR a center punch to push shank into web while separating the head. Do not get discouraged - this WILL work out. And never accept substandard work... you're learning.... we've all been there one way or another.
BTW - A Cherry Max rivet will work perfectly as a replacement: get the right size measured, spend a couple bucks, use the correct puller - DONE. Cherry Max rivets are approved for structural repairs & in place of solids in certified aircraft.
 
Last edited:
Difficult to find center on the factory side. I have drilled pilot holes from the shop side many times. Use a punch and a tiny bit like #50. That way, it's less danger of hitting an edge and the hole relieves pressure. Once you drill all the way through, use a #30 with a stop to drill the factory head. Snap it off and remove the rest.
 
Difficult to find center on the factory side. I have drilled pilot holes from the shop side many times. Use a punch and a tiny bit like #50. That way, it's less danger of hitting an edge and the hole relieves pressure. Once you drill all the way through, use a #30 with a stop to drill the factory head. Snap it off and remove the rest.
Looks ugly but you might do more damage trying to fix it. Might be best to leave it alone looks like it is doing the job
 
If you look in section 5 of the Vans instructions that’s technically considered a “creased head” which is allowable. There is also the note about reworking questionable rivets. Chances are that joint is a strong or stronger than one you rework with the same size rivet. Especially in that location. Rivets are really shear pins. It’s not intended to clamp the joint in compression.

If it developed a good shop head I would be inclined to leave it. If you take it out and the hole is acceptable great. If not I’d use and oversized CherryMax. Try the snap caps they really help keep the set on the rivet especially where you are using an offset rivet set
 

Attachments

  • IMG_0569.jpeg
    IMG_0569.jpeg
    2.7 MB · Views: 44
Last edited:
If you decide to drill this out use a center drill of a small diameter to drill a pilot hole then stop before drilling below the surface of the web. Transition to an undersized twist drill and with the enhanced pilot hole try to drill without crossing the plane of the web. Drill with another smaller diameter than number 30 and if thing look good again drill to a depth just about coplanar with the web. The manufactured head should be easy to knock off with its shank greatly reduced in strength. Then you will have access to the center of the rivet hole. I would drill dead center with the center drill to establish a new pilot hole. Then you can drill using that pilot hole and a twist drill slightly smaller than number 30. Be careful to drill parallel to the axis of the rivet hole. Stay dead center which should be easy using the dead center pilot hole drilled with the center drill. Once you have drilled the core of the rivet shank you should be able to GENTLY TAP the rivet shank out of the hole using an 1/8 inch punch and a hammer. Be sure to back up the web of the exit hole material to prevent backside damage to your work piece. . The trick is to establish dead center of the hole with the center drill. (I use a small center drill when doing demanding rivet removals.) This technique has worked well for me. Another approach is drilling this rivet out from the shop side if access is better that way. Good luck.
 
Consider drilling it out from the shop head side. I’ve done it before. It does work. If the shop head is buggered up too. I would carefully grind the shop head just flush. Center punch it center mass and center drill #40 to relieve internal pressures. If it is a larger (wider) rivet you can always go bigger after

BTW I absolutely hate offset rivet sets.
 
...center punch and start drilling with a small pilot bit (think 1/16" or so)...
Yep! When I first started building I tried all kinds of techniques to remove rivets that I read about here on VAF. The technique I finally landed on was to always start with a center punch and 1/16" bit.

Everybody has their own tolerance for bad rivets and the technique for removing them. The only real advice I would give is to never attempt to remove a bad rivet unless you are very certain you can remove it cleanly. You can easily make things worse trying to remove it if you don't have much experience.

I would definitely drill that rivet out. Not because I'd be worried about it failing but because I'm a bit OCD. If you don't have those tendencies or lack the skill to remove it cleanly, leave it alone.
 
If you don’t have an angle drill yet: I love mine. I use it for all rivet head drill-outs. Short or medium length threaded drill. What’s great is that you have a lot of control of the forces on the drill bit with your fingers right on the end of the drill. You can apply side-force to sort-of “mill” it back into position even if the bit wants to slip off the ugly surface.
 
Welcome to the club!
First off, the double-offset is a two-hand set. Pretty much need a helper bucking so you can control the beast.
I would definitely replace that mess of a rivet.
There are a few ways to deal with this.
A Dremel with an abrasive cutoff wheel, ball, or burr can be used to grind off the head (either side). Just be careful to not get into the part. I use magnifiers on this type of operation. Then center punch and drill. I always start with a 1/16" bit and adjust as I go up in size if I'm off a tad. I always drill a smaller hole than the shank so the material has some "squeeze space" when driving out the shank. In this case, it looks like some 12" bits will let you get into the spot on the factory head side.
You can also use a chisel to shear off the factory head. This is easier if you get some of the shank drilled out. (and protect the surrounding area).
 
Tip for the evil double offset.
Don't fear the beast. Tame it.

Figure out exactly how you want to orient the gun and set. Tape the bugger to the gun so it can't rotate. That's the problem. They tend to rotate if not held and you can't hold a bar and the offset at the same time.
Practice, practice, practice.
 
What air pressure are you shooting those rivets at?
A
There is no way that I would leave as is. Order the rib that you have riveted in place as a replacement. Get a dremel with a sanding drum, small and compact. Sand off all the heads flush using the flange as a sacrificial piece. Use a backer and punch out the rivets and do over. Get an extra experienced hand for the second attempt.

When you receive the replacement rib, shoot the rivets for the flange first while flexing the rib in between the HS skins, That way you can use the straight set and then come back and do the easy 426 rivets in the skins.
 
Last edited:
If you’re concerned about drilling it out, ask someone with experience to help you. You can’t leave it like that ( my opinion) but longer rivets can be a challenge getting them out without damaging the hole. Drill tend to wandering on its way through.
 
Consider drilling it out from the shop head side. I’ve done it before. It does work. If the shop head is buggered up too. I would carefully grind the shop head just flush. Center punch it center mass and center drill #40 to relieve internal pressures. If it is a larger (wider) rivet you can always go bigger after

BTW I absolutely hate offset rivet sets.
The shop side is actually not in bad shape — and I agree so far on the offset rivet sets. I’m also going to try the rivet caps that @Mikeyb mentioned. I’ll take all the help I can get.
 
What air pressure are you shooting those rivets at?
A
There is no way that I would leave as is. Order the rib that you have riveted in place as a replacement. Get a dremel with a sanding drum, small and compact. Sand off all the heads flush using the flange as a sacrificial piece. Use a backer and punch out the rivets and do over. Get an extra experienced hand for the second attempt.

When you receive the replacement rib, shoot the rivets for the flange first while flexing the rib in between the HS skins, That way you can use the straight set and then come back and do the easy 426 rivets in the skins.
I was hitting them at about 90psi but the gun is regulated with the brass fitting dial, and I’ve moderated it a little bit. Do you have a recommendation?
 
Welcome to the club!
First off, the double-offset is a two-hand set. Pretty much need a helper bucking so you can control the beast.
I would definitely replace that mess of a rivet.
There are a few ways to deal with this.
A Dremel with an abrasive cutoff wheel, ball, or burr can be used to grind off the head (either side). Just be careful to not get into the part. I use magnifiers on this type of operation. Then center punch and drill. I always start with a 1/16" bit and adjust as I go up in size if I'm off a tad. I always drill a smaller hole than the shank so the material has some "squeeze space" when driving out the shank. In this case, it looks like some 12" bits will let you get into the spot on the factory head side.
You can also use a chisel to shear off the factory head. This is easier if you get some of the shank drilled out. (and protect the surrounding area).
Thanks for this tip — I think this is the approach I will try to use, but with an angle drill as suggested by @tldavis. In the end I’ve decided to replace this one. Maybe it’s the perfectionist in me. I’ll probably bugger the hole but there seem to be options if I do.
 
Yep! When I first started building I tried all kinds of techniques to remove rivets that I read about here on VAF. The technique I finally landed on was to always start with a center punch and 1/16" bit.

Everybody has their own tolerance for bad rivets and the technique for removing them. The only real advice I would give is to never attempt to remove a bad rivet unless you are very certain you can remove it cleanly. You can easily make things worse trying to remove it if you don't have much experience.

I would definitely drill that rivet out. Not because I'd be worried about it failing but because I'm a bit OCD. If you don't have those tendencies or lack the skill to remove it cleanly, leave it alone.

The shop side is actually not in bad shape — and I agree so far on the offset rivet sets. I’m also going to try the rivet caps that @Mikeyb mentioned. I’ll take all the help I can get.
Practice on scrap. The cap is also a training aid. If you bounce or get off to the side it will leave orange on the rivet.
 
I was hitting them at about 90psi but the gun is regulated with the brass fitting dial, and I’ve moderated it a little bit. Do you have a recommendation?
I work with a guy who ALWAYS changes the regulated pressure down to 60 PSI when he rivets.
 
What air pressure are you shooting those rivets at?
A
There is no way that I would leave as is. Order the rib that you have riveted in place as a replacement. Get a dremel with a sanding drum, small and compact. Sand off all the heads flush using the flange as a sacrificial piece. Use a backer and punch out the rivets and do over. Get an extra experienced hand for the second attempt.

When you receive the replacement rib, shoot the rivets for the flange first while flexing the rib in between the HS skins, That way you can use the straight set and then come back and do the easy 426 rivets in the skins.
If you are going to replace the part because of one screwed up rivet you might just as well order a complete new air frame so that you won't have to waste a lot of time waiting on replacement parts. Replacing that part is ridiculous there is nothing wrong with it, just an ugly rivet which I think is still structurally sound.
 
Make sure you’re using a proper universal head set. From some of the other pics, it appears your offset may be a round head set.
RV’s only have universal heads 470, to my knowledge, but many aircraft use round head and not everyone is aware they are different. They sell both types of sets.
If you look at the witness marks on some of those other heads you used the offset on, there are some signs of the set not interfacing the head properly.
Worth double checking.
 
I was hitting them at about 90psi but the gun is regulated with the brass fitting dial, and I’ve moderated it a little bit. Do you have a recommendation?
Dang, that is high for me. I run my Souix 3x at about 40 and only use it on 1/8 because it hits HARD. just a few hits and it’s done. I have an old ATS or something that I use for 3/32 because it is much “buzzier” and run it at 60psi. A double offset will flex a bit so may need more psi.
 
I think you need to figure out how to replace it. Larry's idea sounds possible. That is probably one of the worst rivet heads I have seen and I've done some bad ones. I think you might need to turn your air pressure down. I'm not sure how you got that far before realizing you had damaged the head. Use shorter bursts of the gun and check after each burst.
 
Back
Top