Van's Air Force

The definitive Van's Aircraft support community! Buying, building or flying an RV? Join our exclusive family of mentors and enthusiasts!

[Closed] Step 6 VS spar caps (steps 6.2.2 & 6.2.3) too short

DamonOverboe

Member
Patron
I made the same mistake as noted here: https://vansairforce.net/threads/fi...8th-holes-in-hs-spar-web.208563/#post-1623421
I learned every word matters, and now know what "web" means. 🙃

So now I'm doing the rework, with the new VS web and new spar caps. It was a fairly cheap education ($330 for new spar caps, rear spar, and skin) and good practice, plus I have some realistic scraps I can practice on now too.

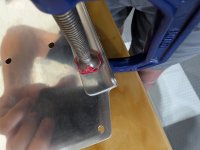
On the rework, I straightened the spar caps the best I could and am very happy with them, better than the first attempt. I flushed them up in the rear spar, drilled the web first this time. Then I went on to drill the flanges, and upon drilling the last hole into the first cap, I noticed there is hardly any meat left, nowhere near the minimum required; these will definitely crack. (They are 0.060" from edge of hole to edge of material, appx 0.100" from edge of material to centerline, and these are #40 rivets so just barely 1D from CL.)

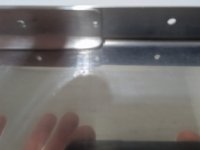
Comparing to my old ones, sure enough, the replacement spar caps are noticeably shorter (but not enough that I caught it until I reached this point.)

Has anyone else encountered this? Should I go back to Van's and ask for replacement spar caps? Or, could I simply shorten the spar caps, removing that hole? I looked ahead in the plans and nothing jumps out at me indicating I couldn't shorten it to remove this hole. But, this is my first build so who knows what I'm missing there. I also figure it was originally designed to span the hole in question so I'm compromising a little bit of the designed strength by doing that.


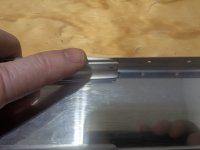
Attached are some images that show:
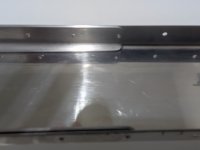
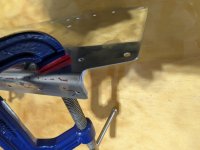
  • the spar cap is flush with the bottom of the rear spar
  • the final hole is extremely close to the edge
  • and with the reworked spar cap cleco'd in (in the back), the original spar cap is butted up in the front to show the length difference and the remaining metal
 

Attachments

  • PXL_20260211_184114342.jpg
    PXL_20260211_184114342.jpg
    895.8 KB · Views: 38
  • PXL_20260212_223017925.jpg
    PXL_20260212_223017925.jpg
    409.4 KB · Views: 37
  • PXL_20260211_184057448.jpg
    PXL_20260211_184057448.jpg
    883.6 KB · Views: 35
  • PXL_20260212_223020487.jpg
    PXL_20260212_223020487.jpg
    388 KB · Views: 34
  • PXL_20260212_223201438.jpg
    PXL_20260212_223201438.jpg
    897.5 KB · Views: 40
I also have to ask as I will start soon (delivery date is 22th April + 5 weeks of shipping). I checked the plans and was looking for "web" but couldnt find it. I fear I will make the same mistake. What is meant by "web"? Is it the front of the VS-1003 Rear spar? So not the siides of it that connects to the skin?
 
Last edited:
On this issue, I spoke to my tech advisor this morning... he recommended reaching out to Van's builder support to get their advice, if they have any on this, and to let them know they're shipping the spar caps a little short. When I have an answer back I'll update this post.

I also have to ask as I will start soon (delivery date is 22th April + 5 weeks of shipping). I checked the plans and was looking for "web" but couldnt find it. I fear I will make the same mistake. What is meant by "web"? Is it the front of the VS-1003 Rear spar? So not the siides of it that connects to the skin?

@tsaG yes, exactly. The "web" refers to the wide, flat span between the flanges. (So on VS-1003 on page 6-2 it's the large, flat surface with holes drilled part-way up.) The "flanges" are the edges that form the angles, with #40 holes drilled across their entire length.

If you happen to get your kit before I update this, you might measure the length of your rear spar caps (VS-1014 x2), and then measure that distance from the bottom of the rear spar flange up the flange and see where that lands in relation to the pre-dilled #40s in the flange. (figure 2 on 6-2 calls out to "Flush bottom of spar cap with bottom of rear spar flange). You may need to straighten the spar cap to get an accurate length.

Going back to my mistake, in hind sight, I really should have tried harder to find someone working on a build locally where I could at least just go sit and observe. I did the SportAir sheet metal workshop, but that didn't expose me to things like this. I'm going to try to work more of that in now, but the people building these are 45 minutes from me, so my build is probably going to cost more 🙃 in the long run. But I'm REALLY learning the things!

I think the reasons I made this mistake, even though I read it several times and read ahead,
  1. I didn't catch the difference between the terms web and flange. So obvious now!
  2. It seemed after clamping to be easier to start in the flange so off I went
  3. Because we're first drilling 1/8" and then later #30 in the web, it didn't trigger my attention that the 1/8" bit was too large when drilling the flanges, because I expected that I should be removing material.
So the next time around, I changed my clamp configuration a bit to make it easier to start in the web. It still is a bit cumbersome, but having the web overhang my workbench for clearance on one row of holes, I was able to make it work and get a backer block between the clamps for drilling. What helped there is I have 4 @ 1" and 2 @ 2" Irwin c-clamps, about $3 & $5 each respectively from Ace. Harbor Freight probably has cheaper ones. Anyway I could have used probably 6 more of the 1", but I was able to get the spar caps firmly nested to both the web and the flange, across the length of it. I used more clamps towards the bottom when starting, started from the bottom, and as the clecos made the clamps ineffective, I worked the clamps up, always securing the cap to both the web and the flange.

Here are a few things of note for when you do start:
  • Section 5 speaks to straightening out the spar doubler (VS-1008); but didn't mention straightening the spar caps, nor does section 6 (VS-1014 x2). I assumed the bow in the caps was on purpose and acceptable, that it added some additional tension. My tech advisor caught that, so I corrected it on this second try.
  • The spar doubler is pretty easy to straighten. Place it in a vice, apply light to moderate pressure with your hand, gently tap the doubler on the back side near the vice with a rubber mallet. The pressure from your hand will straighten it, the mallet is just to coax it. If you're pushing away from yourself in the vice, then you hammer on the backside of the doubler towards yourself.
  • For the spar caps, they're roll formed so twisted in two dimensions.
    • Straighten them before cutting them (step 6.2.1 calls for trimming them) and DEFINITELY before drilling.
    • To straighten them you're stretching one leg and compressing the other. Again place in a vice, flex it. The mallet did nothing for me here, I had to visualize what I wanted to stretch vs compress and applied light force at first, but was surprised how much it took in the end. I was worried about bending or crinkling them, but I just took my time (and practiced on my mistake pieces first).
  • Grab a few cheap pieces of laminated shelving.
    • Even with a great workbench, the shelf should be flatter / more true than your bench; use it for determining if you have your spar caps and spar doublers flat,
    • and, you can also use it as a backing board. Set your drill stop if using one to allow it to go deep enough into the shelving so you can cleco directly to the shelf (you won't be able to with the web unless you cut the shelf down; but when you do the flanges, that works really well; I clamped the shelving to my workbench, hung the rear spar by the flange and clamped it to the shelf, and drilled then clecoed directly into the shelf. it worked really well)
 
I heard back from Van's builder's support. They said:

Even though this edge distance is not sufficient for the specification, as it is at the end of the spar cap it should not be a problem as this is where the least stress is in the structure. I do no think the advantage of replacing it will be sufficient to justify doing it.

Also my tech advisor had some scrap 060 handy and tried these distances out on the bench and didn't have any issues. The spar caps are 080 so I should be good.

It's probably an unfounded fear, I just worried that hole could crack from vibration and/or stress, and then in a worst case scenario, run to the next rivet and so on. But I'm guessing building my first airplane I'll have a lot of moments similar to having your first child, where a tiny little scratch can become a life-threatening condition with just a little bit of runaway imagination!

So it sounds like I'm proceeding with it as is.
 
Back
Top