Van's Air Force

The definitive Van's Aircraft support community! Buying, building or flying an RV? Join our exclusive family of mentors and enthusiasts!

Canopy before avionics? Or avionics before canopy?

nicklewis

I'm New Here
I recently received the finishing kit for my RV-7 with a slider canopy. This is my first build, and most of the remaining tasks (canopy, wiring, avionics, engine, etc.) are very foreign to me. Big learning curve.

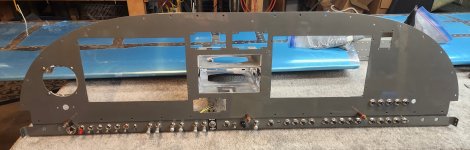
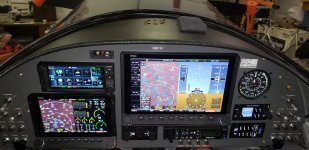
I’m confused about what order to do things in. Specifically, the canopy versus the avionics. For reference, I’m planning on getting AFS to build my instrument panel for me.

I talked to a fellow builder who very much believes that the avionics should be installed and the top forward skin riveted on before fitting the windshield, as things can shift when riveting the top skin. But that would mean me getting the avionics now, sooner than I’d ideally like.

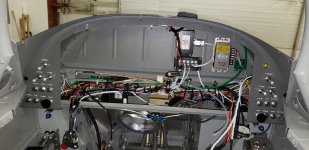
On the other hand, if I did the canopy first, then the panel and wiring (even with a panel built by AFS) would be much harder to install…. right?

Can I prepare and fit the windshield (and the rest of the canopy), but then leave it aside and wait on installing it permanently until the avionics are installed and the top forward skin is riveted on?

Any tips would be appreciated! Thanks,

Nick
 
You definitely want to leave the top skin off until all the avionics are in. I consider it the absolute last thing I rivet in place before I call the DAR for inspection. There is way too much work underneath that skin that is required to install avionics.
 
The question is how comfortable are you working under the panel?
If it's a non issue, then rivet the forward skin. If you can't work under there, do as much as possible before the top skin.

Hold off on buying avionics as long as possible. There is a lot to do from canopy to finished. Avionics will just sit there. That does not mean you can't install wire and nutplates and pull wire you purchase. AFS will also sell you all the harnesses if you want to pre-wire the fuse.

I have a panel-less panel from AFS. Love it by the way. Here's how mine progressed.
1. I pulled every bit of data I could find and layed out every box and mounting hole. Installed nutplates, snap bushings, FOT, stuff like that. Basically everything minus the harnesses from AFS. I installed two hinged panels from panel to sub panel. ACM lives on the co-pilot side. Backup batteries, B&C regulator and a couple small things live on the pilot side. Pull two pins and a panel drops. Pull two more and it removes. Very handy for maintenance sitting in the seat. That just left customer provided wire and the panel itself.
2. Fit the panel. Cut, drilled and finished.
Wrote an article on it.
It's-A-Wrap
3. Rivet the forward top skin.
Rollbar, Canopy, Windshield, Rollbar brace, Canopy trim, Windshield trim in that order.
4. FWF
5. Somewhere in there I ordered the avionics. Lead time was months but I had a lot to keep me busy.
6. Once avionics arrived, it was just mounting everything. Drawings were perfect, because every screw went right in. Since I had fit the panel, it went right in too.
7. FWF and remaining harnesses. They required some time under the panel.

ACM requires you pull and terminate the EMS (1), ADAHRS (1 or 2), Servos (2), Trim (2), Sticks (2) and GPS (1 or 2) harnesses. They provide them but you have to pin them. You provide the power & lighting harness.

I designed the panel so it can be removed in a few minutes but so far dropping the hinged panels is all that has been needed.
 
You are sure to get many opinions on this!

FWIW I installed the avionics wiring and components that go behind the panel before the forward skin was on (it had been drilled and dimpled and fully fitted, just not yet riveted). It made it much easier to access everything standing alongside the fuselage rather than having to climb in and out and work from the seat position.

I then temporarily removed some of the items on the sub-panel to provide access to rivet on the forward skin.

Once the forward skin was on the canopy windscreen could be fitted and attached.
 
Last edited:
What's your maintenance plan?
If you intend to DIY, Van's "Access Hatch Install Kit" lets you get at components under the forward skin.

Access panels also reduce some over head, under panel, on your back efforts.
 
Give serious consideration to maintainability. I know of several wires I'd like to add, but to do that, I'd have to pull the entire avionics stack... ain't gonna happen.
 
As others have mentioned - recommend you fit forward top skin initially with every hole clecoed, then finish canopy (in your case a slider) but DO NOT attach fwd windscreen yet. Then do Avionics AND consider engineering / installing fwd top skin avionics access covers - you can do this right after you have skin fully clecoed and make the frames a part of the top skin so that everything is "integrated" and fits to all under structure well - be sure to make accommodations for your fwd windscreen which will be different than the pic's I'm attaching which are for a tipper. Get your avionics up & running prior to final installation of top skin, and use the additional access while riveting top skin - do not forget to wear hearing protection while underneath bucking rivets!!!
Hope this helps
 

Attachments

I did all of the wiring up to the sub-panel and made everything high-quality plug-in gold connectors, which allowed the panel to be installed after the canopy and windscreen were completed. Even took it into paint that way and installed the panel last thing. Otherwise, especially with a slider canopy, you will spend much time on your back under the panel in a very unhappy state.

1760330698500.png
 
Last edited:
Agree, with plan to fit canopy, not windscreen, then engine, avionics and top skin & windscreen last. But, think very hard about future maintenance before installing anything under the top skin
 
Also don’t install your forward wheel or engine mount until fwf complete. Another gotcha.

As for the top skin, I riveted mine early on and don’t regret it. But I’m using a Dynon advanced panel which makes wiring “fairly” simple. I may take back this statement when I finally install my panel (I’m doing all the back wiring with the panel not yet installed).
 

Attachments

  • IMG_0165.jpeg
    IMG_0165.jpeg
    3.2 MB · Views: 45
How could I forget that quadrant? OMG! I had to rebuild it.
I had the controls nicely spaced then after rigging, "whack". Great. No, you will probably never move the stick full forward and full left or right, but the DAR will and if it hits, he will note it.
 
With today’s avionics you should not need to mount anything between the firewall and the bulkhead forward of the panel. Perhaps the RV-7 slider is different - don’t know.

While you may have the perfect avionics design I guarantee that you will want to do maintenance or modify something once you are flying. Plan on this. Making the panel removable is well worth the small amount of up front work. There are tricks to make this easier and avoid using a bunch of big disconnect. The panel in my old RV-10 and current RV-8 ride comes out in 15 minutes.

Again my rule: “Never on your back with you head under the panel”.

Carl
 
I made my RV-8 main panel removable. The two narrow side panels are not removable but it’s easy to access everything behind them when the big main panel is removed.

Basically all of the avionics are connected with dsub connectors that are easy to disconnect. The switches are not wired directly to the power or ground buses and devices, but rather go through Deutsch connectors (like they use on cars) which are also easy to disconnect. Every connector has an additional 16” service loop so I have slack to pull out the panel to disconnect the connectors.

So removing my panel is as easy as removing a handful of screws and disconnecting ~10 dsub and Deutsch connectors.
 
I've never understood installing avionics before riveting the top skin and fairing the windshield. Sure, do all the prep you can, like installing mounting points and cutting holes. But hey, if you can't easily R&R components with the airframe riveted together, maybe you have not seriously considered long term maintainability.

Besides, windshield fairings can generate a lot of sanding dust. I don't see abrasive dust as being real good for the expensive bits.
 
The key to an easily removable panel is to divide everything into “stays in the plane” and “ comes out with the panel”.

The objective is simple things like switches and breakers do not (with few exceptions) need to come out with the panel. Leave them in the plane. All the remote avionics and the connections to my SkyView displays stay in as well (each display has a large and two small D connectors on the back). Once the panel is out access to remote avionics (XPDR, Comm #2 and such) are easy to access. Same for all the breakers and switches.

The first set of photos is current RV-8 ride. Note the use of the panel “wings” to mount breakers for the panel. The breakers and switches for landing lights are mounted on the right side panel. Also note the plethora of connections that go between the GTN-650 and the audio panel. They all come out - and I’d guess are the root of many people losing their religion trying to add something while laying on their back with their head under the panel.

The next two photos are the current RV-10 build panel (in progress). Note the bottom panel “apron”. This is how Van’s provides the parts and it is perfect for mounting most of the switches and breakers. The breakers on the removable part are for those things that come out with the removable part (e.g Comm #1, Nav #1, Audio Panel, G5). Also note the forward brace for the GTN-650. Don’t let it bounce around.

So the RV-8 and RV-10 come from Van’s set up for doing this.

The last two photos is a panel we did for an RV-6A. We modified the panel, cutting off the bottom and making an apron to mimic the RV-10 for switches and such. It came out well.

Carl
 

Attachments

  • Unknown.jpeg
    Unknown.jpeg
    697.9 KB · Views: 82
  • 9337F3FC-D47A-452A-A76D-79D6764993F6_1_201_a.jpeg
    9337F3FC-D47A-452A-A76D-79D6764993F6_1_201_a.jpeg
    327.3 KB · Views: 77
  • 20250724_145143.jpeg
    20250724_145143.jpeg
    2 MB · Views: 69
  • 20251013_111902.jpeg
    20251013_111902.jpeg
    1.5 MB · Views: 68
  • IMG_0680.jpeg
    IMG_0680.jpeg
    545 KB · Views: 71
  • IMG_0678.jpeg
    IMG_0678.jpeg
    741.3 KB · Views: 67
  • 20210729_135426.jpeg
    20210729_135426.jpeg
    1.9 MB · Views: 82
Forward hatches!
A recipie for wet feet! Although I never plan to fly in rain, or leave the aircraft out in the rain, it seems to get wet often enough that I would not want any more entry points for water. It is quite possible to avoid installing very much equipment in that space.
 
A recipie for wet feet! Although I never plan to fly in rain, or leave the aircraft out in the rain, it seems to get wet often enough that I would not want any more entry points for water. It is quite possible to avoid installing very much equipment in that space.
I predict you will regret this decision :)
 
Thanks for all the responses!

I do indeed have the Vans access hatch install kit on order…. although it seems that most equipment will live between the main panel and the sub-panel, while the access hatches only provide access to the area between the sub-panel and the firewall, correct?

I’m trying to digest all of the suggestions and understand what I’m seeing in the pictures, but my complete lack of wiring or avionics experience is making it difficult. The instructions from Vans seem to completely disappear at this point of the project. Are people just building brackets and holders from scratch using scrap bits of metal, and cutting holes in the sub-panel and forward ribs wherever they need?

I’m wondering whether anyone has taken either the EAA “Electrical and Avionics” course or the AEA “Avionics Installation for Experimental Aircraft” course? And if so, which one they’d recommend for a newbie like me. I feel completely clueless right now.

Thanks again.

Nick
 
Welcome to the club. Manual is pretty scarce after the fuse.
Plan mounting locations for boxes and antennas first. That drives where cables route. You will need antenna mount stiffener plates. Spruce sells them.

Download mounting drawings. The hole dimensions and screw sizes are shown for every box and panel.

If you're going with the AFS solution there's only a few boxes to find a home. They provide pretty much every cable and even the switch panel if so desired. They have excellent schematics available. I found it helpful to draw quite a few of my own. I created a spreadsheet for every circuit from load to source. It has color, wire gauge, connector, pin #, etc.

1. ACM. It's big and all the D-subs connect the same direction. Power and ground connect at the left side. 8 AWG. Plan access to it so conenctors have space and maintenance is easy. FWF you have ANLs and Shunt. Big cables or copper buss.

2, 3, 4. Dynon XPONDER, COM & ADSB. Plan for D-subs and coax.

5. Intercom is a panel mounted box.

6. GPS puck needs a clear view of the sky. Some fab a bracket for it so it lives just below the cowl firewall forward. Glare Shield works. Aft top deck if slider clears it.

7. ADAHRS has to be mounted away from ferrous materials. Vans sells a couple mounts for it.

8. AP Servos. Dynon provides the mounts and cables.

9. EMS. Small box with D-sub and two big cables. Most wires go FWF.

10. Two EFIS back up batteries

11. Nav. ACM has a connection. Depending on the device, it probably goes in the panel and will require some work.

12. Trim servos. Ray Allen wire is difficult to work. Buy 5 conductor 22AWG. Much easier.

13. Voltage regulator if B and C.

14. Forest Of Tabs. B and C sells a nice one with blade terminals inside and FWF. Keeps all the grounds at the same potential.

15. Lights. Manufacturer provides the documentation for wire. FlyLED is awesome. If used, buy the control board for the ACM.

Tons more. Happy to discuss on the phone.
 
I've been flying an RV-6 for 23 years, I am reasonably firm in my view on what works and what does not. I suspect your prediction will not be accurate!
Alrighty then, you do you. I'll tell you this tho, nobody has ever told me they regret putting in these hatches. Many people have told me they regret not doing so.
 
How could I forget that quadrant? OMG! I had to rebuild it.
I had the controls nicely spaced then after rigging, "whack". Great. No, you will probably never move the stick full forward and full left or right, but the DAR will and if it hits, he will note it.
As long as the control surfaces have hit the min throw specifications before hitting the panel, the dar has nothing to protest. Just tell him it is part of the control stop. Hitting the panel, in and of itself is-not necessarily poor workmanship if the control surfaces are reaching designed points. No one really needs max left aileron and max elevator down at the same time. Should be able to make a spectacular spiral dive with the minimum recommended throw angles.
 
Alrighty then, you do you. I'll tell you this tho, nobody has ever told me they regret putting in these hatches. Many people have told me they regret not doing so.
I have put those hatches into my 14 (which i have not yet finished building) and I already can see how a number of steps/operations have been considerably easier with those panels. Looking forward to maintaining the bird, a future of head-under-panel is not for me (when it will be so easy to avoid in a lot of cases). But that is the beauty of experimental aviation, my bird, my way.(y)
 
Not picking on Carl specifically, and those are all lovely panels, but while on the subject of layout...why do Vans builders persist with installing kneecap removers?

Why not move the engine controls up into the panel? And the vent works just fine tucked under the panel, completely out of sight.

Unknown.jpg

Like this:

IMG_20180623_193736979_HDR.jpg
 
Not picking on Carl specifically, and those are all lovely panels, but while on the subject of layout...why do Vans builders persist with installing kneecap removers?

Why not move the engine controls up into the panel? And the vent works just fine tucked under the panel, completely out of sight.

View attachment 99461

Like this:

View attachment 99464
In my case, it was because there wasn't room in the panel. The most obvious options were to make a panel that hangs down further or to just build it per plan.

I have a friend who wrecked his RV6, (flipped on landing) which if I recall correctly had a standard panel in it. When he crawled out, the only injury he had was where his shins had smacked the bottom of the panel hard enough that he had holes in both legs of his blue jeans and needed a few band aids. That was enough to make me decide that if you got that from a standard panel there's no way I was going to extend mine down another inch or so to accommodate switches or whatever.

I'm sure you know this already, and Carl may have had a reason for doing his this way, but the panel extension in the first picture is backward. At least on the RV7, that sub panel is supposed to be flipped 180 so that instead of being flush with the main panel it's recessed forward. I only mention it here because I've seen a bunch of people who for whatever reason build it like in that picture and it makes the knee capping potential worse than if it were built per print.
 
Last edited:
Not picking on Carl specifically, and those are all lovely panels, but while on the subject of layout...why do Vans builders persist with installing kneecap removers?

Why not move the engine controls up into the panel? And the vent works just fine tucked under the panel, completely out of
Dan,

The kneecap removers in this RV-6A were by owner design and seems to work for him.

While having the engine controls higher is a gain for leg clearance I find that having the controls in the per plans location on the RV-10 to be advantageous, both for gaining panel space and for use. I do however make a new control bracket narrower than the Van’s planes to gain more leg room. For this version the Engine Oil Cooler Air, Engine Alternator Air and both Cabin Heat Control cables are moved to the panel apron as you suggest. Two controls on the far left and far right of the panel apron.

The corollary here is to never extend the bottom of the panel.

On the cabin vent valve, I find the worst offender is the per plans location in the RV-14 (I broke one off with my knee when ferrying an RV-14A). In the RV-10 they work just fine in the per plans location. I would never put these on the panel in any RV as such real estate is far too valuable. I fully agree having the cabin air valve mounted under the panel is good (that is what I do in the RV-8).

Carl
 
In my case the original quadrant was spread out so at max fwd and right or left, it was possible to hook the stick on the controls. I made a new one and crowded them closer. It still taps the panel, but just barely.
Reason to keep the quad separate is panel removal. If they are in the panel, the controls have to be removed to pull the panel out of the airplane. If you're ok with working on it inside, by all means. Those big cables are a royal pain to remove. Especially the prop control.
 
Not picking on Carl specifically, and those are all lovely panels, but while on the subject of layout...why do Vans builders persist with installing kneecap removers?

Why not move the engine controls up into the panel? And the vent works just fine tucked under the panel, completely out of sight.

View attachment 99461

Like this:

View attachment 99464
A good idea. An even larger benefit is another 2" to get your head under the panel. Wish I had thought of that. Was much younger and more limber back when I built the 6.
 
Back
Top