MechaSteve
Well Known Member
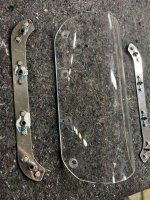
I managed to break the landing light lens during install, but probably not the way you would expect.
I installed the landing light components, and lens, almost all according to the instructions. One exception was that I had not tightened the side screws locking the aim of the landing light in place, prior to installing the lens. I elected to work in this order as I was installing the light during the original wing build, rather than a retrofit.
I finally tightened these two bolts and all looked well, but when I came back to it in 15-20 minutes cracks had formed and continued to develop as I examined the cause.
My assumption is that the lens was over constrained by the Lens mounting screws, and when the light mounting bolts were tightened, the structure flexed slightly.
Any tips on how to better ensure the fit of the lens to prevent a repeat when installing a replacement?
Any tips on how best to cut a new lens, given the mounting holes are now dimpled to accommodate the #6 flat head screws?
How much risk is there if I un-dimple the mounting holes with a flat squeezer, before re-dimpling? Has anyone had cracks form from this?