
Van's Air Force
You are using an out of date browser. It may not display this or other websites correctly.
You should upgrade or use an alternative browser.
You should upgrade or use an alternative browser.
Antisplataero oil separator, oil filter drain, Crankcase vaccum kit
- Thread starter CJT
- Start date

Auburntsts
Well Known Member
I have the antisplat oil separator and crankcase vacuum kit. They appear to work as advertised (at least no more oily belly) . The hardest part was installing the vacuum valve as that required removal of the muffler to get enough access to drill the hole into the pipe. Pretty straightforward nevertheless. Not aware of the oil filter drain.
CJT
Well Known Member
Answer from ChatGPT
No, you don’t necessarily need both the oil separator and the crankcase vacuum kit from Antisplataero installed on your RV-10. However, each system offers distinct benefits, and choosing between them (or using both) depends on your specific goals and how much you want to optimize your engine’s performance and cleanliness.
Here’s a breakdown of what each system does:
1. Oil Separator:
• The oil separator is designed to capture oil mist from the crankcase breather line, condense it, and return the oil to the engine. This reduces oil loss, prevents oil stains on the belly of the aircraft, and improves overall cleanliness.
• It’s beneficial if you want to minimize oil consumption and reduce the amount of oil being vented overboard.
2. Crankcase Vacuum Kit:
• The crankcase vacuum system reduces the pressure inside the engine’s crankcase by creating a slight vacuum. This improves engine efficiency by reducing the blow-by of combustion gases into the crankcase, lowering oil leaks, and reducing crankcase pressure that can cause oil to seep past seals.
• The vacuum system can also contribute to better ring sealing and may slightly improve engine performance and fuel efficiency.
Do You Need Both?
• If your primary goal is to reduce oil loss and keep the aircraft belly clean, the oil separator alone might be sufficient. It will capture oil that would otherwise be vented and return it to the engine.
• If you want to improve engine efficiency, reduce crankcase pressure, and minimize oil seepage, the crankcase vacuum kit might be more useful. This system helps reduce oil leaks and improves overall engine performance by reducing internal pressures.
• If you want to maximize the benefits, installing both systems can complement each other:
• The oil separator will catch any oil mist and return it to the engine.
• The vacuum system will help reduce crankcase pressure, which may also reduce the amount of oil mist being created in the first place.
Summary:
You don’t need both the oil separator and the crankcase vacuum kit, but they serve different purposes. If you only want to minimize oil consumption and venting, the oil separator might be enough. If you’re looking for performance gains through reduced crankcase pressure and fewer oil leaks, the vacuum kit could be more appropriate. Some RV-10 owners choose to install both systems for comprehensive benefits.
I have the whole kit and it seems to work as advertised. I do check the valve for coking at every oil change...
My experience, to the letter. I have the extra check valve, and remove coking at every oil change as well.I have the whole kit and it seems to work as advertised. I do check the valve for coking at every oil change...
Cheers,
Bob
I have a similar experience using just the crankcase vacuum kit. No oil at all on the belly in 200+ hours over 2+ years. I clean any coking (very little) at every oil change. That takes about 15 minutes. I change my oil every 25 hours (oil filter every other oil change). I think it’s a worthwhile mod.
Answer from ChatGPT
...
reducing the blow-by of combustion gases into the crankcase
Overall, ChatGPT's answer is in line with everything I've read today about these systems. ... Except that one part. As I understand it, "blow-by of combustion gases" would be from the combustion chamber to the case. So creating a vacuum in the case should increase the blow-by, not decrease it. No?
Possibly no, pulling a vacuum in the crankcase may help piston rings seal better. I say “may” because in drag race engines, they’ll use super low tension rings and the vacuum helps them seal, similar to gas ports or the L shaped dykes ring. Our aircraft engines don’t use low tension ring or thinner ring packs, so we really don’t gain all these HP benefits. I like my AS oil separator setup with the crankcase evacuating setup, no more annoying oil leaks!Overall, ChatGPT's answer is in line with everything I've read today about these systems. ... Except that one part. As I understand it, "blow-by of combustion gases" would be from the combustion chamber to the case. So creating a vacuum in the case should increase the blow-by, not decrease it. No?
I have the same and have found some minor coking at the last annual. Probably around 200 hrs since I installed the system.I have the whole kit and it seems to work as advertised. I do check the valve for coking at every oil change...
On another note- I have been considering an engine dehydrator from Red Baron Aviation, http://www.rbaviation.com/mojave/ but it calls for attaching an output hose from the dehydrator to the oil breather tube (dump line) which I don’t have since this line is mounted to the exhaust. Any thoughts?
I use the AntiSplat air/oil separator only on the RV-10s. I use the $100 separator from ACS on the RV- 8A and RV-8. None use crankcase vacuum and the oil from the separator is collected in a small can, not returned to the engine.
My thinking:
- While properly maintained the crankcase vacuum approach should be fine, but I consider the added stuff and added worry to not be worth it.
- Many will argue that returning the oil to the engine is fine. I however like the fact that at every oil change (or annual once oil use is known) I can check how much oil is blowing by. I consider this an early warning indicator. I collect perhaps 4-6 oz of oil in the can a year.
- I still direct the output of the separator to the top of an exhaust pipe. This provides another indicator if something is amiss;.
- This approach results in a clean belly - the principal objective.
Carl
Ditto. Keeps the belly clean, but I'd be hard pressed to cite any performance improvement. And it stopped the small amount of typical Lycoming oil seepage in various places.I have the whole kit and it seems to work as advertised. I do check the valve for coking at every oil change...
I also have the oil filter drain tool. With the additional effort - pounding it into the filter, attaching air pressure, taping over the hole - I found it not all that helpful. Went back to simply sticking my plastic cut-in-half 1 quart oil container under the filter to catch the draining oil.
but it calls for attaching an output hose from the dehydrator to the oil breather tube (dump line) which I don’t have since this line is mounted to the exhaust. Any thoughts?
The Red Baron dehydrator appears to be a closed-loop system, but it certainly isn't the only way to do it. I have a homemade dehydrator that is very similar (tupperware filled with dessicant beads, hygrometer, aquarium pump, tubing, rubber stopper). I use the oil filler neck as the inlet, and I don't connect a return line at all. Because of this, I have to recharge the beads much more often than I would with a closed-loop system. But not too bad.
I think getting an inlet-only dehydrator to play nice together depends largely on the behavior of the check valve they'd have us attach to the exhaust tube. In-flight, air is being pulled through that check valve by the action of the exhaust gases. But with an inlet-only dehydrator connected to the oil filter neck, we're on the upstream side trying to push air through that check valve. Same direction of air, but if it's not designed for that, maybe we'd trigger the 0.5 psi of the relief valve in that safety bypass? Just thinking out loud.
This may require a call to AntiSplatAero, to ask how many PSI it takes to push air through the check valve. If you call them, could you post here what they say?
This may also require a test of the dehydrator pressure. In theory, a dehydrator does not need much pressure at all. It can very slowly move the dry air through the crankcase and still accomplish its goal. I'm using one of the smallest and quietest aquarium pump I could find, but I really don't know it's max pressure. To determine this, I could use a long piece of tubing and make a manometer, and see if the aquarium pump can even reach 0.5 psi. If not, then we're all good. You could do the same test with the Red Baron system.
For a closed-loop dehydrator, I was thinking maybe adding another "tee". This way, in theory, the dehydrator is not increasing the pressure in the crankcase, and therefore no risk of popping that relief valve. I'd probably route the line over to the oil filler door so the dehydrator's inlet and return can be connected side-by-side. But it would need a cap, so when the dehydrator is disconnected, the system remains closed and the crankcase vacuum system functions as designed. I'm not sure I like this idea, though. The AntiSplatAero system is already adding more lines in a crowded engine compartment, and this would add yet another. I may just stick with my inlet-only dehydrator design.
Last edited:
Oh, forget that. What was I thinking? The answer is so much simpler: Get a larger rubber stopper and connect to the end of the exhaust tube. So the closed-loop dehydrator pushes air into the oil filter neck and pulls air from the exhaust tube where the vacuum check valve is installed.For a closed-loop dehydrator, I was thinking maybe adding another "tee". This way, in theory, the dehydrator is not increasing the pressure in the crankcase, and therefore no risk of popping that relief valve. I'd probably route the line over to the oil filler door so the dehydrator's inlet and return can be connected side-by-side. But it would need a cap, ...
I'm emailing them today. You've got me intrigued now.This may require a call to AntiSplatAero, to ask how many PSI it takes to push air through the check valve.
I was thinking that was the correct answer also. I looked at the crankcase vacuum kit installation instructions and it only deals with the oil separator/vacuum kit but not the vacuum kit alone. So, how do the instructions get modified and does anyone want to sell the crankcase vacuum kit they aren't using? I'm tired of chasing oil leaks.Oh, forget that. What was I thinking? The answer is so much simpler: Get a larger rubber stopper and connect to the end of the exhaust tube. So the closed-loop dehydrator pushes air into the oil filter neck and pulls air from the exhaust tube where the vacuum check valve is installed.
I'm emailing them today. You've got me intrigued now.
You may have a hard time trying to find an unused vacuum kit; I have not yet seen any unhappy customer.I was thinking that was the correct answer also. I looked at the crankcase vacuum kit installation instructions and it only deals with the oil separator/vacuum kit but not the vacuum kit alone. So, how do the instructions get modified and does anyone want to sell the crankcase vacuum kit they aren't using? I'm tired of chasing oil leaks.
")
Based on my reading on this forum, many people do install the vacuum kit alone. Even in the AircraftSpruce Q&A, they say an "You can install this product without a separator but is best with one. We cannot see a reason to not want one."
I'm also considering doing only the vacuum kit, for now, and maybe adding the separator later if needed. I may find rerouting my breather tube, to pull it as high as possible before it goes down to the check-valve, is enough to meet my goals, and maybe I don't need a separator at all. My goal is to reduce the oil leaking past the rings on my 47-yr-old engine; I'm not too concerned with a dirty belly yet.
Modify instructions? It's an experimental aircraft.
Just understand how the system works and run the tubes accordingly. ASA sells the tubing by the foot, so it shouldn't be too bad. Just make sure you get the right diameter tubing. Instructions say the air/oil separator outlet and the check valve inlet are both 3/4" OD. I believe the Lycoming 71140 fitting on the accessory case is also 3/4" OD. (Some people have the AN844-10D fitting instead, 5/8" OD, so maybe an extra barb-to-barb reducer)I have a new one in the box that I will never use.You may have a hard time trying to find an unused vacuum kit; I have not yet seen any unhappy customer.
Carl
1 qt every 100 hours? Wow. Even 1 qt every 25 hours is impressive, I'd say.+1 for the ASA crankcase vacuum system. Oil loss per 50 hours is now less than 1/2 quart, compared to 2 qt loss.
Clean belly, too!
 My engine burns (or "loses") 1 qt every 3 hours.
I spoke with Anti-splat yesterday and they claim there is almost no vacuum created by the venturi and the only purpose is to keep the belly clean. Has anyone applied a vacuum pump to the breather tube to create a true, measurable, reduction in crankcase pressure?
And yet, when I asked them that directly, they said there is almost no vacuum created by the Venturi effect.
Someone else can confirm, but I believe there are slight vacuum pulses - during the exhaust stroke, the exhaust gases escape the cylinder very quickly. This creates a high-speed pulse moving down the header tube. The low pressure behind the exhaust pulse creates a vacuum effect.
It’s just that the gauges we have access to would be unable to capture a reading with the engine pulses, even if there is a slight vacuum, which there should be.Someone else can confirm, but I believe there are slight vacuum pulses - during the exhaust stroke, the exhaust gases escape the cylinder very quickly. This creates a high-speed pulse moving down the header tube. The low pressure behind the exhaust pulse creates a vacuum effect.
I have been told that on race cars they actually put a vacuum pump on the crankcase ventilation. Has that ever been done, to anyone's knowledge, on a Lycoming engine?
I’d put another valve on the other exhaust and ‘T’ them to the check valve, before adding a pump. I don’t think there’s really a need to go there. Race cars are high rpm, whereas Lycomings are low rpm and looser tolerances.I have been told that on race cars they actually put a vacuum pump on the crankcase ventilation. Has that ever been done, to anyone's knowledge, on a Lycoming engine?
We have a Mojave System set up on an O-320 with the ASA vacuum system. A tee was installed in the line between the crankcase and oil separator. The port is plugged when not using the dehydrator. I have not done testing with the instrumentation for temp and humidity but appears to be working.I have the same and have found some minor coking at the last annual. Probably around 200 hrs since I installed the system.
On another note- I have been considering an engine dehydrator from Red Baron Aviation, http://www.rbaviation.com/mojave/ but it calls for attaching an output hose from the dehydrator to the oil breather tube (dump line) which I don’t have since this line is mounted to the exhaust. Any thoughts?
This is strange, as already mentioned, this feature is one thing they advertise. But experiential evidence: This was one of the features I installed their system for. I have a Lyc 390 which despite its only 500 hr since new is a typical Lyc that marks its territory, seeping just a bit at the front of the oil pan gasket and front lower case part line. Since the installation of the AntiSplat system, this has stopped completely - completely dry, so there must be something to the vacuum.And yet, when I asked them that directly, they said there is almost no vacuum created by the Venturi effect.
I also installed the safety relief valve as well, although periodic inspections have shown very little coking. One thing I am considering is upgrading the lines associated with the relief valve path to something that can sustain the heat of the exhaust that would end up going through the valve if the venturi valve did ever get stuck open. Might be a fire hazard if left with just the simple silicone hoses provide by AntiSplat.
This is strange, as already mentioned, this feature is one thing they advertise.
I also heard the same directly from them... that any vacuum benefit is not really the point of the system; that the point is a clean belly. Made no sense at all, given their public materials on the product. I wonder if there are differing opinions within their company.
I returned the one I bought (for now), until I can gather more opinions on this. I definitely don't want to put a hole in my exhaust for nothing. Also I realized that air/oil separator and the vacuum go together, and that pushed me beyond my "non-critical projects" budget.
Since the installation of the AntiSplat system, this has stopped completely - completely dry, so there must be something to the vacuum.
Thanks for this direct report. This is exactly what I'm hoping to hear (but from many others too) before I pull the trigger on this project.
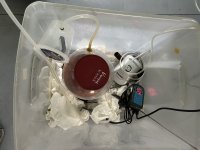
I have zero oil on the belly since installation but I do get what I’d call a moderate amount of coking.
This is the latest clean. Was about 38h. I usually change oil every 25-30 but this time went a little longer.
They mandate max 50h between cleans. I certainly wouldn’t push that. Some installs may need shorter intervals.

This is the latest clean. Was about 38h. I usually change oil every 25-30 but this time went a little longer.
They mandate max 50h between cleans. I certainly wouldn’t push that. Some installs may need shorter intervals.
^^^^^^^^I have the whole kit and it seems to work as advertised. I do check the valve for coking at every oil change...
What he said…
Richard,I have zero oil on the belly since installation but I do get what I’d call a moderate amount of coking.
This is the latest clean. Was about 38h. I usually change oil every 25-30 but this time went a little longer.
They mandate max 50h between cleans. I certainly wouldn’t push that. Some installs may need shorter intervals.
View attachment 77847
Is that what you get after only 38 hours since your last cleaning?
I ask because I never get close to that level of depositing. If anything, I get a little fine grey ash.
Yes. That’s correct.Richard,
Is that what you get after only 38 hours since your last cleaning?
I ask because I never get close to that level of depositing. If anything, I get a little fine grey ash.
It would be good to know what others see as well.
I guess it depends on how well the separator is working - temperatures etc. Nothing unusual about my install. As per ASA.
I have both Anri splat products. Connect clean air going into oil fill. Install a plug into each exhaust pipe with a ‘T’ connection line to the air pump. Now, you have a fairly closed system of recirculating dry air.I have the same and have found some minor coking at the last annual. Probably around 200 hrs since I installed the system.
On another note- I have been considering an engine dehydrator from Red Baron Aviation, http://www.rbaviation.com/mojave/ but it calls for attaching an output hose from the dehydrator to the oil breather tube (dump line) which I don’t have since this line is mounted to the exhaust. Any thoughts?
Attachments
I have a Lyc 390 with over 500 hours. As described by others, I had nagging oil leaks and an oily belly, even though I had an Antisplat separator installed. After installing the vacuum portion to the exhaust for the breather tube (and eliminating the separator), my belly oil reduced 95+%. My first inspection of the port for coking is upcoming, but I’m a happy camper.
Richard,Yes. That’s correct.
It would be good to know what others see as well.
I guess it depends on how well the separator is working - temperatures etc. Nothing unusual about my install. As per ASA.
Follow-up questions:
- Do you have the return line connected from the oil/air separator to the engine case?
- Do you usually run substantially rich of peak? (Not sure that would matter but I am curious.)
For reference:
- To be clear, I DO have the Anti-Splat separator, exhaust valve, and bypass valve installed (ie, the "works").
- I DO have the return line connected from the oil/air separator to the engine case?
- I do NOT run full rich other than for takeoff and landing. Otherwise, I run in accordance with Mike Busch's 'red box' brainology. (PS: That's a word).
Bottom line: I'd really like to know why you have such high deposits. Until you sort it out, I recommend you DO NOT skip a cleaning. If that bypass valve closes up with deposits, you run the risk of over-pressurizing the case. That is discussed in other VAF posts, and none of them are good.
Sounds like we are the same. Yes it’s plumbed back to the case and run almost exclusively LOP iaw Mikes red box / Deakins red fin.Richard,
Follow-up questions:
- Do you have the return line connected from the oil/air separator to the engine case?
- Do you usually run substantially rich of peak? (Not sure that would matter but I am curious.)
For reference:
- To be clear, I DO have the Anti-Splat separator, exhaust valve, and bypass valve installed (ie, the "works").
- I DO have the return line connected from the oil/air separator to the engine case?
- I do NOT run full rich other than for takeoff and landing. Otherwise, I run in accordance with Mike Busch's 'red box' brainology. (PS: That's a word).
Bottom line: I'd really like to know why you have such high deposits. Until you sort it out, I recommend you DO NOT skip a cleaning. If that bypass valve closes up with deposits, you run the risk of over-pressurizing the case. That is discussed in other VAF posts, and none of them are good.
This is by far the longest I’ve ever let it go. I usually change the oil every 25h and see significantly less deposits.
It’s quite possible that the rate of growth or obstruction increases once there’s something for them to grow on (plus the diameter getting smaller obv).
I don’t use a crazy amount of oil. One quart per oil change goes in usually. This one at 38h had 2 qts since last change.
One thing that has crossed my mind is that I could be over filling at each change.
Each change I drain, replace the filter and add 10qts.
I see 7 on the stick and then usually leave it until 6. Then add one.
Because it’s a CAI sump I know the stick is not spot on. I’ve been meaning to re calibrate it at some stage.
So maybe I’m throwing it overboard and overwhelming the separator.
I find that anywhere between 8-10 quarts is fine for my bird; it just isn’t using much oil…For the RV 10, unless you need some extra cooling with oil, 66% of 12 = 8 qts is all that you need. Add your 12.8 oz of Camguard if you use that additive and using Aeroshell 100W or something else compatible. I let it go below 7, then add a full qt vs topping off.
I get a little less than that in 50 hours, I clean it out on every oil change.I have zero oil on the belly since installation but I do get what I’d call a moderate amount of coking.
This is the latest clean. Was about 38h. I usually change oil every 25-30 but this time went a little longer.
They mandate max 50h between cleans. I certainly wouldn’t push that. Some installs may need shorter intervals.
View attachment 77847
I have the exhaust vac system only, no separator. I get no oil on my belly, and very little coking in the 25-30 hours between oil changes. RV6 / O-360. I change my Champion oil filter every other oil change and do an oil analysis. +7 qts, plus 12 oz Camgard at oil change. I don’t add any oil between oil changes, and I’m typically down a little over a qt from the original 7 qts.
I use a brass gun barrel cleaning brush from my old gun cleaning kit. I'm not sure which caliber: I just grabbed a brush that fits, but it's a loose fit so I can easily turn it inside the tube to scrub out the ash. I think .40 caliber works.
I haven't sprayed any solvent up in there because I only ever see light ash. However, knowing that some RV'rs have seen some oily deposits up in there, I believe the wire brush would still work but you'd probably need brake cleaner or something to wash the gunk out and clean the wire brush.
Richard Connell might elaborate.
I use a loose-fitting wire brush in a drill, takes a few seconds. I don't ever see any real hard deposits that don't come clean, it usually just knocks right out.What are you using to clean the evac 1 way valve- brakeclean?
sansoneservices
Well Known Member
I agree with Carl, I'm not comfortable returning the separated oil back to my precious crankcase. I would much rather toss that small quantity of oil and replace with newI use the AntiSplat air/oil separator only on the RV-10s. I use the $100 separator from ACS on the RV- 8A and RV-8. None use crankcase vacuum and the oil from the separator is collected in a small can, not returned to the engine.
My thinking:
- While properly maintained the crankcase vacuum approach should be fine, but I consider the added stuff and added worry to not be worth it.
- Many will argue that returning the oil to the engine is fine. I however like the fact that at every oil change (or annual once oil use is known) I can check how much oil is blowing by. I consider this an early warning indicator. I collect perhaps 4-6 oz of oil in the can a year.
- I still direct the output of the separator to the top of an exhaust pipe. This provides another indicator if something is amiss;.
- This approach results in a clean belly - the principal objective.
Carl
Same hereI use a loose-fitting wire brush in a drill, takes a few seconds. I don't ever see any real hard deposits that don't come clean, it usually just knocks right out.
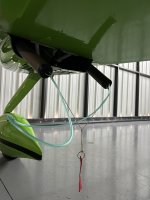
I finally got around to installing the Crankcase Vacuum on my RV-10. It took quite a bit of customization to make the kit work with a Vetterman exhaust. Details and parts list can be found here: https://www.strikhedonia.com/installing-the-antisplataero-crankcase-vacuum-kit-on-an-rv-10/
BoydBirchler
Well Known Member
I had a SkyDynamics 6 onto 1 exhaust that had a 3/8" stainless pipe situated in the center of the cluster, designed to give a negative pressure to the breather. I think it may have caused a slight increase in oil consumption, but there was never any oil seeping from the engine. The driest AEIO-540 I ever saw.
