

flyvans.com
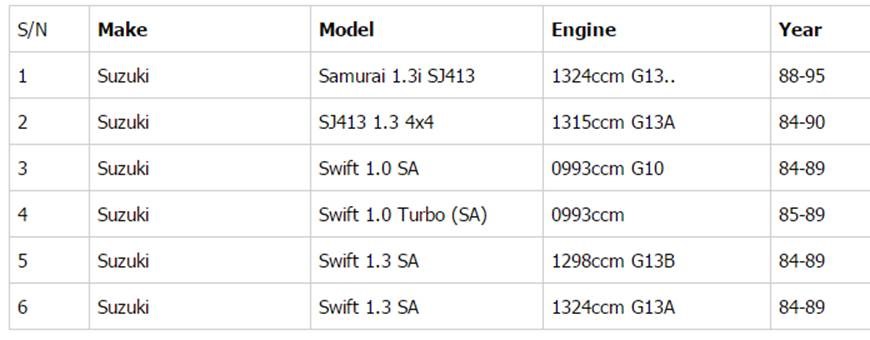
Well Known Member
here's the story of our first major electrical hiccup...
with some pictures to help understand and with the hopes to save someone else headaches at some point...
at exactly 300hrs, our alternator decided to quit...
"low voltage alert" courtesy of the vp-200 sounded, loadshed and divert to an airfield, which happened to be below the wing and i knew that some fellow RV'ers call home. after some initial troubleshooting, the plane was flown under minimum load and on battery for the 30min flight back home. weekend trip cancelled :-(
and of course, things like that tend to happen on friday afternoons at 5'o clock, when the "supply chain" is most dry :-(
next problem was finding out exactly what part (with what kind of mods) we were looking at, what possibly failed, and how to supply a replacement...
initial guess and indication was the regulator or the field wire (field not drawing amps)
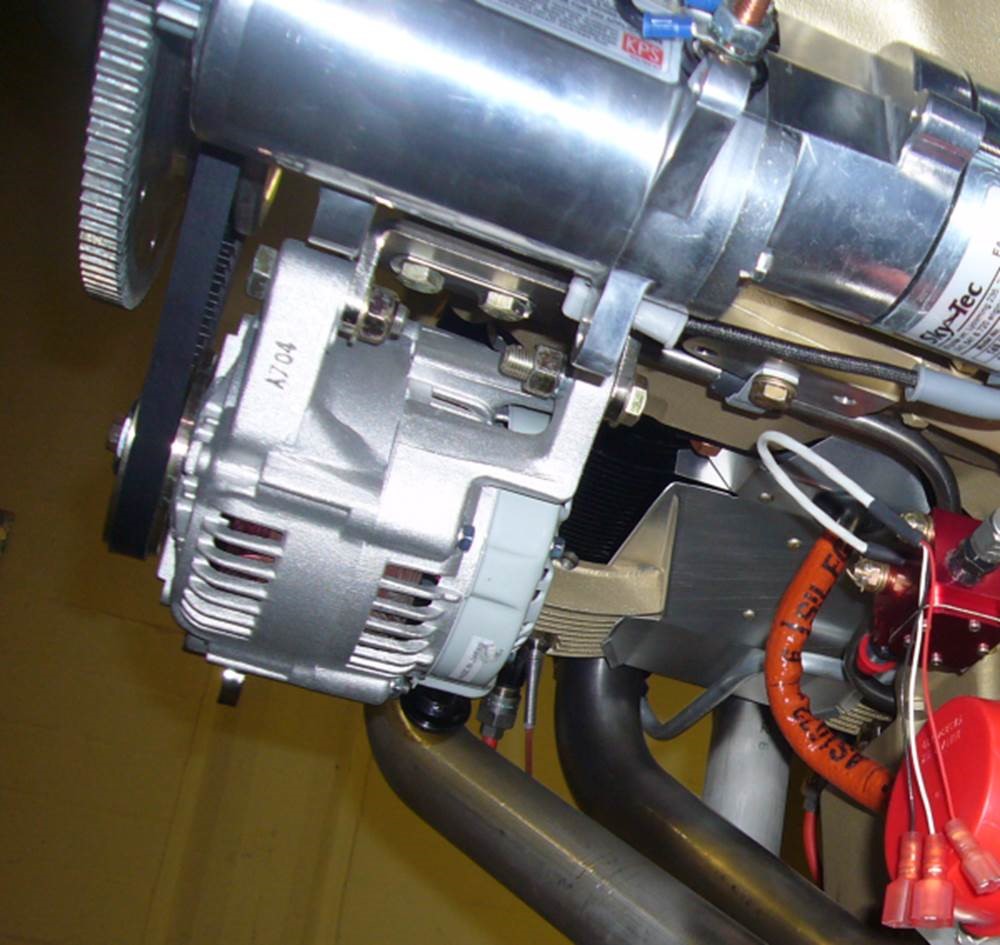
after some investigation, looking through documents that came with the engine from mattituck and photos taken during the construction, the alternator on our 2007ish-vintage mattituck tmx-io-360 turned out to be a (probably van's supplied or at least similar) nippon denso unit (refurbished).
Pictures taken during construction:
however, no exact part number/source declaration was found. matching pictures to pages in online auto parts catalogues and searching some threads on VAF did bring up possible candidates.
Didn't want to spend time to pull the cowl and alternator right away, but immediately started sourcing of a replacement. (and learnt a lot in the process)
and yes, we were already aware about the practically fundamental discussions of internally regulated vs externally regulated from the very start when ordering the engine and didn't want to revisit this/go there. (turned out later that it also didn't really matter in our case).
Since car parts suppliers don't work on saturdays/sundays around here, the chances of flying again on the same weekend looked grim. Plus the DW absolutely deserved some quality time ;-) Therefore the airplane and alternator were left untouched in the hangar for now.
Initial searches confirmed that it was going to be more expensive and likely a longer wait trying to source the alternator here or getting it rebuilt (switzerland) over importing it from somewhere in north america (which does not mean it weren't likely manufactured in the same factory in china these days)...
Next step was a facebook post looking for friends and buddies, who might already be in Canada/U.S. (or travel soon). The power of social media resulted in 3 offers for courier services within the next 2 weeks ;-)
The most immediate, was an airline buddy already on layover in vancouver with a return the following monday/tuesday.
How to find:
The alternator search produced a huge list of OEM parts and part numbers for the same alternator. And a lot of online catalogs only allowed for searching via Vehicle Information.
Enter the 1988 Suzuki Samurai (SJ) 1.3l ;-)
or some alternative cars:
Primary Part Number is
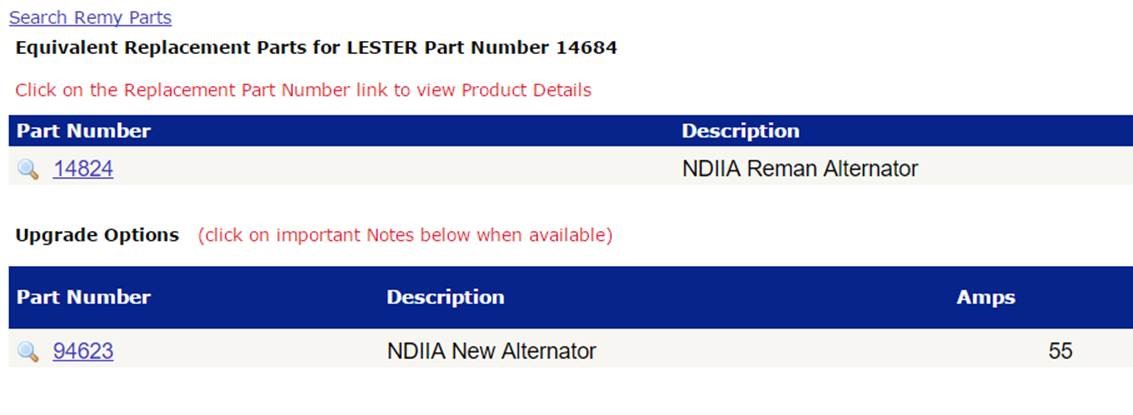
Lester 14684
equalling Dixie A8159 or A.C. Delco 334-1747
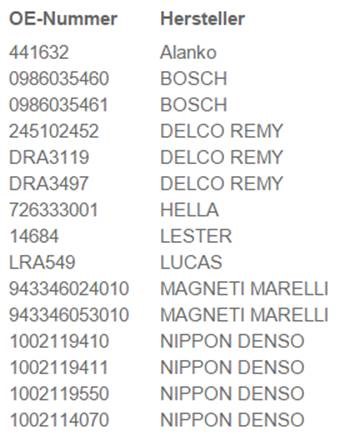
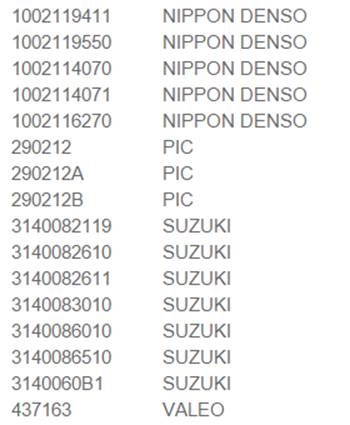
but those are only the numbers that had a further role to play, the list as found on different parts catalog sites is much longer, among that list some alternative numbers (not complete):
Nippon Denso 1002119410/1002119411, Bosch 0986035460/0986035461, Suzuki 31400-82611 etc..
some more possible alternative part numbers:
So, putting the timezone difference to advantage, immediately made a few phone calls to auto parts stores to find any of those alternators in stock/deliverable by monday afternoon vancouver time latest. long story short, an A.C. Delco new build 334-1747 found its way to us in switzerland on tuesday afternoon") It was a pleasure dealing with "Al" at Vancouver Auto parts, who even offered to deliver a few blocks down to the crew hotel of my buddy on monday afternoon and truly cared for a customer a few thousand miles away!
It was a pleasure dealing with "Al" at Vancouver Auto parts, who even offered to deliver a few blocks down to the crew hotel of my buddy on monday afternoon and truly cared for a customer a few thousand miles away!
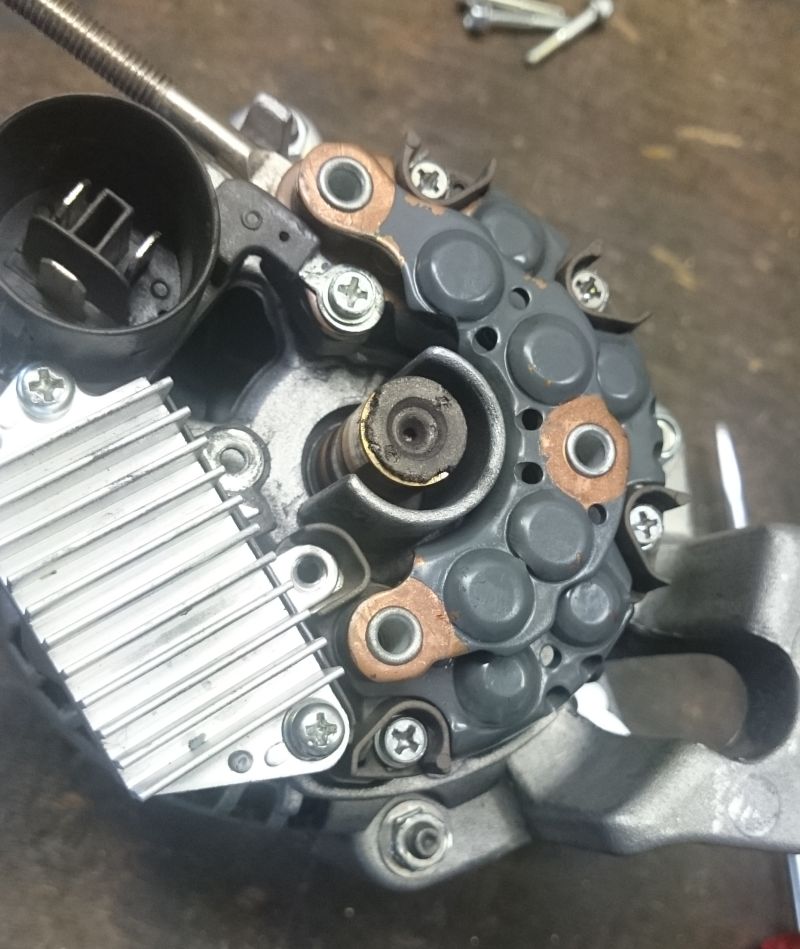
Now came the time to do the exchange/maintenance on the plane about a week after the failure.
Turns out, it wasn't going to be as straight-forward as expected, certainly not plug and play...
Mount:
The boss mount uses two AN bolts, whereas the car part by default has slightly smaller metric holes and threads. So we had to drill/ream out the two main mounting holes to fit with the existing mounts on the engine (must have been done on the supplied part as well, traces tell). 9.5mm (tight) or 9.6mm (minimal play) drill required. This went really easy on a drill press, especially being 2 persons (thank you dominik/swisseagle for all your help!)/4 hands available. one hole meant directly drilling the forged aluminum case, the other hole is a press-fit bushing made from some kind of steel, that had to be both enlarged to the same size as well as further pressed to be flush with just the other side of the alternator flange.
Pulley:
The pulley must also have been modified over the car part. (belt plane closer to the housing) We went to the next nearby car dealership and just walked into the workshop looking for help ;-) Swapping the pulley turned out really short/easy when having the proper tools available, wouldn't want to try that somewhere in the field, though. air impact wrench, 22mm nut/wrench for the big nut and some loctite fixed us up, 80-100Nm would be perfection. also, this "aviation" pulley itself is probably another conversion and was found spaced with several flat washers that need not be forgotten during the swap.
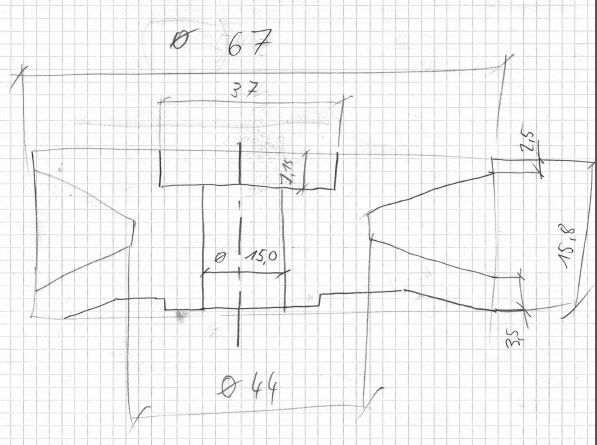
Now, does anyone recognize this pulley? Know a source for it? Including the right amount of spacers? The idea would be to build up a spare plug'n'play alternator. And we don't want to repair the old alternator due to the overall condition. We'll just source another new build eventually.
Sketch of the pulley (dimensions in mm):
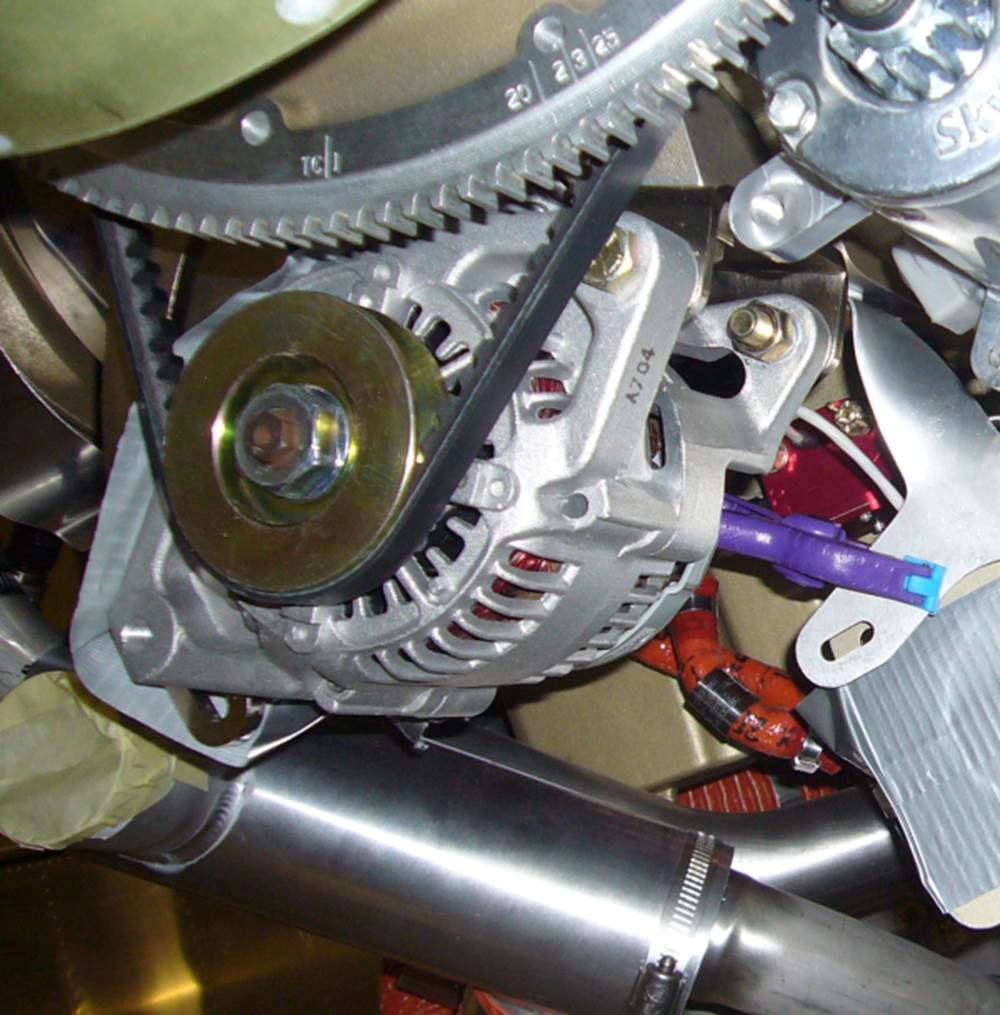
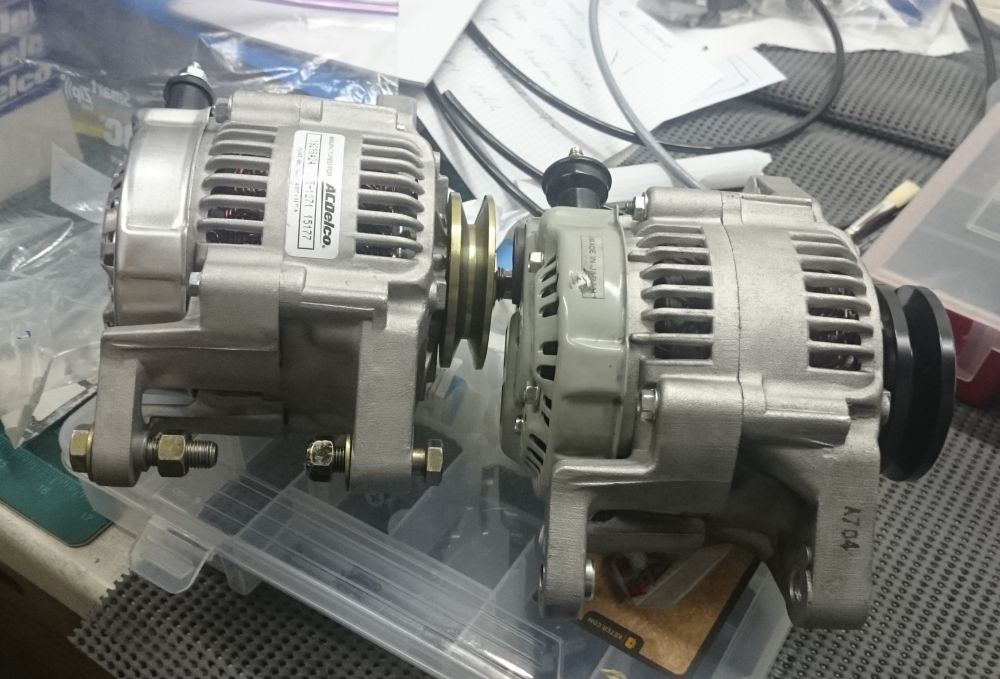
The old and the new alternator side by side (after mods):
Failure:
The failure turned out to be in the internal rotary joint/brush module that makes the two electrical contacts for the field on the rotor. One brush was quite unevenly worn and the little braided wire broken / with signs of arcing.
When taking the module apart, the second contact also immediately broke off, would have been only a matter of time.
The general internal condition did not look too good (damaged/aged rear side of the main shaft for example)
Failed brushes:
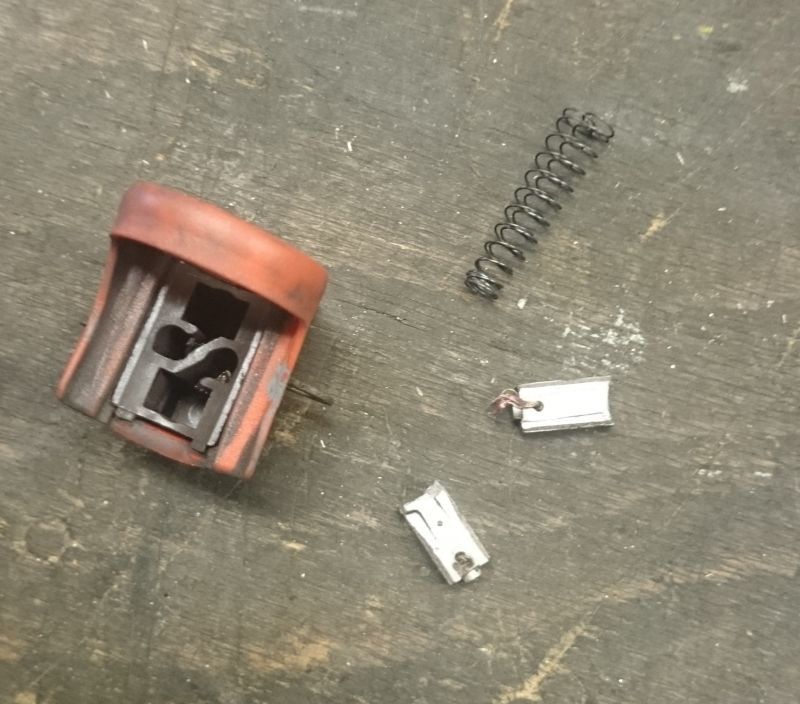
Rear shaft:
Thanks for any hints / ideas how to get a hold of an extra pulley!
regards,
Bernie
with some pictures to help understand and with the hopes to save someone else headaches at some point...
at exactly 300hrs, our alternator decided to quit...
"low voltage alert" courtesy of the vp-200 sounded, loadshed and divert to an airfield, which happened to be below the wing and i knew that some fellow RV'ers call home. after some initial troubleshooting, the plane was flown under minimum load and on battery for the 30min flight back home. weekend trip cancelled :-(
and of course, things like that tend to happen on friday afternoons at 5'o clock, when the "supply chain" is most dry :-(
next problem was finding out exactly what part (with what kind of mods) we were looking at, what possibly failed, and how to supply a replacement...
initial guess and indication was the regulator or the field wire (field not drawing amps)
after some investigation, looking through documents that came with the engine from mattituck and photos taken during the construction, the alternator on our 2007ish-vintage mattituck tmx-io-360 turned out to be a (probably van's supplied or at least similar) nippon denso unit (refurbished).
Pictures taken during construction:
however, no exact part number/source declaration was found. matching pictures to pages in online auto parts catalogues and searching some threads on VAF did bring up possible candidates.
Didn't want to spend time to pull the cowl and alternator right away, but immediately started sourcing of a replacement. (and learnt a lot in the process)
and yes, we were already aware about the practically fundamental discussions of internally regulated vs externally regulated from the very start when ordering the engine and didn't want to revisit this/go there. (turned out later that it also didn't really matter in our case).
Since car parts suppliers don't work on saturdays/sundays around here, the chances of flying again on the same weekend looked grim. Plus the DW absolutely deserved some quality time ;-) Therefore the airplane and alternator were left untouched in the hangar for now.
Initial searches confirmed that it was going to be more expensive and likely a longer wait trying to source the alternator here or getting it rebuilt (switzerland) over importing it from somewhere in north america (which does not mean it weren't likely manufactured in the same factory in china these days)...
Next step was a facebook post looking for friends and buddies, who might already be in Canada/U.S. (or travel soon). The power of social media resulted in 3 offers for courier services within the next 2 weeks ;-)
The most immediate, was an airline buddy already on layover in vancouver with a return the following monday/tuesday.
How to find:
The alternator search produced a huge list of OEM parts and part numbers for the same alternator. And a lot of online catalogs only allowed for searching via Vehicle Information.
Enter the 1988 Suzuki Samurai (SJ) 1.3l ;-)
or some alternative cars:
Primary Part Number is
Lester 14684
equalling Dixie A8159 or A.C. Delco 334-1747
but those are only the numbers that had a further role to play, the list as found on different parts catalog sites is much longer, among that list some alternative numbers (not complete):
Nippon Denso 1002119410/1002119411, Bosch 0986035460/0986035461, Suzuki 31400-82611 etc..
some more possible alternative part numbers:
So, putting the timezone difference to advantage, immediately made a few phone calls to auto parts stores to find any of those alternators in stock/deliverable by monday afternoon vancouver time latest. long story short, an A.C. Delco new build 334-1747 found its way to us in switzerland on tuesday afternoon
It was a pleasure dealing with "Al" at Vancouver Auto parts, who even offered to deliver a few blocks down to the crew hotel of my buddy on monday afternoon and truly cared for a customer a few thousand miles away!Now came the time to do the exchange/maintenance on the plane about a week after the failure.
Turns out, it wasn't going to be as straight-forward as expected, certainly not plug and play...
Mount:
The boss mount uses two AN bolts, whereas the car part by default has slightly smaller metric holes and threads. So we had to drill/ream out the two main mounting holes to fit with the existing mounts on the engine (must have been done on the supplied part as well, traces tell). 9.5mm (tight) or 9.6mm (minimal play) drill required. This went really easy on a drill press, especially being 2 persons (thank you dominik/swisseagle for all your help!)/4 hands available. one hole meant directly drilling the forged aluminum case, the other hole is a press-fit bushing made from some kind of steel, that had to be both enlarged to the same size as well as further pressed to be flush with just the other side of the alternator flange.
Pulley:
The pulley must also have been modified over the car part. (belt plane closer to the housing) We went to the next nearby car dealership and just walked into the workshop looking for help ;-) Swapping the pulley turned out really short/easy when having the proper tools available, wouldn't want to try that somewhere in the field, though. air impact wrench, 22mm nut/wrench for the big nut and some loctite fixed us up, 80-100Nm would be perfection. also, this "aviation" pulley itself is probably another conversion and was found spaced with several flat washers that need not be forgotten during the swap.
Now, does anyone recognize this pulley? Know a source for it? Including the right amount of spacers? The idea would be to build up a spare plug'n'play alternator. And we don't want to repair the old alternator due to the overall condition. We'll just source another new build eventually.
Sketch of the pulley (dimensions in mm):
The old and the new alternator side by side (after mods):
Failure:
The failure turned out to be in the internal rotary joint/brush module that makes the two electrical contacts for the field on the rotor. One brush was quite unevenly worn and the little braided wire broken / with signs of arcing.
When taking the module apart, the second contact also immediately broke off, would have been only a matter of time.
The general internal condition did not look too good (damaged/aged rear side of the main shaft for example)
Failed brushes:
Rear shaft:
Thanks for any hints / ideas how to get a hold of an extra pulley!
regards,
Bernie

