What's new
Van's Air Force

Don't miss anything! Register now for full access to the definitive RV support community.

Aileron pushrods

JDA_BTR

Well Known Member
In my projects a few things have really caused me a headache. Like the trim tabs. Like the big rivets in the aileron push tubes. Yes I could weld them. I didn’t. Finally figured out how to set those rivets cleanly after many fails. Like a video game where you die and die and finally the boss goes down!

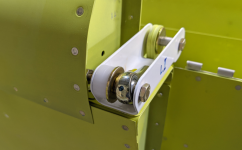
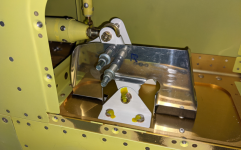
But I was amazed at how hard it was to bolt the aileron pushrod to the aileron with it mounted on its wing attach points already. Struggled massively, then decided to unbolt the aileron, attach the pushrod off the plane and then return the aileron to the wing with the pushrod on.

This worked great. I’m sure I’m not the first to fight this and problem solved. I wonder if anyone has a neat trick for attaching that pushrod with the aileron mounted. I could not do it.
 
I didn't build the airplane so I didn't do the original set up, but I had to remove the aileron pushrods a couple of years ago to address some rust on the bottom. I actually thought the bolt at the bellcrank would be the hardest part, but it really wasn't. Anyway, I documented what I did below. It probably doesn't address what you are really looking for, but maybe it has a tip that may be useful.

https://www.rushesroost.com/post/rv-8-and-the-rusty-push-pull-tube
 
I installed the pushrod's aft Heim F3414M rod end bearing on the A-407 inboard aileron bracket before installing the pushrod. This allows rotation of the aileron 180° trailing edge down, providing much easier access to tighten the through bolt, and easy checking of the aileron's Delrin stop bushing dimensions on assembly. Also makes it easier to check and adjust if necessary the required length of the A-711 inboard upper spacer.
 

Attachments

  • wings_2021-06-01_02.png
    wings_2021-06-01_02.png
    398.4 KB · Views: 91
This tip was really good. I disconnected the pushrod from the rod end on the aileron side. Flopped the aileron over. Easily installed the hardware. Flipped it back and reconnected to the rod end.

Thanks!!
 
Good idea but - be sure to reference your aileron rigging positions before you break loose that jam nut! Or endless re-rigging controls will follow.
 
You're right, but if this is the initial assembly then the rigging and jam nut tightening probably hasn't been done yet.

To make the rigging easier, instead of using the W-730 bellcrank jig I made up an equivalent bellcrank lock which can be installed and removed without undoing any torqued lock nuts. Used 0.032" sheet, bent and cut to sit in contact with the lower arm of the WD-421 aileron bellcrank, with bent flanges sitting on the spar web. Covered the bent flanges with gorilla tape to avoid direct metal-to-metal contact on spar. Match drilled the lock #40 two places, picking up the unused plate nut holes in the bellcrank lower arm. These are not shown on WD-421 aileron bellcrank in DWG 15A, and not mentioned in Section 7 of the construction manual, but I assume they are there for a roll autopilot installation. This jig provides positive locking against aileron travel in both directions, unlike W-730, without disturbing bolts, nuts, rod ends, or pushrods. It's very quick to install and remove.

It's also useful for storage, holding the aileron and both pushrods in position relative to the wing.
 

Attachments

  • wings_2021-06-16_01.png
    wings_2021-06-16_01.png
    526.5 KB · Views: 98
Back
Top