VF84Sluggo
Well Known Member
.
Last edited:


I would check the rigging first, per the manual.
Pull the wing tips
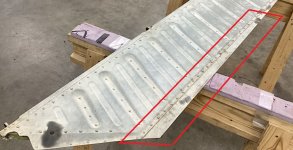
Use the end wing rib tooling holes to line up the aileron trailing edge (see plans for the tooling hole fixture (sheet 12A)),
Use the bellcrank fixture to check or set the pushrod lengths.
Once the ailerons are rigged, then you set the flaps to match the ailerons.
(and hope the wingtips line up with the ailerons!)
After that, if you still have a heavy wing, Van's has an article on the Vans website that tells how to check and correct. (for the pre-punched wings, you basically squeeze the light wing aileron TE (just a little!) as the aileron hinge brackets aren't builder drilled anymore.)
Good luck. I'm about to do this exercise with a fellow 8 owner with a heavy wing.
That is very very far from normal. I recommend a call to the factory and to find a good local RV-aware mechanic. I would fix the flaps before looking at the wing imbalance.Is this gap normal when the flaps are up? Any thoughts on adjustments for this right-roll tendency?
Yep - this is what Van’s says to do, however….The ailerons should be aligned using the tool holes drilled in the outer ribs. There is a drawing for this particular item.
On my RV8, after the ailerons are mounted and aligned, I fitted the flap and aligned it to the trailing edge of the aileron. Then the flap/fuse intersection plates are fitted and riveted to the fuselage. When the flaps are remounted after moving or reassembly, the flap/fuse intersection plates should serve as the alignment guide to ensure everything is back to where it was. This assumes all the parts are straight at the start.
Believe it or not you don’t have to fret about the wing tip alignment. The consensus is it doesn’t have much effect. It’s seems like it is almost always related to the aileron alignment to the wing. Check the aileron alignment to the wing tooling holes and the hinge alignment first.Next time I go to my hangar, I want to look at something I didn't pay close enough attention to yesterday:
I'm curious if the aileron/flap/wintip trailing edges are all lined up with the flaps adjusted in the current slightly extended position.
If so, just trying to visualize it sitting here, that'll mean that with the flap-up postion being readjusted, and the ailerons adjusted to align, then the aileron trailing edges might be slightly above the wingtip trailing edges. Hmmmm.....
 www.vansaircraft.com
I just finished this process. I had a pretty heavy left wing on my first flight - such as you let go of stick and you’ll be at 60 degrees of bank in few seconds. Vans, Carl and others are spot on and using bits from all these resources helped on my recently flown RV-8. For me, I made sure my flaps were up against the stops as Carl mentions. Then checked tooling holes with laser levels - all good. I didn’t do the fuel thing as vans suggests - it’s not necessary in my opinion.YIKES!
I think I’ll pass on bending the elevator.
Agree. The two elevator designs are not the same. The RV has the folded trailing edge. The Mooney has the flat sharp pinched rivet trailing edge and this is why it can be bent. Here is a picture of the Mooney elevator. Needless to say, don't try and bend the Vans elevator.YIKES!
I think I’ll pass on bending the elevator.
There may be a misunderstanding about this technique. The goal is for the aileron top and bottom surfaces to be flat from the leading to the trailing edge. Often they don't come out that way when built and are somewhat convex or less frequently concave along some or all of the aileron. Squeezing the trailing edge gently and carefully only where it's convex will flatten it out. Similarly, bonking the TE with a rubber mallet pushes out a concave surface. This is documented in Van's literature somewhere, and not long after my first flight I spent a couple of hours with Dick VanGrunsven's brother Jerry making sure mine are as flat as could be. The result for me was curing a heavy wing and very light stick forces overall.I would not squeeze the trailing edge. My last 8 that I owned had someone do that to it before I got it. Dramatically heavier roll forces than any other RV.