

If the RV has a structural heart, I believe that it is the Center Section bulkhead. In the RV-8, it is the 804, in the RV-3, the 303. This bulkhead ties the wings and fuselage together, transmitting the load of the engine, fuselage, and tail into the wing spar and creating a single flying entity. As a previous "quickbuilder", I never had to address the critical nature of creating the structural heart, but on the -3 project, we had to start with a few flat and flanged bits and pieces to produce a three-dimensional sculpture that fits the existing spar stubs of our quick build wings. Since a couple of these parts are match-drilled to the wing spars, the thought of ruining them makes the project a bit more daunting because of its criticality.
While Louise has been building up other bulkheads for the fuselage, I squirreled away the pieces of the F-303 and headed to my own bench to build it up. I was pleasantly surprised that the side pieces were pre-punched to fit the bottom center section pieces that had been matched to our QB wings - clecoing it all together didn't take long, and careful measurements at the "top" of the "U" showed that it was right on. This made the overall assembly go a lot quicker, as much of the potential for misalignment was taken out of the equation. It didn't take long to rivet the forward and aft bulkhead components into sub-assemblies. In order to join the front and back, I needed a spar simulator exactly 1.0625" thick (that's an inch and a sixteenth). That's the measurement called out in the plans, and I also measured the spars to confirm it - I could think of nothing worse than getting the fuselage all fab'ed up and then the spars not fitting in to the box.....
I wandered around Lowes for about an hour trying to find an easy way to build up a wooden blank just that thickness, and eventually bought a nice piece of ½" finish plywood there, and a piece of 1/16th thick plywood at a local Hobby shop. I sandwiched the model plywood in between two pieces of half inch and let the glue dry with considerable clamping force to keep the dimensions tight. Presto - a perfect thickness! I cut the laminated piece in to two 6"x18" pieces, plus two little blocks to set the spacing at the top of the bulkhead "U". I used the tooling holes at the top of the bulkhead, plus a couple of AN3 bolts, to establish perfect alignment between the front and back pieces of the spar. I then slid the false spars in between the bottom portion and marked the locations of the wing spar bolts. Pulling them back out, I drilled the holes slightly oversized, so that the bolts I used to join the two halves during assembly would not actually be bearing in the wood. Much to my delight, temporary bolts went in perfectly from front to back, proving both accurate drilling by Van's (Phlogiston I bet) and good assembly alignment. From there, it was not hard to match drill the side and bottom pieces to create the center section "box". I elected to install the -4 rivets that hold the sides and bottom on now, and will pre-drill for all the skin rivets before we start skinning the fuselage. If I discover later that I have a hole that needs to be open, I can always drill a rivet out.
The proof of the pudding came when I took the false spars out and slid the center section on to the real wing spars - and everything fit, with no play! Now THAT'S a great feeling!
I decided to go ahead and pre-drill the F-303G pieces (the channels that closeout out the forward and aft sections in the cockpit) now, rather than wait to drill them once the fuselage is completed - having done it later in the construction of the -8, I remembered how awkward it was getting the drill to certain spots. Having the pieces clecoed in place will also make the assembly that much more rigid when building the fuselage around it. At least, that's my theory for now!
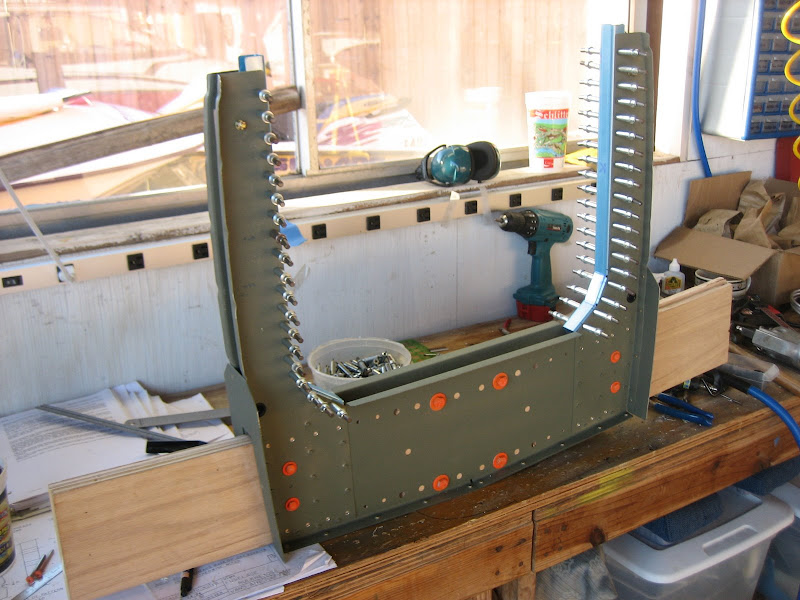
Here's the "finished" product, ready to go into the fuselage jig along with all the other bulkheads Louise is building. (Note the orange bolt heads - any time I use "hardware store" bolts in the shop, I give them a spritz of primer and fluorescent orange paint, just to make sure they don't hang around during final assembly. I don't allow "orange" in any finished part of my airplanes!)
Additional pictures at: http://picasaweb.google.com/Ironflight/2009_11_18RV3F303CenterSection#
While Louise has been building up other bulkheads for the fuselage, I squirreled away the pieces of the F-303 and headed to my own bench to build it up. I was pleasantly surprised that the side pieces were pre-punched to fit the bottom center section pieces that had been matched to our QB wings - clecoing it all together didn't take long, and careful measurements at the "top" of the "U" showed that it was right on. This made the overall assembly go a lot quicker, as much of the potential for misalignment was taken out of the equation. It didn't take long to rivet the forward and aft bulkhead components into sub-assemblies. In order to join the front and back, I needed a spar simulator exactly 1.0625" thick (that's an inch and a sixteenth). That's the measurement called out in the plans, and I also measured the spars to confirm it - I could think of nothing worse than getting the fuselage all fab'ed up and then the spars not fitting in to the box.....
I wandered around Lowes for about an hour trying to find an easy way to build up a wooden blank just that thickness, and eventually bought a nice piece of ½" finish plywood there, and a piece of 1/16th thick plywood at a local Hobby shop. I sandwiched the model plywood in between two pieces of half inch and let the glue dry with considerable clamping force to keep the dimensions tight. Presto - a perfect thickness! I cut the laminated piece in to two 6"x18" pieces, plus two little blocks to set the spacing at the top of the bulkhead "U". I used the tooling holes at the top of the bulkhead, plus a couple of AN3 bolts, to establish perfect alignment between the front and back pieces of the spar. I then slid the false spars in between the bottom portion and marked the locations of the wing spar bolts. Pulling them back out, I drilled the holes slightly oversized, so that the bolts I used to join the two halves during assembly would not actually be bearing in the wood. Much to my delight, temporary bolts went in perfectly from front to back, proving both accurate drilling by Van's (Phlogiston I bet) and good assembly alignment. From there, it was not hard to match drill the side and bottom pieces to create the center section "box". I elected to install the -4 rivets that hold the sides and bottom on now, and will pre-drill for all the skin rivets before we start skinning the fuselage. If I discover later that I have a hole that needs to be open, I can always drill a rivet out.
The proof of the pudding came when I took the false spars out and slid the center section on to the real wing spars - and everything fit, with no play! Now THAT'S a great feeling!
I decided to go ahead and pre-drill the F-303G pieces (the channels that closeout out the forward and aft sections in the cockpit) now, rather than wait to drill them once the fuselage is completed - having done it later in the construction of the -8, I remembered how awkward it was getting the drill to certain spots. Having the pieces clecoed in place will also make the assembly that much more rigid when building the fuselage around it. At least, that's my theory for now!
Here's the "finished" product, ready to go into the fuselage jig along with all the other bulkheads Louise is building. (Note the orange bolt heads - any time I use "hardware store" bolts in the shop, I give them a spritz of primer and fluorescent orange paint, just to make sure they don't hang around during final assembly. I don't allow "orange" in any finished part of my airplanes!)
Additional pictures at: http://picasaweb.google.com/Ironflight/2009_11_18RV3F303CenterSection#
Last edited:
")

