

Van's Air Force

The definitive Van's Aircraft support community! Buying, building or flying an RV? Join our exclusive family of mentors and enthusiasts!

Cylinder removal O-320-D3G

MarkCFI

Well Known Member
Patron
I have to inspect the piston pins and caps on my O-320.

I've read through the Lycoming documentation I can find but I'm still not sure of the hold down nuts removal AND re-installation sequence.

Is there a specific sequence that the nuts should be removed? And thence how they need to be re-installed?

thanks
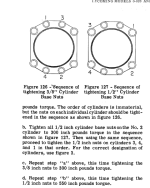
 
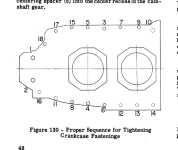
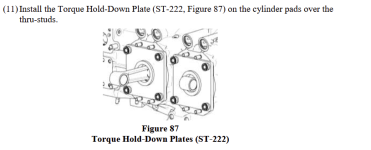
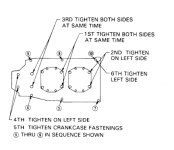
A lycoming overhaul manual will tell you the case torque sequence and the cylinder hold down nut sequence in the assembly section. If you are removing all of the cylinders, I would suggest that you get some cylinder base plate (old cylinders that have the top part cut off) and install that with a o-ring while you cylinder is off the case. As you remove, install the base plate and then re-torque the hold down nuts per the sequence. Do this on all cylinders when they are off and then reverse the sequence when installing the cylinders. In theory, this helps hold the case halves together while you cylinders are off and doesn't let the case move or rack. I don't know if there is any evidence of that happening but the ol timers I've learned from told me that and always had a set of cut off base plates to use when they pulled cylinders on engines.
 
This is what I couldn't find for some reason.

I'm doing a cylinder at a time so my plan is to remove Cylinder #1 first and then reinstall after checking the piston pins/caps. Then move through the firing order to the next cylinder one at a time.

I assume I should remove the hold down nuts in the reverse of the installation order?

Does that plan sound reasonable?
 
This is what I couldn't find for some reason.

I'm doing a cylinder at a time so my plan is to remove Cylinder #1 first and then reinstall after checking the piston pins/caps. Then move through the firing order to the next cylinder one at a time.

I assume I should remove the hold down nuts in the reverse of the installation order?

Does that plan sound reasonable
You can do the reverse order. I don't know if it will do anything. I think the installation order is to pull the through bolts and case studs evenly as well as seating the cylinder base evenly (similar to installing a car wheel on the hub in the star pattern).
I've done the wrist pin swap a few years ago, installing the heavier duty Superior pins. Lay everything out so all parts go back as pulled from the cylinder (rocker arms and pushrods). Install a NEW cylinder base o-ring. Take care to not rotate the cylinder when you pull it. Don't let the con rod fall and hit the inside case bore after you pull the wrist pin. And be very careful not to pull the piston out to far and let the rings spring out. You will need new lockplate for the pushrod tube hold down clip as wheel as new seals for the pushrod. I took the time to check my hydraulic plunger as you need to unload it anyways if you want to get the rocker arms back in. I cleaned them and then unloaded them and checked the pushrod clearances again. I did find two that needed a new pushrod lengths to get back to the factory recommended clearances .026-.080. I guess metals wear in a bit after you run the engine for 400-500 hours. After I got everything back together, I ran mineral oil again for about 10 hours to help reseat everything back in. It's probably ovrerkill but disturbing the rings, I figured it would help creat some high friction and rehone the rings back in. I did a compression check after 10 hours and was all in the 76-79 range. So it didn't hurt.
 
I've done the wrist pin swap a few years ago, installing the heavier duty Superior pins. Lay everything out so all parts go back as pulled from the cylinder (rocker arms and pushrods). Install a NEW cylinder base o-ring. Take care to not rotate the cylinder when you pull it. Don't let the con rod fall and hit the inside case bore after you pull the wrist pin. And be very careful not to pull the piston out to far and let the rings spring out.
Good guidance here. Don't think removal sequence makes any difference, but reverse order is fine. Always remove the cmall nuts first.

The highlighted needs extra caution, as there is VERY little margin between having enough room to get the pin out and having the oil ring pop out. Very easy for the novice to pop the ring out. Very doable, but very easy to go too far. Resist the urge to push it back in unless you have done this kind of thing before and assume you haven't. If the ring pops out, you should fully remove the piston and use a ring compressor to re install. This warrants further thought and research. don't want to risk breaking the oil ring by pushing it back in or get stuck unable to reinstall without compressor.
 
Last edited:
Back
Top