
Van's Air Force
You are using an out of date browser. It may not display this or other websites correctly.
You should upgrade or use an alternative browser.
You should upgrade or use an alternative browser.
8 landing gear bolt torque
- Thread starter DMFenster
- Start date

Let me put this another way.... ")
In the 8 there are 2 bolts inside the gear towers - I get those.
There are other bolts which hold the gear on that the torque specs are not specifically called out. Are these torqued to the specs consistent with the bolt diameter?
Thanks all,
Dave
In the 8 there are 2 bolts inside the gear towers - I get those.
There are other bolts which hold the gear on that the torque specs are not specifically called out. Are these torqued to the specs consistent with the bolt diameter?
Thanks all,
Dave
AAflyer
Well Known Member
Gear nuts with epoxied wrench-ends?
Can anyone speak from experience about how they torqued these bolts if they modified the nuts with epoxied-on wrench ends?
For those scratching their heads, a little explanation?.I read and followed a post that showed how some guys cut off the end of a wrench, glue it to the nut, and install inside the gear tower. This, purportedly allows you to easily re-torque these PITA nuts from the bolt-head side, instead of spelunking into the crowded gear towers, where the nut with the glued-on wrench end, which still has a small "lug", remains jammed in place. Of course this will invalidate the specified torque value.
My question: how do you recalculate a proper torque value? TLAR? A certain percentage above what's specified? Should you lube these close tolerance bolts so they turn easier?
I'm almost ready to turn my fuselage upright to install gear, and have been wondering about this technique.
Thanks, guys.
cjhammes
Well Known Member
This does not answer your question, but possibly a simpler solution. See post #6.
http://www.vansairforce.com/community/showthread.php?t=80679&highlight=bolt
http://www.vansairforce.com/community/showthread.php?t=80679&highlight=bolt

Can anyone speak from experience about how they torqued these bolts if they modified the nuts with epoxied-on wrench ends?
For those scratching their heads, a little explanation?.I read and followed a post that showed how some guys cut off the end of a wrench, glue it to the nut, and install inside the gear tower. This, purportedly allows you to easily re-torque these PITA nuts from the bolt-head side, instead of spelunking into the crowded gear towers, where the nut with the glued-on wrench end, which still has a small "lug", remains jammed in place. Of course this will invalidate the specified torque value.
My question: how do you recalculate a proper torque value? TLAR? A certain percentage above what's specified? Should you lube these close tolerance bolts so they turn easier?
I'm almost ready to turn my fuselage upright to install gear, and have been wondering about this technique.
Thanks, guys.
What I did was measure the torque required to turn the bolt before it got tight. This presumably is a measure of the friction torque that is required to turn the bolt. I added that torque to the torque specification. Assuming the added friction under the head of the bolt to turn it when it is tight is about the same as the friction to turn a nut, this should be about right. The wild card is if the bolt turning friction changes when the bolt is tight, because of parts alignment. So, if anything, my technique is still a bit on the low side, but not off by as much as just using the torque spec without correction.
How I did it
Bought 2 1/4" drive 9/16" sockets. Then ground them down every-which-way-but Sunday. Made them shorter and narrower. The I mangled my hand into the gear tower and got the sockets on each nut. Then I fed a long extension with a universal down onto each socket through one of the lightening holes. Put a 1/4" drive on each extension and my buddy torqued down from the outside while I held both drives. It would be a pain for the initial torque to try to switch the socket back and forth because they are torqued in 5 in-lb increments. Worked out fine.
Bought 2 1/4" drive 9/16" sockets. Then ground them down every-which-way-but Sunday. Made them shorter and narrower. The I mangled my hand into the gear tower and got the sockets on each nut. Then I fed a long extension with a universal down onto each socket through one of the lightening holes. Put a 1/4" drive on each extension and my buddy torqued down from the outside while I held both drives. It would be a pain for the initial torque to try to switch the socket back and forth because they are torqued in 5 in-lb increments. Worked out fine.
AAflyer
Well Known Member
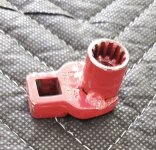
Flash light, mirror, Two wobble heads and two extensions, and a 7/16 twelve point socket... With two people I can retorque the gear tower bolts in < 2 minutes.
Mmmm?Mine are 9/16th. This might be why it's easier for you. (?)
Upon further review?I popped the nuts out of the sawed-off wrench ends, and installed per plans. I did have to unscrew a small bolt in the aft, left section of the gear tower in order to get a socket on the big nut located there.
Now?I need to find a monster torque-wrench so I can 'set' the PITA nuts. I want to do those first, because if the gap is too small on the outer bracket, I have to remove EVERYTHING. For this reason, I will tighten, but not torque, all the other nuts, initially.
BTW, the HUGE, single bolt on the inside bracket calls for 450-500 in-lbs, according to my book. Can anyone confirm this big number, please?

Re-torque Tecnique?
I am at my condition inspection. In retorquing the prop, you loosen everyone and then step-wise re-torque to spec (fixed pitch composite). With gear bolts do you loosen first? Seems like that would call for new lock nuts. Am I correct that it is proper to put on the torque wrench and check that is tight enough without loosing to make sure it's not too tight?
Thanks.
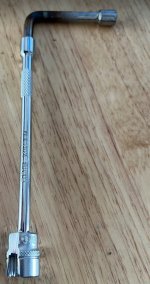
Reopening this thread. For my purchased Rv8, I don't have the luxury of installing the clever clips inside the gear towers during construction, and I think trying to replace the bolts now seems like a huge job. After trying various spanner modifications, I managed to fabricate the following tool that worked. The problem is that there are protruding bolts that prevents use of a normal socket. The slot in the socket works great. The protruding bolts end up helping as they fit into the slot and stop the socket from turning. Next year I will fabricate the double socket as shown.
Attachments
Great idea on the tool! I hope you have replaced the bolts and nuts as discussed in a previous thread by scsmith. I have replaced the nuts and bolts in 2 flying RV8's. It is not fun but doable. On one I was able to put the bolts in top down with the clips which makes re torquing a one man job, but the other had to be bolt up. It did require removing a couple of the small weldment bolts but not a big deal.
A couple of questions if you don't mind...Great idea on the tool! I hope you have replaced the bolts and nuts as discussed in a previous thread by scsmith. I have replaced the nuts and bolts in 2 flying RV8's. It is not fun but doable. On one I was able to put the bolts in top down with the clips which makes re torquing a one man job, but the other had to be bolt up. It did require removing a couple of the small weldment bolts but not a big deal.
How did you go about replacing the bolts - did you have to jack the aircraft or just replace one bolt at a time?
Did they come out easily or need some persuation?
Did you also replace the inboard bolts as well.
What prevented you from installing bolts top down in your second 8?
Thanks
Both done one bolt at a time sitting on the gear.A couple of questions if you don't mind...
How did you go about replacing the bolts - did you have to jack the aircraft or just replace one bolt at a time?
Did they come out easily or need some persuation?
Did you also replace the inboard bolts as well.
What prevented you from installing bolts top down in your second 8?
Thanks
All bolts came out ok with a little tapping to start.
Only replaced the outboard bolts.
The replacement bolts are a little longer than the originals. Couldn't get get them in from the top on the one due to curve of the side skin and where the holes were drilled. It was just a little too tight. The other plane just fit top down. Mine was done when first installing the gear and the bolts fit ok.
Hope that helps.
Thanks,Both done one bolt at a time sitting on the gear.
All bolts came out ok with a little tapping to start.
Only replaced the outboard bolts.
The replacement bolts are a little longer than the originals. Couldn't get get them in from the top on the one due to curve of the side skin and where the holes were drilled. It was just a little too tight. The other plane just fit top down. Mine was done when first installing the gear and the bolts fit ok.
Hope that helps.
Probable stupid question.. why are the new bolts longer? Is that because of the upgraded nuts? Will have to think of replacing the bolts. I am too big to come anywhere close to working in those gear towers, so have to rely on thin friends.
Will need to source some of those clips and get them to Australia as well.
Bruce Brielmaier <[email protected]> |
513.703.1287
Bruce makes the clips and is where I ordered them. He seems a little slow with responses but I did eventually receive them. The cost at the time was $45 US plus shipping. Not sure about now.
The bolts have the same grip but longer thread to accommodate the larger nut. The two that I did had the stock gear tower openings which made it very tight for working, even for small me. I did the gear tower mod on my 8 which makes it a much easier job.
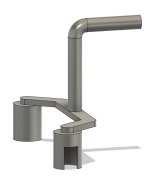
Here is the tool my buddy welded up for me. A crow’s foot and a socket to fit the nuts inside the tower. I’m using Grove landing gear and their hardware, so perhaps my bolt nuts are different from others.
The socket length solves the problem of the nut being close to the steel plate. The crows foot solves the problem of getting a straight shot to the socket.
For new builds DO NOT forget to do the gear bolt retorque at the 10 hour point or so, and then at six months and then annually. The first retorque on my plane was much needed as it started to dart right on landings.
Carl
Attachments
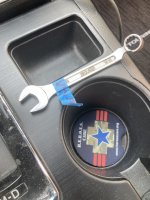
Thanks,This worked pretty well- get a small 7/16” box end wrench and grind down the box end till it fits over the nuts. Works well, the hardest parts is turning yourself into a pretzel to get your hand in the right spot inside the gear tower.
I tried grinding down a box end till there was almost nothing left and still could not get it to work.
The ground down socket seemed to work better for me.
My main problem now is removing the 20 screws on each side for the gear tower cover. This takes longer than actually doing the torque.
