Van's Air Force

The definitive Van's Aircraft support community! Buying, building or flying an RV? Join our exclusive family of mentors and enthusiasts!

Fuel Tank Rib to Skin Rivet Feedback

rthur

Member
Patron
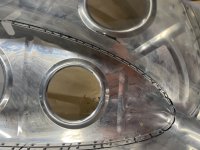
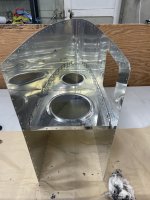
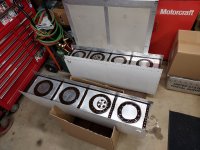
I've been putting off riveting the fuel tank ribs in, something about all the goop is scary. I have a spare leading edge rib and a piece of skin, so I practiced riveting it all together with proseal.

I did what Van's fuel tank construction video suggests: started at the bottom leading rivet, worked my way back, flipped it, and did the top leading rivet to the back. I used a piece of paper to scoop excess proseal before inserting a rivet.

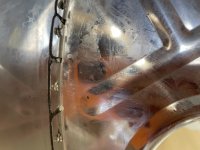
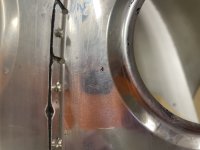
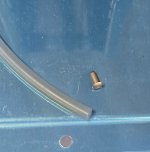
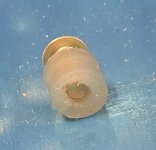
The results are ... meh. Some rivets are a little over / under set, but worst of all a few toppled. The hardest ones seem to be ones on the leading edge curve.

What am I doing wrong? Holding the bucking bar crooked?

Do I just drill them out, set a new one, and then encapsulate the shop head in proseal? Or should I set them with a little proseal on the shank?

Any tips for holding the bucking bar for the most leading edge rivets? I've been using the side of a small tungsten bar, with my thumb and middle finger on either side against the skin in the hopes of keeping it level. But I can barely reach them and rivet gun on the other side at the same time!

Needless to say, I'm going to drill all these out and keep practicing before I start on the real tanks. Really appreciate any tips - thank you!
 

Attachments

  • IMG_3921.jpg
    IMG_3921.jpg
    2.4 MB · Views: 91
  • IMG_3915.jpg
    IMG_3915.jpg
    3.3 MB · Views: 84
  • IMG_3914.jpg
    IMG_3914.jpg
    3 MB · Views: 73
  • IMG_3912.jpg
    IMG_3912.jpg
    2.7 MB · Views: 70
  • IMG_3909.jpg
    IMG_3909.jpg
    2.6 MB · Views: 91
I just finished building the extended range fuel tanks that I'm gonna retrofit into my RV 10. I know what you're going through. Those rivets on the leading edge. Top surface are hard to get to with both hands to hold both bucking bar and a rivet gun I suggest you find a buddy that knows how to rivet. I clecoed all of the holes in the ribs and only removed two Cleco's at a time as I was riveting. I use the bucking bar standing on end rather than on its side like you have done. I found it sometimes you need to use a small pic to get the holes lined up before you insert the rivet. I also use masking tape on either side of each rib to keep the prose mess down to a minimum.
 
You can drive them down as is, but I don't see any I'd worry a whole lot about. What I would do, before closing the tanks is topcoat with "A" sealant over all the bucktails and flange as well as the radius on the opposite side. Not everyone does this, nor do plans require it...but it gives an extra layer of comfort, and resistance to leaks. I dont have a sample pic of inside, but see the tank I repaired and how I seal over all the rivets and seams.
 

Attachments

  • Sealed baffle covers.jpg
    Sealed baffle covers.jpg
    1.7 MB · Views: 37
Those rivets can be tough to drive, especially near the nose area of the ribs. It’s further complicated with everything covered in Proseal. I don’t think they look terrible. The Proseal supposedly creates a significant bond as well and the rivets are just along for the ride. You can get a partner, but if you can practice some more, I think you’ll be fine. I use my thumb and pointer finger to gauge the end of the bucking bar against the skin/flange. Once you develop that feel, it gets easier.
 
I take silicone fuel tubing that has the same internal diameter as the rivet shank. Cut it to the length needed Slide it over the rivet, this helps push the skin together and keep the rivet straight.
 

Attachments

  • 20260516_160250.jpg
    20260516_160250.jpg
    321.3 KB · Views: 10
  • 20260516_160221.jpg
    20260516_160221.jpg
    211.8 KB · Views: 11
I take silicone fuel tubing that has the same internal diameter as the rivet shank. Cut it to the length needed Slide it over the rivet, this helps push the skin together and keep the rivet straight.
I like this idea. I’ll have to give it a try. I have typically used an appropriate sized O-ring. Probably six of one, half a dozen the other.
 
Thanks for everyone's input! It's reassuring to know I'm not the only one struggling with those first few leading edge rivets, motivated me enough to get all the ribs riveted in the right tank over the weekend! It went a lot better than I expected, I only have one rivet I'm not happy with. Going to drill it out and get someone to help me set it.

I found it sometimes you need to use a small pic to get the holes lined up before you insert the rivet.
I'd forgotten how well this works - Scott McDaniels does it a bunch in the Fuel Tank Tips and Tricks video. Thank you!

You can drive them down as is, but I don't see any I'd worry a whole lot about. What I would do, before closing the tanks is topcoat with "A" sealant over all the bucktails and flange as well as the radius on the opposite side. Not everyone does this, nor do plans require it...but it gives an extra layer of comfort, and resistance to leaks. I dont have a sample pic of inside, but see the tank I repaired and how I seal over all the rivets and seams.
Thanks for the picture! Scott also suggests this in the video, it definitely seems like a good idea.
 
Back
Top