

Bleeding brakes can be a challenging and messy job; however, I have been using a system for years that works so well it's almost hard to believe. I first saw this method being used by Jay Pratt, and I shamelessly made my own version.
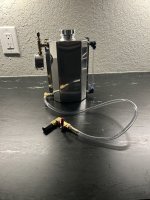
My older version had a bigger and ungainly tank, so I decided to make a new one that was a little smaller and easier to use. This one incorporates a larger fill opening, a level sight gauge and smaller tubing. I plan to add a backboard with a handle at the top and a base at the bottom for it to set on.
To use it, fill it about 1/3 to 1/2 full with fluid and use the Schrader valve to put in 15 PSI.
Bleed the air out of the tubing til all the bubbles are gone.
Hook up the Cleveland Bleeder Adapter.
Loosen the bleeder fitting and open the valve.
It typically takes only a few seconds to bleed a brake line.
If working alone, I put a barb fitting with some vinyl tubing in the breather hole of the reservoir so I can see if I am over filling. After a few uses you will get used to how it works and rarely over fill.
I personally like the Cleveland Brake Adapter but you could also attach some vinyl tubing to the valve and connect that to the bleeder fitting. That fitting is available from Spruce.
All the other parts came from Amazon. Total cost for everything is about $100.
I'm not sure if I will retain the sight gauge that came with the tank, but I have tested it to 25 PSI with no problems. Since I only use 15 PSI to bleed brakes this should work out fine. If not, all I need is two plugs to plug the bungs.
Anyway, this is the best, easiest and fastest way to bleed brakes I have come across.
Hopefully this helps someone looking for a new tool project.
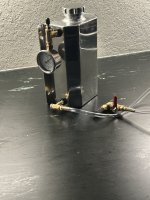
Made a few changes, moved pick up to bottom of tank, added a foot and handle.
My older version had a bigger and ungainly tank, so I decided to make a new one that was a little smaller and easier to use. This one incorporates a larger fill opening, a level sight gauge and smaller tubing. I plan to add a backboard with a handle at the top and a base at the bottom for it to set on.
To use it, fill it about 1/3 to 1/2 full with fluid and use the Schrader valve to put in 15 PSI.
Bleed the air out of the tubing til all the bubbles are gone.
Hook up the Cleveland Bleeder Adapter.
Loosen the bleeder fitting and open the valve.
It typically takes only a few seconds to bleed a brake line.
If working alone, I put a barb fitting with some vinyl tubing in the breather hole of the reservoir so I can see if I am over filling. After a few uses you will get used to how it works and rarely over fill.
I personally like the Cleveland Brake Adapter but you could also attach some vinyl tubing to the valve and connect that to the bleeder fitting. That fitting is available from Spruce.
All the other parts came from Amazon. Total cost for everything is about $100.
I'm not sure if I will retain the sight gauge that came with the tank, but I have tested it to 25 PSI with no problems. Since I only use 15 PSI to bleed brakes this should work out fine. If not, all I need is two plugs to plug the bungs.
Anyway, this is the best, easiest and fastest way to bleed brakes I have come across.
Hopefully this helps someone looking for a new tool project.
Made a few changes, moved pick up to bottom of tank, added a foot and handle.
Attachments


Last edited:


")


