Van's Air Force

The definitive Van's Aircraft support community! Buying, building or flying an RV? Join our exclusive family of mentors and enthusiasts!

Serious inspection after 5 years and 500 hours on the hardest working RV-14 in the fleet!?

Status
Not open for further replies.
And that is why the OP is asking the question and seems to reinforce he might not have the "hardest working RV-14 in the fleet" but seems to have the highest number of G load hours in the fleet and looking for best practice how to evaluate wear for critical components, worthy endeavor!

Seems a great question before going to a design dedicated aero platform.
Thanks! 👊
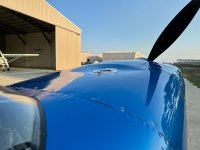
It has admittedly been a bit of a roller coaster here in terms of where all these replies have gone - basically the whole spectrum from "you're not doing anything special and the airplane doesn't need anything other than a normal condition inspection"... to ..."you're on your own as you're abusing the airframe pushing it beyond what it is designed for".
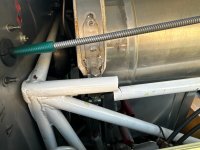
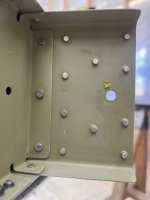
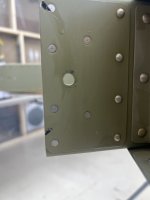
So, yeah, I think the conservative plan to do an overly thorough inspection this winter is a good one, and I'll report back with how it goes for those that are interested.
I will also share it publicly, and despite any implications that a "utube inspection" is some how going to mean it is not real / offer value to the community; rest assured, I'll transparently disclose what / if any issues are found, and how we address them.
 
Thanks for the detailed analysis. 👍
I think it is important to differentiate between gentleman's aerobatics and competition flying.

And asymmetric or rolling g for which these platforms don’t have separate numbers. Believe someone mentioned 5.5 bottom of a barrel roll, which is a lot for a barrel roll, but that is asymmetric meaning stress is greater than 5.5.
 
And asymmetric or rolling g for which these platforms don’t have separate numbers. Believe someone mentioned 5.5 bottom of a barrel roll, which is a lot for a barrel roll, but that is asymmetric meaning stress is greater than 5.5.
Interesting - maybe this part of the reason barrel rolls are not a figure you'll see in competitive sequences - I was told it is because they are hard to judge.
Regardless, yes, barrel rolls are one of my favourite low G (and entirely positive) figures to do with passengers, but when competing, I'm never yanking and banking at the same time. 👍
 
when competing, I'm never yanking and banking at the same time.

Not a fan of “yank and bank” as an expression, even if done sequentially… goes against “fast is slow, slow is smooth, smooth is fast” and this is from platforms in even more dynamic environments. ‘Relative aerobatics’ as opposed to precision aerobatics if you will.
 
Not a fan of “yank and bank” as an expression, even if done sequentially… goes against “fast is slow, slow is smooth, smooth is fast” and this is from platforms in even more dynamic environments. ‘Relative aerobatics’ as opposed to precision aerobatics if you will.
I'm not a fan of high G loadings for aerobatics, really - in these aircraft they scrub off way too much energy. A decent Sportsman routine in an RV shouldn't need more than 3.5-4gs, at most, anyway.

And if you're participating in a "relative" contest, something I like to conceptually refer to as "Combat Sportsman", running out of energy is not a winning strategy ;).
 
Believe someone mentioned 5.5 bottom of a barrel roll, which is a lot for a barrel roll, but that is asymmetric meaning stress is greater than 5.5.
If you can safely perform a barrel roll on a Boeing 707, you can probably do it on RV14
 

Attachments

  • 5aedc13c-3af2-11e5-917e-8590c54c670f.jpg.webp
    5aedc13c-3af2-11e5-917e-8590c54c670f.jpg.webp
    117.2 KB · Views: 81
I would say that any structural deformation would show up fairly quickly as a skin ripple or a slightly lifted rivet or two somewhere. Especially with Steve's paint job being as good as it is, I suspect 20 mins sitting still and looking at everything at fine oblique angles from 10 feet and 1 foot away would show up something if it's there.
Perhaps those big rectangular LED lights (used in the car paint scene) that produce stripy reflections on paint jobs would help.
We noticed this inconspicuous indent in a skin on a one design after a session of snaps and tumbles. Figured it wasn’t a big deal - probably leaned on it when refuelling? Or maybe some oil canning? We pulled the skin off to see anyway. Lucky we did!
 

Attachments

  • 73477012316__AC9BA260-F2F1-4736-BAF6-7D6552445712_Original.jpeg
    73477012316__AC9BA260-F2F1-4736-BAF6-7D6552445712_Original.jpeg
    436.3 KB · Views: 427
  • 73477025580__51D8B1FF-46C7-4A73-B5CA-CF02280B182F_Original.jpeg
    73477025580__51D8B1FF-46C7-4A73-B5CA-CF02280B182F_Original.jpeg
    696.8 KB · Views: 430
Given the topic -- I guess this is what comes to mind.

1765341800062.png
Vans Aircraft had a significant demonstrator crash on May 24, 1998, when an RV-8 (N58RV) broke up in flight during a demonstration in Ripley, California, killing both occupants and leading to discussions about the aircraft's structural design, specifically the wing spar. This was a factory-built prototype used for demonstrations.
The aircraft's nose suddenly pitched up about 45-degrees then abruptly nosed over as it began a left roll. The aircraft entered a nose-down spin to the left, continuing in a vertical descent until impact.


Shortly after this happened, when I was first considering building an RV, which we started in 2000 (new at the time, RV-9A), I was talking to one of Van's design engineer's at the Arlington Washington fly-in who told me "you know, that stick between your legs can become a "wing release lever" if you pull too hard or too fast", And, that's all he would say about that May 24th, 1998 factory RV-8 demonstrator crash. I later learned that the actual pilot flying was an aerobatic pilot who was checking-out the RV-8 for that purpose. But, what he didn't realize was the RV-8 isn't an unlimited aerobatic airplane, and it can break if stick inputs are too aggressive, especially on the pitch axis. They later found that the left wing had separated mid-span breaking the main spar. So, that might be a good place to pay particular attention to during the inspection. I would also carefully inspect the elevator and aileron hinge attach points as per Vans SB's for these items. (y):cool:(y)
 
Last edited:
Steve: I don’t have structure suggestions, but systems: you might compare as-bought component performance to what you’re seeing now.

After five years, your current oil pressure may be likely lower than Lycoming engine test, but is it in spec? The alternator test may show a difference, p-mag min self-power rpm may have changed; fuel flow may have changed, etc.
Non-destructive, and it might point out items that need attention.
"It’s just a thought."
 
I’ve enjoyed your content for years and I think this is a great idea for an episode or series. Someone early on suggested Vic Syracuse, and that seems like a good thought to me. Have you tried reaching out to him? If he’s not willing to do it, maybe he would know someone.

I would be particularly interested, having just finished and started flying a -14a and started thinking about doing condition inspections in the future.

Keep up all your good work - it is appreciated!
 
We noticed this inconspicuous indent in a skin on a one design after a session of snaps and tumbles. Figured it wasn’t a big deal - probably leaned on it when refuelling? Or maybe some oil canning? We pulled the skin off to see anyway. Lucky we did!
DAMN! I'm confused why it required removing a skin to see the broken engine mount though - isn't that accessible to see with the cowls off?
 
Given the topic -- I guess this is what comes to mind.

View attachment 104372
Vans Aircraft had a significant demonstrator crash on May 24, 1998, when an RV-8 (N58RV) broke up in flight during a demonstration in Ripley, California, killing both occupants and leading to discussions about the aircraft's structural design, specifically the wing spar. This was a factory-built prototype used for demonstrations.
The aircraft's nose suddenly pitched up about 45-degrees then abruptly nosed over as it began a left roll. The aircraft entered a nose-down spin to the left, continuing in a vertical descent until impact.


Shortly after this happened, when I was first considering building an RV, which we started in 2000 (new at the time, RV-9A), I was talking to one of Van's design engineer's at the Arlington Washington fly-in who told me "you know, that stick between your legs can become a "wing release lever" if you pull too hard or too fast", And, that's all he would say about that May 24th, 1998 factory RV-8 demonstrator crash. I later learned that the actual pilot flying was an aerobatic pilot who was checking-out the RV-8 for that purpose. But, what he didn't realize was the RV-8 isn't an unlimited aerobatic airplane, and it can break if stick inputs are too aggressive, especially on the pitch axis. They later found that the left wing had separated mid-span breaking the main spar. So, that might be a good place to pay particular attention to during the inspection. I would also carefully inspect the elevator and aileron hinge attach points as per Vans SB's for these items. (y):cool:(y)
I appreciate the insights bout this story. I wonder how many Gs that pilot pulled to actually rip the wing off an RV-8. And it hadn't occurred to me that the failure would be further outboard - I always assumed the main center attach point is where you'd see the first signs.
 
Steve: I don’t have structure suggestions, but systems: you might compare as-bought component performance to what you’re seeing now.

After five years, your current oil pressure may be likely lower than Lycoming engine test, but is it in spec? The alternator test may show a difference, p-mag min self-power rpm may have changed; fuel flow may have changed, etc.
Non-destructive, and it might point out items that need attention.
"It’s just a thought."
Thanks for these insights!
 
I’ve enjoyed your content for years and I think this is a great idea for an episode or series. Someone early on suggested Vic Syracuse, and that seems like a good thought to me. Have you tried reaching out to him? If he’s not willing to do it, maybe he would know someone.

I would be particularly interested, having just finished and started flying a -14a and started thinking about doing condition inspections in the future.

Keep up all your good work - it is appreciated!
I did reach out to Vic, but he wasn't available.
 
DAMN! I'm confused why it required removing a skin to see the broken engine mount though - isn't that accessible to see with the cowls off?
That wasn’t an engine mount - it’s the frame of the fuselage where the fuel tanks hang.
 
Vic Syracuse sees a bunch of RVs. He’s pretty well-respected and I doubt he’d pull any punches. NDT and more advanced testing is usually farmed out anyway, isn’t it?
He also has the ability to see into an engine case and determine the CAM will fail, it’s kind of a special talent i guess
 
Good stuff Steve! Gives me even more confidence that my pampered queen will outlast me :P
 
Last edited:
Your G meter only reads accurately perpendicular to its center axis. Are these planes G limits only referring to the limits perpendicular to the longitudinal axis of the plane or thorough all of its axis? Food for thought.
 
Steve,

FYI,
I just recently took my plane completely apart to take home and paint. Found the forward vertical stabilizer spar bolt hole elongated by .020.

375 hours total time, mild very intermittent aerobatics, loops spins and rolls that’s it. I built the plane and I’m a 25 yr AP/ IA (not that that implies anything other than it’s not my first bolt hole I reamed or torqued ;)

Vans engineering said to up size to next bolt size, and keep an eye on it , they did say I’m the first that’s reported this. (I assume for this model?)

Mark
 

Attachments

  • IMG_1508.jpeg
    IMG_1508.jpeg
    1.3 MB · Views: 259
  • IMG_1507.jpeg
    IMG_1507.jpeg
    1.3 MB · Views: 230
  • IMG_1509.jpeg
    IMG_1509.jpeg
    1.7 MB · Views: 224
  • IMG_1503.jpeg
    IMG_1503.jpeg
    1.5 MB · Views: 223
  • IMG_1504.jpeg
    IMG_1504.jpeg
    1.5 MB · Views: 271
Steve,

FYI,
I just recently took my plane completely apart to take home and paint. Found the forward vertical stabilizer spar bolt hole elongated by .020.

375 hours total time, mild very intermittent aerobatics, loops spins and rolls that’s it. I built the plane and I’m a 25 yr AP/ IA (not that that implies anything other than it’s not my first bolt hole I reamed or torqued ;)

Vans engineering said to up size to next bolt size, and keep an eye on it , they did say I’m the first that’s reported this. (I assume for this model?)

Mark
It appears that the RV-14 vertical stab forward attachment is quite different than the similar RV-9/9A tail, making me wonder why the change on the RV-14? Is it because the RV-14 is aerobatic and requires more "freedom of movement" than the RV-9/9A? Here's what my RV-9A VS attachment looks like with the standard 6-bolt mounting configuration. That area gets carefully inspected every condition inspection -- has 22-years and 1,872-hours now.

1776566677698.png
 
Last edited:
Steve,

FYI,
I just recently took my plane completely apart to take home and paint. Found the forward vertical stabilizer spar bolt hole elongated by .020.

375 hours total time, mild very intermittent aerobatics, loops spins and rolls that’s it. I built the plane and I’m a 25 yr AP/ IA (not that that implies anything other than it’s not my first bolt hole I reamed or torqued ;)

Vans engineering said to up size to next bolt size, and keep an eye on it , they did say I’m the first that’s reported this. (I assume for this model?)

Mark
Thanks for this insight - I'll investigate.
I don't imagine many people are actually taking apart their tails when inspecting so this would not be a common thing to catch.
 
You would probably have to go a step further and un-bolt the stab to detect the elongated hole.
Exactly my thoughts.
I inspect this area thoroughly with the fairing off each time, but to see an elongated hole the bolt needs to come out, and the stab needs to be removed.
 
Steve,

FYI,
I just recently took my plane completely apart to take home and paint. Found the forward vertical stabilizer spar bolt hole elongated by .020.

375 hours total time, mild very intermittent aerobatics, loops spins and rolls that’s it. I built the plane and I’m a 25 yr AP/ IA (not that that implies anything other than it’s not my first bolt hole I reamed or torqued ;)

Vans engineering said to up size to next bolt size, and keep an eye on it , they did say I’m the first that’s reported this. (I assume for this model?)

Mark
Did you see any witness mark for the VS to HS movements? If not, is it possible that the hole was already in that shape? I would imagine if there was much movement, then we should see some marks especially that it has been primed.
 
Exactly my thoughts.
I inspect this area thoroughly with the fairing off each time, but to see an elongated hole the bolt needs to come out, and the stab needs to be removed.
Wouldn't just loosening the bolt and inspect for "wiggle" be an appropriate review? (You are hearing this from a Chem E) ;)
 
OP didn’t say who built the plane, but the glue residue surrounding the hole makes curious thoughts arise in my dull old brain.

I don’t see any fretting, which strikes me as completely unusual. More than once I have seen guys countersink, rather than lightly deburr a hole like that. Two holes over-size kinda cuts the free play down and with a little torque, that’s to gonna move…more than a few first time builders might not even be alarmed by that.

Lots of guys don’t learn about reamers until too late…and some folks just plod ahead regardless.

To me that’s a good catch and an easy fix, though I do have to say I’d prefer to have two extra 1/4” bolts, as secondary fasteners…that is a pretty blatant single point failure mode in its current configuration. Easy to add a couple 3/16 or 1/4 bolts…backups are comforting.
It’s a pivot joint. Designed to move. The mating surfaces are supposed to be greased.
Fixing it with multiple bolts will break something else.
 
That sure doesn’t look like a moveable joint to me. It looks like a removable bolt, torqued and castellated its secondary security of a cotter pin. So….I’ll go back to my first assertion…single point failure joint. Be nice to have a backup of a couple 3/16-1/4” bolts, as backup. Not sure what or how anyone could interpret that as a moveable joint. No bushing…no bearing….no nothing. The Anti-sieze suggested is to ensure the bolt won’t gall into the aluminum…not to allow movement of the joint.
 
That sure doesn’t look like a moveable joint to me. It looks like a removable bolt, torqued and castellated its secondary security of a cotter pin. So….I’ll go back to my first assertion…single point failure joint. Be nice to have a backup of a couple 3/16-1/4” bolts, as backup. Not sure what or how anyone could interpret that as a moveable joint. No bushing…no bearing….no nothing. The Anti-sieze suggested is to ensure the bolt won’t gall into the aluminum…not to allow movement of the joint.
It’s definitely a pivot. Like the rear spar attachment on the wing. The reason it’s a castlated nut is exactly because it can rotate about the bolt and undo.
The antiseize is to prevent the mating faces from fretting.
The movement is not large but it exists.
 
Looks like the RV-10 has the same single-hole forward VS mounting arrangement as the RV-14 but yet very different than all other RV models with their multiple bolt connections. It makes sense that the HS mounting end should also be checked for elongation.

1776822251570.png
 
It’s definitely a pivot. Like the rear spar attachment on the wing. The reason it’s a castlated nut is exactly because it can rotate about the bolt and undo.
The antiseize is to prevent the mating faces from fretting.
The movement is not large but it exists.
Sorry to disagree….but I do. That joint is not a pivot joint. Anti-seize is not used to prevent fretting. If the forward spar attach moves, big problems will soon follow.

castle nuts are not used as friction joints. You Torqu’e the nut to a specified value and the cotter pin is a second retention method in conjunction with the torque, or safety, similar to safety wire.

Sorry to pick a snit here, but movement is not to be allowed at this location.

The rear spar attachment is completely different in design and function, starting with the fact that it is a double shear joint.

The forward wing attach…the one ahead of the main spar…that joint is a joint that allows the wing to tear away aft in a crash…but that is not what’s intended at the forward vertical spar attach.
 
The Anti-sieze suggested is to ensure the bolt won’t gall into the aluminum…not to allow movement of the joint.
This statement alone proves that you do not know anything about this type of a structural connection.
Not all properly designed load paths have a bunch of bolts joining the two parts.
If this makes you nervous, then don’t ever look at the wing rear spar attach point on RVs or most other light Aircraft…. Yeah, they’re a single bolt.
This design of the vertical stabilizer is basically just the RV wing attachment philosophy, flipped 180°.

BTW, the anti seize and castellated nut are because by design, there is a small amount of movement at the attach point.
 
This statement alone proves that you do not know anything about this type of a structural connection.
Not all properly designed load paths have a bunch of bolts joining the two parts.
If this makes you nervous, then don’t ever look at the rear spa attach point on RVs or most other light Aircraft…. Yeah, they’re a single bolt.
This design of the vertical stabilizer is basically just the RV wing attachment philosophy, flipped 180°.
Scott, all due respect…but if you think that allowing the forward spar of your vertical stabilizer is okay to move around…more power to you.

As far as understanding this joint, I do. The vast majority of the load is bore by the rear spar of the vertical. But the front shouldn’t move.

I am however wrong about the rear spar. I recall the modifications I made to my own aircraft and in fact those vary from those of the 4 and 6 by placing my rear spar attach point in double shear. That’s not stock and my comment is wrong there.

So sorry.
A bolted joint is designed based on the loads that need to be passed.
The rear spar on the wing is a double shear clevis style joint because the loads are much much higher. Note how much thicker all of the material is compared to the joint being discussed here.

In this case, the loads are much much lower. So a single bolt in single sheer is more than adequate.

Do you know that there is actually movement at the rear spar attach point, as a result of high G load? That is why it also has a castellated nut with a cotter pin.
You are absolutely right. The wing transmits bending load to the rear spar bolt joint, which convey as a pivot…given that the g load is either positive or negative, and the thickness of the beam height available, it is not possible to capture those loads without a much more sophisticated machined part and joint. Conversely the bending loads of the main spar are easily dealt with, given the envelope.

Now to compare those vertical loads…to a horizontal shear load through the aluminum forward spar and aluminum center attach with one bolt…it might work just fine, it might also start working in aerobatics and enlarge holes…I wouldn’t be surprised to see more of this as more people start looking.
You can’t “transmit” bending moments through a pinned joint. All vertical bending loads in the wing are transmitted by the main spar. The rear spar attach is solely there to stop the wing twisting.

With the VS all the bending loads are taken by the rear spar and the front spar likewise is solely there to stop the VS from twisting.
Both pins transmit shear loads only.
They both are designed to allow rotational degree of freedom. Hence the castle nut and the anti seize.

The forward wing attach…the one ahead of the main spar…that joint is a joint that allows the wing to tear away aft in a crash…but that is not what’s intended at the forward vertical spar attach.

I never mentioned the front wing tank attachment bolt. However it is relevant. It’s also a pin. It transmits no bending moments. Just shear (vertical only in this case)
The RV10 was originally a rigid forward tank spar to fuselage attachment which did transmit bending. It turned out that all that did was crack the structure where it hit the fuse side. Analysis subsequently showed it wasn’t needed and that attachment was removed. Now this isn’t a massive deal for a 10 or 14 wing because the rear spar is the main game for resisting twist.
Which was why I mentioned that turning that VS pin joint into a fixed joint will just end up cracking something else in the joint.
A joint we all agree is critical.
 
This statement alone proves that you do not know anything about this type of a structural connection.
Not all properly designed load paths have a bunch of bolts joining the two parts.
If this makes you nervous, then don’t ever look at the wing rear spar attach point on RVs or most other light Aircraft…. Yeah, they’re a single bolt.
This design of the vertical stabilizer is basically just the RV wing attachment philosophy, flipped 180°.

BTW, the anti seize and castellated nut are because by design, there is a small amount of movement at the attach point.
I'm mostly curious why this change was made for the RV-10 and RV-14, especially when all other RV models are attached with multiple bolts and/or rivets and don't allow any movement at the forward VS attach point? In addition, the many other aircraft I've owned over the years don't either.
 
Last edited:
I'm mostly curious why this change was made for the RV-10 and RV-14, especially when all other RV models are attached with multiple bolts and/or rivets and don't allow any movement at the forward VS attach point? In addition, the many other aircraft I've owned over the years don't either.
Better engineering design and analysis tools?
 
Good discussion.

What's the plan to keep the bolt hole from elongation?
Simply putting a larger diameter bolt in might resolve the issue. A larger bolt has more bearing contact area and reduces the stress concentration around the edges of the hole. And/or a thicker doubler...
 
Status
Not open for further replies.
Back
Top