Van's Air Force

The definitive Van's Aircraft support community! Buying, building or flying an RV? Join our exclusive family of mentors and enthusiasts!

Not seeing a rivet direction on something

Fenderbean

Well Known Member
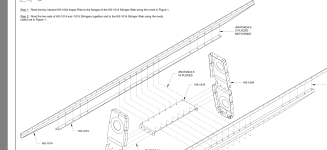
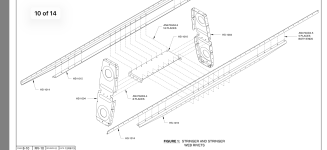
Page 8-10 the two steps tell you to rivet the HS1016 to the HS1004 ribs but doesnt specify direction same for the next step for HS1015 to HS1016.
other places it tells you and I dont want to assume. read a few pages ahead which it mentions where to put the shop heads like before just nothing on this page
thanks
 
Without looking at the plans, this is where you act as a builder. Think forward to decide if the shop head will interfere with something else. Then it becomes a matter of the thickness of the materials. We generally prefer the mfg head on the thinner material if possible, but nothing is set in stone.
Build on!
okay im pretty new into the build and understand what you’re saying but this is the first time I ran into something that didn’t specify there are only two steps on the page and neither specify and the fig doesnt specify like it does with the ribs to the spar and other places.
 

Attachments

  • IMG_2669.png
    IMG_2669.png
    517.5 KB · Views: 36
  • IMG_2670.png
    IMG_2670.png
    656.8 KB · Views: 35
Last edited:
okay im pretty new into the build and understand what you’re saying but this is the first time I ran into something that didn’t specify there are only two steps on the page and neither specify and the fig doesnt specify like it does with the ribs to the spar and other places.
As you progress into the build, Vans assumes you get better at figuring things out on your own. e.g., with the tail kit (which is usually built first) the instructions tend to be detailed. But later kits, less so. If it's important for the rivet tail to be on a specific side, the instruction will usually say so. But otherwise they're silent.
 
Just wait until you get further into the kits... You'll be spoiled with how detailed the instructions are for the tail. I'm towards the end of the wings and keep getting to steps that just say 'deburr, dimple and prime' after that rivet per diagram.

So yeah, unless it specifically says, or you can identify a specific reason (interference, squeezer/gun access, etc.) then use the rule of thumb manufactured head on thinest material.
That doesn't sound all that fun, this shouldn't be a guessing game, but hey that what you guys are for right lol
 
That doesn't sound all that fun, this shouldn't be a guessing game, but hey that what you guys are for right lol
Honestly the wing kit instructions felt like a first draft to me. I ended up consulting the RV-14 instructions for clarity in a lot of places. There are incorrectly labeled parts and incorrect rivet callouts for the filler neck and I had to reconcile the SB aileron bracket to the original plans. The 14 also had a bending pattern for the float arms where the 10 had dimensions. All of those were fixed in the 14 KAIs. I think some of those have also been fixed in the 10 KAIs but not all..

Once you get into installing systems you're totally on your own. You will be drilling (large) holes into the structure to get wires routed and adel clamps to hold them. The single 3/4" hole they give you to get all the wires into the tailcone won't be enough unless you're building a very bare bones bird. Those handful of rivets that bothered you in the tail will be just fine.

As for rivet direction, the "factory head on thinner side" only helps prevent puckering the 0.025" stuff. The 0.032" and thicker fare better. Setting the rivets on the lower end of the acceptable range also helps. Even then the puckering is a cosmetic issue not a structural one. I try to put the factory head on whichever side is easiest to access or more visible later on in case it needs to be drilled out.
 
Factory head on thinner material side is the rule of thumb, but always think “can I drill this out when I botch it up?” That will serve you well, because you will!
 
Factory head on thinner material side is the rule of thumb, but always think “can I drill this out when I botch it up?” That will serve you well, because you will!
Learned this last night, replaced a couple and almost put the rivet in wrong but like you said would never been able to replace it. Thanks, nice to get this type of information. I had everything above in my head just didnt want to go without asking to make sure.
 
Generally, factory head on the thinner material.
Very close second, is riveting tool access. Pretty hard to get on the factory head if there's no access for the gun or squeezer. Lots of rivets in my plane are "backwards" due to tool access.

End of the day, rivet direction isn't super critical.

FYI, rivets can be drilled out from the shop head side too. Just a bit more guess work as to where to drill. Go slow and careful. Often the head can be broken off before drilling completely through and potentially elongating the hole in the part. The more mangled the shop head, the more the guess work. But also, the easier it is to break it off before drilling deeper than the head. Patience and creativity is sometimes needed.
Thanks.
 
Back
Top