Van's Air Force

The definitive Van's Aircraft support community! Buying, building or flying an RV? Join our exclusive family of mentors and enthusiasts!

Exhaust hangs too low

RNB

Well Known Member
Sponsor
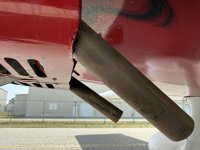
I recently did my first condition inspection and. have been trying to pay attention to anything wrong. I noted that the pilot side exhaust touches the bottom cowling. I can push it back up but it does not stay. I suspect some heat damage. It took some time for me to try and better understand what is likely involved in this, have now looked closer at my plane. I will attach several photos and. video link.

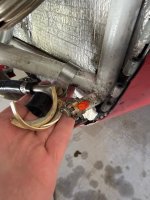
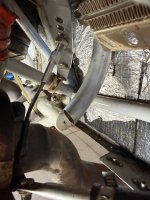
Almost nothing was tight on this side and the clamps could move easily on the engine support frame.
The rubber likely needs replacement (originally from 2009, nothing noted in logs since the build)
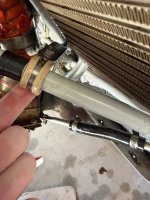
I've seen some online photos that only have the stainless and rubber hose supports, two of them. Mine has one.

I will accept the community anger asking this prior to searching, but what would you do and more so, where do I source the parts?
I will now sign off and continue my own searching.

Thank you.


Attachments

  • IMG_9366.jpeg
    IMG_9366.jpeg
    1.7 MB · Views: 166
  • IMG_9422.jpeg
    IMG_9422.jpeg
    2.2 MB · Views: 152
  • IMG_9423.jpeg
    IMG_9423.jpeg
    2.2 MB · Views: 156
  • IMG_9424.jpeg
    IMG_9424.jpeg
    2.5 MB · Views: 166
There's a lot wrong here, but I'll start with a couple of things.

White rubber on Adel clamps indicates silicone. The spec clearly states "Not resistant to petroleum based fluids." Look up the spec for MS21919 clamps, and get the proper ones. The one with the cushion also indicates that they are the wrong size (too large).

It looks like that clamp in the second photo sans rubber cushion has beaten the heck out of the motor mount.

The castellated nut on the mount-to-firewall has a boogered up cotter pin. Remove, retorque and do it right (in fact, I'd probably do them all after seeing this one).

What I find interesting is the use of white clamps in the plans: https://www.vansaircraft.com/wp-content/uploads/2021/10/FF6_10.pdf

The abuse observed is just oil marks as I manipulated the clamp. Paint is clean and clear.

I am puzzled by sizing. Someone on fb said to get size 11 when 12 is clearly called for by measuring the engine mounts.

Co pilot side holding strong with white but I have engine oil my side.
 
I don't know what to tell you. It's probably less of a big deal than the Adel clamps being loose. But the spec is clear. Should be an MS21919DG. Perhaps the fact that the cushion fell apart is due to oil causing it to degrade, since it's not for use in a petroleum environment?

As for size, just like rivet lengths...use what fits. Sometimes the plans don't exactly match the parts. If a -12 is too loose, then use an -11.

And I did notice another incorrectly done cotter pin on another one of the castellated nuts. Makes me think that whoever did them didn't know how to do it correctly, and if it were me, I'd be checking ALL the cotter pins in the aircraft.
1774889776117.png

Beyond that, consider redoing the system so that the exhaust is hung *from the engine* and not the mounts. Lots of threads on here about why that's a bad idea.
 
Last edited:
The cotter key curly cue was kinda making me twitchy, too. What's there works, but it's not a standard way to bend those. I agree with RV7A Flyer that it probably merits checking throughout the rest of the aircraft. Rudder cables especially come to mind. You're in for Mr. Toad's Wild Ride if the rudder cable nuts back off.

And the last comment on RV7A Flyer's post may get overlooked because it's below the attached drawing. I agree with that statement, as I always understood the exhaust supports had to be hung from the engine, not the mounts. When the engine starts up and goes through its "wet dog shaking" routine, those supports are trying to tear themselves apart between what's moving and what's stationary. It's not a surprise that they're loose and/or damaged. I have a 4-pipe system on an RV-7, so maybe it's a different thing on a 10. But I don't think so. My system has two of those supports made up of crimped tubing and rubber hose.

If it were me, I'd replace all the rubber hose to tubing connectors with clean, oil-free rubber hose pieces, clean everything up, and relocate the supports from the engine mount to a bolt that's directly mounted to the engine. That way, the exhaust pipe is shaking in unison with the engine and not try to rip itself apart.
Why do you understand the supports have to hang from the engine?
Why do you suggest I do the same (as opposed to the manner in the plans I linked above)?
 
Why do you understand the supports have to hang from the engine?
Why do you suggest I do the same (as opposed to the manner in the plans I linked above)?
Okay, my bad, but Mike addressed it. As they say, sometimes you don't know what you don't know. The 10 IS different.

While I've shown my ignorance regarding the RV-10 exhaust system, I'm guessing that those spring-loaded ball joints shown in the instruction pics ahead of the muffler allow for some degree of movement in the entire exhaust system. Typically, that ball type joint gets Mouse Milk or something similar during the CI to make sure it can move. Are yours free? Does your CI checklist include a check of these?
 
Speaking of low hanging exhaust - how close to the outlet cowl is okay? As they sit right now, my exhaust is about 1/2" from the fiberglass. I'll have fiberfrax and reflective foil there, but after seeing the above picture, wondering if I need to figure out how to get more of a gap.
 
Do your best to follow the plans here. They are obviously the source of truth. Not the internet.
One thing to look out for (and this is relevant for all similar setups whether engine hung or mount hung) is the tubes sliding in the hoses. They get oily and the hose clamps lose tension over time. Then the tube slides and the exhaust drops.
This is very common. Regular inspection is recommended.
Flaring the tube slightly before inserting into the hose helps a lot too.
 
You need to shorten the hangar link shown in image 9424. It is threaded and if you tighten (shorten) it by a quarter inch or so, that should get the exhaust off the cowl and also provide a reasonable distance to the firewall flange. Personally, I try to split that difference and leave an equal air gap on each side.
 
Roughing up the stainless tubes with some 100 grit sandpaper will help keep them from slipping also.
I also rough up the stainless tubes with 60-80 grit sandpaper then flare the ends of tube to the point where with a little difficulty I can still push the hose on by hand.

Don Broussard
RV9 Rebuild in Progress
57 Pacer
 
Roughing up the stainless tubes with some 100 grit sandpaper will help keep them from slipping also.
I’m going to add that I replaced the lightweight fuel line used to connect the stainless tubes with high pressure auto air conditioner hose. I bought a RV7 with the stock hose and it was stretched and deteriorated.
 
Back
Top