Van's Air Force

The definitive Van's Aircraft support community! Buying, building or flying an RV? Join our exclusive family of mentors and enthusiasts!

Aeroled connection options

Not sure if anyone recalls but some time ago I posted about my left strobe going dim. I fiddled with the wires and it got it back working so I ziptied them to keep some tension on them so they wouldn't jostle around and it worked for a time. Anyways it stopped working again so I reached out to AeroLED about getting a new connector kit and they sent me one for free which was awesome.

I watched the YouTube video for install and it seemed easy. Well like most things that I try for the first time it was anything but easy. Nothing seemed to fit or lock into place like the video showed. On top of that, my markings on the wires rubbed off so then I was left trying to figure out which wires went to what. 2 blown fuses later I finally had it figured out, managed (I thought) to get all the stupid wires pushed in and locked and put the male and female connectors together but when I flipped the switch the strobe didn't come on.

I had loosely connected the wires prior to fitting everything together and everything lit up like it should. I remarked everything, took a picture and video to ensure I wouldn't mess it up again. So I'm confident that everything was put in the right place. But these new connectors seems so overly complex. The old molex connector was a simple piece of plastic that locked it all together.

So my question is, does anyone have a utterly simple solution to connecting these wires? Any reason I can't just go to Lowe's and get some molex connector and just slap it all together? Or even just splice the wires together and slap some electrical tape and caps on them?

TLDR: I need an easy solution to connect the wires at the wingtip for my aeroled light because I'm too electrically/mechanically challenged to make it work.


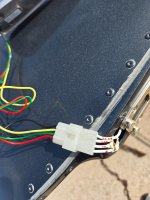
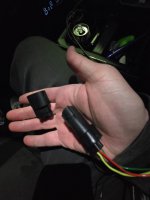
I attached a picture of the old connector and the new connector.
 

Attachments

  • 20260220_133458.jpg
    20260220_133458.jpg
    2 MB · Views: 77
  • 20260220_191303.jpg
    20260220_191303.jpg
    1.4 MB · Views: 75
I went through the same process on my left nav/strobe. Root cause was a bad ground, which is inaccessible the way Van’s designed the termination at the wing tip. I ended up extending the ground point to the landing light ground, which solved my problem. But regarding your termination question…. I got frustrated with the connector too and ended up soldering the leads together. I know I’m going to hear a lot of pushback on this, but by using a generous length of heat shrink beyond both ends of the termination, there’s plenty of support to avoid breakage from vibrational fatigue. Anyway, that’s how I solved my issue.
 
Those connectors are not easy to deal with. I fought through it and mine work fine. If they ever don’t, I will simply cut them out and splice them or use a simpler spade or other connector.
By the way, their instructions show you how to crimp them without the very expansive, single purpose, crimper. If you had the tool, things would go much easier. Their “use pliers” crimp method is what casies the issues. Those pins are a precision fit into the body. Squeezing them with pliers messes them up.
 
Frostbite -

I’m not sure if this is an option you’re looking for, but you might consider it. I have used it and found it was very helpful.

Apologies that I haven’t included the actual link here, but go to “steinair.com” and navigate to Stein’s video section.

On page 2 of 3 of “Steinair Videos”, Play “008: SIMPLE CONNECTION FOR AIRCRAFT TRIM WIRES”.
 

Attachments

  • IMG_7362.png
    IMG_7362.png
    2.5 MB · Views: 49
Frostbite -

I’m not sure if this is an option you’re looking for, but you might consider it. I have used it and found it was very helpful.

Apologies that I haven’t included the actual link here, but go to “steinair.com” and navigate to Stein’s video section.

On page 2 of 3 of “Steinair Videos”, Play “008: SIMPLE CONNECTION FOR AIRCRAFT TRIM WIRES”.
Wow, really wish I would have gone that route in the beginning. Seems really secure, water right, and simple to put together. Thank you for sharing that, I'll be buying a heat gun now and the needed parts, thank you!
 
Those connectors are not easy to deal with. I fought through it and mine work fine. If they ever don’t, I will simply cut them out and splice them or use a simpler spade or other connector.
By the way, their instructions show you how to crimp them without the very expansive, single purpose, crimper. If you had the tool, things would go much easier. Their “use pliers” crimp method is what casies the issues. Those pins are a precision fit into the body. Squeezing them with pliers messes them up.
Yea one of the male pins was bent on arrival so I'm assuming that I didn't straighten it out perfectly and that may be the reason when the assembly was put together it didn't function. I would have hoped there would be some slop allowed but I guess not. Could be something else though. Tough to tell with such a bulky assembly and with no visual of the insides once put together.
 
My own build used the old style Molex connectors, and I hated them. The pins all fit loosely, and while they tested out ok, I'm not confident they're going to stay where they should be once I'm flying. I'm working with a high school build that got the new connectors. They seem to be far superior to the old style. If you're having difficulty getting things in place, make sure the connector housings aren't in the locked position (pull them out as shown in the video for removing pins) and make sure the pins are oriented properly. Our experience was that that everything fits easily, snaps into place securely and just works the way the video shows, provided those two conditions are met. If I have any trouble with mine, I won't hesitate to replace them with the new connectors.
 
I'd also recommend the SteinAir videos -- and the proper connectors & tools (Stein sells them). The fellow who taught me, when I was becoming a carpenter, once said "if the job's too hard, you're using the wrong tool". We'll pretend you didn't even mention using auto or big-box parts:cool:
 
Thanks for the replies everyone, just had my mechanic do some sort of regular crimp connector to connect the wires and everything works perfectly now. I'll probably throw a heat shrink wrap around it at some point to make sure it's extra secure and waterproof. Now on to the next problem....
 
So my question is, does anyone have a utterly simple solution to connecting these wires?
I realize you already found a solution but if you ever run into this again in the future, my recommendation is to use Deutsch connectors. Super easy to crimp the pins on the wires and you can insert and remove them from the connectors very easily. It's idiot proof and frustration free. The opposite experience of working with Molex pins and plugs - at least it has been for me.
 
Deutsch all the way. I have gotten to the point to where I refuse to use those legacy Molex white plastic connectors. The Deutsch are so easy to assemble, dis-assemble, are weatherproof and very high quality. No special tools required for insertion or removal of pins in connectors. DTMs (M is stands for "miniature") are perfectly fine for LED wingtip position lights and strobes. The DTs (larger size contacts) would be preferred for high-amp applications like pitot heat. For combination light/strobe units I use the DTM4 connectors (4 positions, one of which is for syncing the all the lights). I wire all aircraft alike so if I need to swap out light assemblies they are plug and play. If you do go with Deutsch do NOT buy the JTReady brand clones from online outlets. They are inferior quality and have the pin positions mislabeled. Buy original Deutsch or Amphenol or TE Connectivty equivalents.

DTM Wiring Scheme.jpg

 
Last edited:
Back
Top