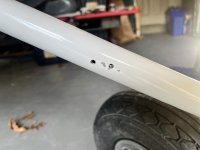
Here we go. In the attempt of tapping the screw mount for the nose gear steering I accidentally broke off the 8/32 tap. Unfortunately, the tap broke right at the surface, so that I saw no way of removing it.
Since the fairing certainly needs a screw on the left and on the right side, I drilled and tapped another hole about an inch higher (see picture attached).
I currently do not think that this affects nose gear leg stability (this is the replacement leg 1201-1, so after the SB-19-08-26).
Still I would like your opinions:
- Do you think the second hole significantly affects the stability of the strut?
- And if so, should I have someone knowledgeable weld a seam over it! (A new nose gear leg is currently not available at vans).
- If not, could I move the hole on the other side up as well to make them symmetrical? Likely no one will notice the difference, as on could only see both side simultaneously from the very front. And I could easily fill the old hole with a screw unnoticed unter the fairing.
- Michael