So I am sure I am over thinking this step, but when I get to this bit:
The F-804A-2 and F-804B-2 Center Section Sub Assemblies must be held in correct alignment while they are
being joined and while the fuselage is being assembled. Make two hard wood or particleboard spacers 1 7/16
(1.438) thick. The exact size of these spacers is not important, but the thickness is, as they will simulate the
spar as the bulkhead is fixed in its final position. Drill holes in these spacers to allow the installation of the NAS-
1304-50 1/4 close tolerance bolts. The holes in the spacer blocks may be oversized to allow the bolts to pass
through easily. This spacer will remain in the bulkhead throughout fuselage construction, until it is time to install
the wings. If you choose, make the spacer extra long so that it protrudes out the side of the fuselage. This
would allow for the future attachment of appropriate length legs for the fuselage to stand on while completing
other work on the interior.
I am unsure/unclear what is required.
What do they mean by make two spacers? One for each side, or one for top cap, one for bottom cap. And then when they say make it protrude out the side so you can use it as a support, it makes me think a single beam that is say approx 4' x 8" x 1/7/16" is what is best. But this is only one. And then given the precision asked for, how do we feel about the changes in thickness the spacers will undergo with the seasons?
Can anyone show mw what they did? I have tried a search on here to no avail.
Abd btw, merry christmas everyone.
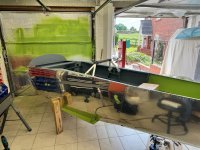

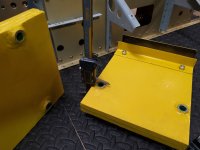
 ) my wings yet, so TBA if I got the tolerance right, but here is the method I did for the spacing. I did DIY steel spacers similar to what Ben suggested (didn't know buying them was an option) and epoxied it into wood. The fuselage is basically done now and this is how I am supporting it until installing the landing gear.