Traash
Well Known Member
This mount for a Starlink Mini antenna works great in a RV-10 (without carbon fiber overhead)
Objectives:
1. Position works
2. Easily hardwired for power and control (on/off)
3. Easily removed (both antenna and mount)
4. Not a hazard to occupants during turbulence
5. Not in the way of normal activity
6. Minimal exposed wires and attachment hardware
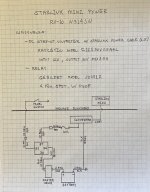
The mount arm and brackets come from a company in Dallas called 67 designs in their Ball2Ball series. It's mounted to the aft bulkhead at the centerline on the vertical support. The bulkhead received an additional mount screw to the support just below the bracket. The antenna sits on and is partially supported by the stiffening ridge on the upper bulkhead cover. If the ball screws should loosen over time the antenna will swing down into the baggage area. This would be obvious and, due to the generous length of the screws, would happen well before the arm disassembles. This should ensure it doesn't become a missle into the back of your head in turbulence (or worse). Might add a safety lanyard as well.
Power and control are mounted on the battery tray (relay), vertical support arm (DC step- up converter and power cable) and instrument panel (on/off switch to relay).
Having internet inflight is a true game-changer for those who engage in long flights. The weather products available far surpass and compliment XM and ADS-B (if they are available). Weather cams, forest fires and satellite cloud cover views to name a few. I've used internet phone calls to listen to AWOS or D-ATIS way before my radio could pick it up. Call the FBO for arrival coordination. If your cruising and have a beautiful view, share it with others on a Facetime call. VFR and the weather turns bad?... File an IFR flightplan in seconds. I use ForeFlight and can build, file and receive in less than a minute. I can't even find the right FSS frequency to use that fast much less call and recite all the necessary data.
The only limitation is your imagination so let me know of crafty uses you come up with.


Objectives:
1. Position works
2. Easily hardwired for power and control (on/off)
3. Easily removed (both antenna and mount)
4. Not a hazard to occupants during turbulence
5. Not in the way of normal activity
6. Minimal exposed wires and attachment hardware
The mount arm and brackets come from a company in Dallas called 67 designs in their Ball2Ball series. It's mounted to the aft bulkhead at the centerline on the vertical support. The bulkhead received an additional mount screw to the support just below the bracket. The antenna sits on and is partially supported by the stiffening ridge on the upper bulkhead cover. If the ball screws should loosen over time the antenna will swing down into the baggage area. This would be obvious and, due to the generous length of the screws, would happen well before the arm disassembles. This should ensure it doesn't become a missle into the back of your head in turbulence (or worse). Might add a safety lanyard as well.
Power and control are mounted on the battery tray (relay), vertical support arm (DC step- up converter and power cable) and instrument panel (on/off switch to relay).
Having internet inflight is a true game-changer for those who engage in long flights. The weather products available far surpass and compliment XM and ADS-B (if they are available). Weather cams, forest fires and satellite cloud cover views to name a few. I've used internet phone calls to listen to AWOS or D-ATIS way before my radio could pick it up. Call the FBO for arrival coordination. If your cruising and have a beautiful view, share it with others on a Facetime call. VFR and the weather turns bad?... File an IFR flightplan in seconds. I use ForeFlight and can build, file and receive in less than a minute. I can't even find the right FSS frequency to use that fast much less call and recite all the necessary data.
The only limitation is your imagination so let me know of crafty uses you come up with.