Van's Air Force

The definitive Van's Aircraft support community! Buying, building or flying an RV? Join our exclusive family of mentors and enthusiasts!

A bad day in the shop a couple of months ago....

jdm1248

Member
Friend
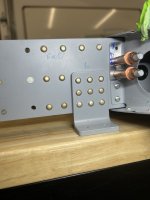
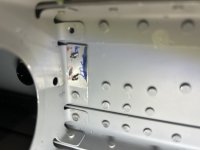
Hi all, On doing some of the final riveting on the center section horizontal stab of my RV-10 kit a couple of months ago, I made big trouble when using a double offset rivet set. I mangled manufactured head of one rivet *real* bad and made matters worse when I tried to remove the rivet as I missed the center and enlarged the hole. Vans support recommended I put doublers over that hole and the neighboring one I had not riveted yet (below in the picture), on both sides, then use same size rivets.

From Vans:
"I suggest you install the specified rivet with two doublers stretching between the two rivets - the one alongside that is not riveted yet. It is going to be compromised but save replacing the
whole HS one compromised rivet is not going to have any kind of significant effect on the performance of the whole structure."

At the time, I put fixing it on hold as I was worried I would just make matters worse. I have since gained more experience ( and tools :) building the elevators and starting tail cone, so I feel ready to revisit.

Do doublers as described sound like a "fix" for this? Are any other approaches available? If doublers, what thickness makes sense?

I have since acquired additional rivet sets - including a long one so I don't need to risk the double offset again.

Thanks very much for the help as always!

Jeff


1765324822885.png
 
I think you were wise to put this aside for a while. Coming back to it with a fresh perspective, a calm attitude and some better skills should make this just a footnote in your build story.

I suppose upsizing the hole to #27 for a #6 screw may not envelope all the carnage and going to #19 hole for a #8 screw would compromise edge distance. I'd at least drill out the middle rivet and span a flat doubler across all three holes (front and back side) so that the buggered up hole is bridged, but that would call for attempting to drill it out which is how we got here in the first place. Matching the thickness of rib is probably adequate which I'm guessing is .025. A bump up to .032 should be fine but I probably won't go any thicker than that.
 
In tight spots like that and you've already buggered up the hole, I have drilled it out and deburred it and installed Structural screws with the perspective structural lock nuts. Has way more shear strength then a rivet and you don't have to worry about messing up the hole or rivet head anymore. Plus, in this area, no one but you will ever know......
Just make sure you don't over tighten the screw as they can shear off fairly easily. Need a real good in/lb torque wrench or a gunsmithing torque screw driver.
 
Personally, I would drill and remove the rivet above and install a doubler each side spanning three holes. Rivet above appears to have a smiley anyway. Add a .032 doubler each side spanning all three holes. Longer rivets will be needed.

Tip for drilling rivets just in case
-center punch
-center punch
-center punch
-use a drill 10 smaller than the hole to drill a hole dead nuts all the way through. Assuming you center punched in the center. Did I mention center punch? A 90 degree adapter and screw drill bits may be necessary.
-use a dill one smaller than the hole with a drill stop set to the head thickness.
-snap the head off with the opposite end of the bit
-use a pair of side cutters to rotate the shop head and pull it. If it won't come out easy, move on to the next step
-use a back rivet bar and punch to drive the shank. You need a helper to hold the bar. If you don't have a bar, make one from another bar by drilling a 3/16" hole in a corner. Or buy some cold rolled steel and make a few. Very useful.
 
“…Do doublers as described sound like a "fix" for this? Are any other approaches available? If doublers, what thickness makes sense?…”

So you asked vans and they gave you an answer that is satisfactory to the engineer but then you come back to the forum to ask if the engineer’s answer is correct?

Smh
 
Rivet spacing is not critical. If it was mine, I would clean up the hole and drill a new hole 2 diameters above or below. If you're concerned, put a rivet above and a rivet below the elongated hole.
 
I think you were wise to put this aside for a while. Coming back to it with a fresh perspective, a calm attitude and some better skills should make this just a footnote in your build story.

I suppose upsizing the hole to #27 for a #6 screw may not envelope all the carnage and going to #19 hole for a #8 screw would compromise edge distance. I'd at least drill out the middle rivet and span a flat doubler across all three holes (front and back side) so that the buggered up hole is bridged, but that would call for attempting to drill it out which is how we got here in the first place. Matching the thickness of rib is probably adequate which I'm guessing is .025. A bump up to .032 should be fine but I probably won't go any thicker than that.
Interesting thought - that would be more stable - my rivet removal skills have also improved a bunch for certain reasons :)
 
Personally, I would drill and remove the rivet above and install a doubler each side spanning three holes. Rivet above appears to have a smiley anyway. Add a .032 doubler each side spanning all three holes. Longer rivets will be needed.

Tip for drilling rivets just in case
-center punch
-center punch
-center punch
-use a drill 10 smaller than the hole to drill a hole dead nuts all the way through. Assuming you center punched in the center. Did I mention center punch? A 90 degree adapter and screw drill bits may be necessary.
-use a dill one smaller than the hole with a drill stop set to the head thickness.
-snap the head off with the opposite end of the bit
-use a pair of side cutters to rotate the shop head and pull it. If it won't come out easy, move on to the next step
-use a back rivet bar and punch to drive the shank. You need a helper to hold the bar. If you don't have a bar, make one from another bar by drilling a 3/16" hole in a corner. Or buy some cold rolled steel and make a few. Very useful.
Thank you - a second vote for a spanning doubler. And thanks also for the technique
 
“…Do doublers as described sound like a "fix" for this? Are any other approaches available? If doublers, what thickness makes sense?…”

So you asked vans and they gave you an answer that is satisfactory to the engineer but then you come back to the forum to ask if the engineer’s answer is correct?

Smh
Yup. As an engineer myself ( not structures ), I value the input from multiple experienced people - engineers or not. I have learned over the years there is a lot of power in "the wisdom of the crowd". That's the very power of this forum IMO. I don't have to follow every suggestion I read but I value the input and ideas - I think these replies support that. So continue to "shake your head" and you do you.
 
My $.02. Assuming that these are -4 rivets, I would assess whether a 5/32 rivet would fix the hole, and if ED would still be adequate. If not, enlarging for a steel screw can be done. For a screw to take sheer loads like a rivet it needs to have the shoulder fully engaged in the full thickness of the metal, and it should fit the hole snugly. Otherwise the other rivets will have to partially shear before the screw does anything.
 
Looking at the picture. I see you have a number of ‘smiley’s’ going on. You are probably releasing pressure on the gun before if has stopped completely moving.

I would recommend applying full pressure to both sides of the equation, use your middle finger on the trigger so you can point with your index finger at your target, and maintain full pressure on the gun till well after the gun stops making noise.

While a ‘smiley’ isn’t exactly FAA A&P perfect. I wouldn’t recommend replacement.

As far as the buggered up hole in the original post. I would consider an oversize Hi-Lok fastener instead.
 
Yup. As an engineer myself ( not structures ), I value the input from multiple experienced people - engineers or not. I have learned over the years there is a lot of power in "the wisdom of the crowd". That's the very power of this forum IMO. I don't have to follow every suggestion I read but I value the input and ideas - I think these replies support that. So continue to "shake your head" and you do you.
Valuing input is absolutely fine. The question is, are you going to value the internet experts, engineers or not, opinion over the recommended repair from the people that designed the airplane? It is fine if you do, it's your aircraft...however...will you end up with a nagging question in your mind when you climb in and go fly?

I ask because when I got my empennage kit, the crate was damaged, specifically the spar. It was minor but... I also asked for opinions from vans and the group. Many people said to build on Vans said it was my choice and could go either way. I chewed on it for awhile and it came down to the same question. I did not want to have that nagging thought every time I went flying. I ended up replacing the spar. Realize that I am NOT advocating you do the same. I would agree with vans, use the doublers and build on. They are correct in stating that one bungled rivet isn't going to be an issue in the whole scope of the project. They question is can you be ok with whatever decision you decide on?
 
Looking at the picture. I see you have a number of ‘smiley’s’ going on. You are probably releasing pressure on the gun before if has stopped completely moving.

I would recommend applying full pressure to both sides of the equation, use your middle finger on the trigger so you can point with your index finger at your target, and maintain full pressure on the gun till well after the gun stops making noise.

While a ‘smiley’ isn’t exactly FAA A&P perfect. I wouldn’t recommend replacement.

As far as the buggered up hole in the original post. I would consider an oversize Hi-Lok fastener instead.

Thanks for the observation and input. Since this work, I read had a post about two similar rivet sets that produced very different quality results. After personally having a more than a desirable number of less than ideal 1/8" rivet results, I splurged a few bucks and purchased a second 3" rivet set and now I am doing so much better! I can see nothing wrong with the original set but I have much more consistent results. If it's a placebo effect I'll take it! Although I still can't say I am 100% confident approaching each riveting chore - especially 1/8" ones in more challenging locations. I will look at Hi-Lok fasteners. Thanks again!
 
Simply substituting a threaded fastener is not a sound approach. The beauty of a properly installed rivet is it swells to create a zero tolerance installation. This is paramount for a shear application. If substituting any fastener for a rivet is ever considered, common threaded fastener installation techniques are not acceptable.

The hole should be reamed (when able) and a close tolerance fastener used. You still don't know the hole size required to make it acceptable for any fastener install; e.g. a NAS 1241 rivet, a 1097 (or just next size up, The larger head won't disrupt this non-visible rivet line) , a Hi-LOK (typically installed with a slight interference fit), an AN6? Some measurement would be needed to determine the largest hole than maintains proper ED.

Do I sound smart? I'm yet just another anonymous voice in the VAF hive-mind. All of the aforementioned is just background to reinforce what's already been stated.

The OEM has given you a proposed solution. Stick with it. Unless they were involved with the design, no one here knows what design margins they've engineered into their product. My $0.02.
Hi-LOKs generally offer superior strength (shear/tensile) and better clamping force than traditional solid rivets, combining bolt-like tension with rivet-like installation, making them industry standards for high-strength aerospace joints needing precision preload, while solid rivets offer proven strength but often require two-sided access and might be heavier for equivalent performance, with specialized blind rivets (like Huckloks) bridging the gap for one-sided needs.
Hi-LOK Fasteners:
  • Strength: High shear and tensile strength, often exceeding solid rivets, especially in high-performance alloys (titanium, steel).
  • Clamping: Provide significant, consistent preload (clamping force) because the collar swages onto the pin, similar to a bolt.
  • Application: Ideal for critical airframe structures where high strength, fatigue resistance, and controlled preload are essential (e.g., wings, fuselage).
  • Installation: One-sided installation (blind), with a torque-controlled collar that breaks off, indicating proper tension.
Solid Rivets (e.g., MS20470):
  • Strength: Very strong, especially heat-treated structural types (AD, D), but strength depends heavily on material and size (e.g., aluminum, steel).
  • Clamping: Rely more on the shank filling the hole for shear resistance; less inherent clamping force than a tensioned Hi-LOK.
  • Application: Excellent for general airframe riveting where access to both sides is possible, offering reliability and proven performance.
  • Installation: Requires bucking from the blind side, which can be more labor-intensive than Hi-LOKs.
Key Strength Comparison:
  • For equivalent material and size, Hi-LOKs (especially those with titanium or alloy steel pins) usually provide higher shear and tensile values and, critically, superior tension/preload, which is key for fatigue life.
  • Solid rivets are robust, but the Hi-LOK system excels in achieving consistent, high clamping force in demanding, one-sided applications.
When to Choose Which:
  • Hi-LOK: High-stress areas, where you need maximum strength and tension (preload), especially in newer, lighter aircraft.
  • Solid Rivet: General structural joining where two-sided access is easy, cost is a factor, and high preload isn't the primary driver.
The high cost of HI-LOKs becomes the prohibitive factor. Solid rivets are generally good enough

25+ years A&P
 
Not sure of the intent of the post. Proper initial application has already been determined. No tensile load required. More isn’t necessarily better.

Edit = another issue with such “searches”. Ex= Hi-Loks come in different materials and head designs depending on application. Improper application (titanium, shear head, etc.) could prove disastrous.
 
Last edited:
Personally, I would drill and remove the rivet above and install a doubler each side spanning three holes. Rivet above appears to have a smiley anyway. Add a .032 doubler each side spanning all three holes. Longer rivets will be needed.

Tip for drilling rivets just in case
-center punch
-center punch
-center punch
-use a drill 10 smaller than the hole to drill a hole dead nuts all the way through. Assuming you center punched in the center. Did I mention center punch? A 90 degree adapter and screw drill bits may be necessary.
-use a dill one smaller than the hole with a drill stop set to the head thickness.
-snap the head off with the opposite end of the bit
-use a pair of side cutters to rotate the shop head and pull it. If it won't come out easy, move on to the next step
-use a back rivet bar and punch to drive the shank. You need a helper to hold the bar. If you don't have a bar, make one from another bar by drilling a 3/16" hole in a corner. Or buy some cold rolled steel and make a few. Very useful.

Hi Larry, I decided to go with this approach but as soon as I looked at the rear of the hole again, I realized the empty hole above goes through a tab so a double would not sit flat. I went on to extract the additional neighbor rivet and made one doubler for 3 holes and one for two, shown clecoed in the attached pictures. I matched the material thickness of the ribs which was 0.025". Thoughts?
 

Attachments

  • IMG_7193.jpeg
    IMG_7193.jpeg
    1.4 MB · Views: 163
  • IMG_7195.jpeg
    IMG_7195.jpeg
    1.4 MB · Views: 161
Last edited:
Hi Larry, I decided to go with this approach but as soon as I looked at the rear of the hole again, I realized the empty hole above goes through a tab so a double would not sit flat. I went on to extract the additional neighbor rivet and made one doubler for 3 holes and one for two, shown clecoed in the attached pictures. I matched the material thickness of the ribs which was 0.025". Thoughts?
That should be fine in that location.
 
Hi Larry, I decided to go with this approach but as soon as I looked at the rear of the hole again, I realized the empty hole above goes through a tab so a double would not sit flat. I went on to extract the additional neighbor rivet and made one doubler for 3 holes and one for two, shown clecoed in the attached pictures. I matched the material thickness of the ribs which was 0.025". Thoughts?
I'm no engineer, but that looks good to me.
 
That is fine for those doublers, just as Vans engineering suggested.

As far as the offset rivet set, use some gorilla tape to keep it from rotating in the gun.
The middle finger trigger discipline is a great technique.
A tungsten bucking bar sets those rivets like they’re butter.
Verify rivet length will be adequate for doublers.
Pressure will need to be higher for longer length.
(Maybe practice a few on some scrap that thickness and new riveting tool)

If you’re real OCH you can flay them with some epoxy primer when installing.

Oh, and relax. That’s not a “quittable” offense.
Save the stress for the wing spars….
 
Last edited:
Hi Larry, I decided to go with this approach but as soon as I looked at the rear of the hole again, I realized the empty hole above goes through a tab so a double would not sit flat. I went on to extract the additional neighbor rivet and made one doubler for 3 holes and one for two, shown clecoed in the attached pictures. I matched the material thickness of the ribs which was 0.025". Thoughts?
Nice work.
Matching the material thickness is appropriate.
An ideal repair, if there is such a thing, matches the strength of the original design. You do not necessarily want a repair to be stronger. (I don’t think a small repair like this matters, but….)
AC-43-1b has a very good explanation of this and how different structures react to their design loads and why it’s important. Worth a read.
Also, the AC specifically states that repair to substantial structures, like spars, can only be approved by the FAA, who defaults to the manufacturer. In our case, with EAB, we are the manufacturer. However, I believe the intent is to defer to the “designer”. You did just that.
Man, that was a lot of words for such a simple concept…..sorry….
 
Thanks again everyone. Lots of great ideas. I will keep those Hi-Lok fasteners in the back pocket for a future serious error - would need to learn a lot more about selection an use as was pointed out. Really appreciate the time taken by everyone. Sure is nice to have encouraging words when things go south!
 
Due to the awkward location, isn't this an ideal place to use a pneumatic squeezer? Looks like lots of access there to get the jaws in, instead of trying to hold bucking bars and double-offset rivet guns.
 
Due to the awkward location, isn't this an ideal place to use a pneumatic squeezer? Looks like lots of access there to get the jaws in, instead of trying to hold bucking bars and double-offset rivet guns.
No, this area isn’t suitable for a squeezer, maybe an a type, but not many folks have those.
 
Due to the awkward location, isn't this an ideal place to use a pneumatic squeezer? Looks like lots of access there to get the jaws in, instead of trying to hold bucking bars and double-offset rivet guns.
Not a fit for the squeezer and yokes I have. I ended up using a long (10”) rivet set and that worked very well for me compared to the mess I made with the double offset set.
 
So late to the party as usual…

I see a couple of posts mention shear - is that rivet install in shear or tension? I would have guessed tension myself.

Another way I’ve heard of is making a doubler, but with a tab. Kind of an L-shape. You put 2 rivets into the web of the rib, and the other portion of the L covers your hole.

That said, repair looks good. I’m not Van’s, not an aerospace engineer, didn’t sleep at that place last night.
 
Using a structural screw in place of a single rivet where there is no cosmetic impact is acceptable. Something like an AN 525 will carry that load just fine. I should also note that #6 or smaller screws are generally not structural fasteners.
 
Using a structural screw in place of a single rivet where there is no cosmetic impact is acceptable. Something like an AN 525 will carry that load just fine. I should also note that #6 or smaller screws are generally not structural fasteners.
I struggle to think any #6 steel screw would have less strength than an aluminum rivet.
 
Back
Top