Van's Air Force

The definitive Van's Aircraft support community! Buying, building or flying an RV? Join our exclusive family of mentors and enthusiasts!

Vans lower cowl split

I’m looking to split my lower cowl to make easier removal/installation with my 3 blade prop. Looks like there are three options:

1) split down the middle on front then around the snorkel (like Vans did when they updated their 10)

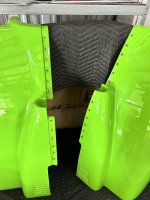
2) split all the way down the middle

3) make aft bottom portion separate from rest of bottom cowl.

Pros/cons of each ?

IMG_3405.jpegIMG_3404.jpegIMG_3406.jpeg
 
I did like Vans with the split around the snorkel. I was really dreading it but it was really simple. I used left over strips of fiber glass removed from my cowling cuts and bonded them on to form the lip and then did a couple of cloth and resin layers to tie it back farther onto the cowling for strength. I then put a layer of glass over it to clean it up.
 
Right down the middle for me.
 

Attachments

  • IMG_5841.jpeg
    IMG_5841.jpeg
    2 MB · Views: 134
  • IMG_5831.jpeg
    IMG_5831.jpeg
    1.2 MB · Views: 130
  • IMG_5836.jpeg
    IMG_5836.jpeg
    1.6 MB · Views: 129
  • IMG_5833.jpeg
    IMG_5833.jpeg
    1.8 MB · Views: 136
I did the removable snorkel. My plane is not flying yet but it does make removing and installing the cowl much easier than on my 6A. I used #8 screws on the snorkel but am probably going to go back and change them to Skybolts like the rest of the cowl.

Now you have one of each :)
 
I did the removable snorkel. My plane is not flying yet but it does make removing and installing the cowl much easier than on my 6A. I used #8 screws on the snorkel but am probably going to go back and change them to Skybolts like the rest of the cowl.

Now you have one of each :)
Would you please post installed pictures? I’m not fond of the visual of the center split and curious how your option looks installed.
 
I just looked through my photos and for some reason I don't have a closer picture of the cowl installed. I think I just got focused on finishing instead of taking pictures :)

Here are a couple that should give you an idea of what it looks like. I too didn't want the center split all the way to the front of the cowl.
 

Attachments

  • IMG_1777.jpeg
    IMG_1777.jpeg
    124.3 KB · Views: 121
  • IMG_1815.jpeg
    IMG_1815.jpeg
    138.4 KB · Views: 122
  • Like
Reactions: TYK
I did the removable snorkel. My plane is not flying yet but it does make removing and installing the cowl much easier than on my 6A. I used #8 screws on the snorkel but am probably going to go back and change them to Skybolts like the rest of the cowl.

Now you have one of each :)
Thx for the feedback. With the other two options that basically split the cowl in half I can see how easily that makes the lower cowl easier to remove. By just removing the snorkel part, can you explain the process to remove the lower cowl after you remove the snorkel cutout piece ?
 
It lets you drop the remaining part of the lower cowl straight down to get it out from behind the spinner without having to pull the "boot" forward off the airbox at the same time.
 
After flying the aircraft for a while, I made the snorkel removable. But I regretted doing so afterwards.

In my opinion, there was an unanticipated consequence of the removable snorkel. Removing the snorkel made removing the lower cowl pretty simple when working alone. But it also made installing the lower cowl nearly impossible without a helper. With the snorkel removed, there is no way to use the nose gear leg as a crutch. I simply didn't have enough hands to insert any fasteners while holding the lower cowl in place when working alone.

The plane is at the paint shop now and they have split the lower cowl and grafted the snorkel back onto one side. The result will be pretty much the same as the blue Van's factory RV-10 shown in the first post above.

All of this modification will likely result in a significantly heavier lower cowl but live and learn.

RV-10 Cowl (2).jpg RV-10 Cowl (1).jpg RV-10 Cowl (1).jpeg
 
Last edited:
After flying the aircraft for a while, I made the snorkel removable. But I regretted doing so afterwards.

In my opinion, there was an unanticipated consequence of the removable snorkel. Removing the snorkel made removing the lower cowl pretty simple when working alone. But it also made installing the lower cowl nearly impossible without a helper. With the snorkel removed, there is no way to use the nose gear leg as a crutch. I simply didn't have enough hands to insert any fasteners while holding the lower cowl in place when working alone.

The plane is at the paint shop now and they have split the lower cowl and grafted the snorkel back onto one side. The result will be pretty much the same as the blue Van's factory RV-10 shown in the first post above.

All of this modification will likely result in a significantly heavier lower cowl but live and learn.

View attachment 103195 View attachment 103196 View attachment 103197
Not nearly impossible without a helper. I have a T-shaped post support with some thin foam rubber on top that I pop under the cowl to hold it in place while I put screws in. At least on one side you still have to reach under to jimmy the cowl into exact position, but with this method it is easy to single handedly install the lower cowl.
 
Regarding solo cowl installation... I've built, modified, and/or maintained RVs with every common variation of cowl fastener, and my advice to builders based on experience is: even if you use screws or camlocs elsewhere, consider using the stock piano hinges for the vertical sides of the lower cowling. They make it pretty easy to install the bottom cowl solo, since you can use one hand to stab the hinge pin into place and then work your way around to do the same on the other side.
 
Not nearly impossible without a helper. I have a T-shaped post support with some thin foam rubber on top that I pop under the cowl to hold it in place while I put screws in. At least on one side you still have to reach under to jimmy the cowl into exact position, but with this method it is easy to single handedly install the lower cowl.

I thought my point was pretty obvious but I guess I need to add words:

"Removing the snorkel made removing the lower cowl pretty simple when working alone. But it also made installing the lower cowl nearly impossible without a helper or a device or fixture."
 
I thought my point was pretty obvious but I guess I need to add words:

"Removing the snorkel made removing the lower cowl pretty simple when working alone. But it also made installing the lower cowl nearly impossible without a helper or a device or fixture."
I thought my point was pretty obvious but I guess I need to add words:

"Removing the snorkel made removing the lower cowl pretty simple when working alone. But it also made installing the lower cowl nearly impossible without a helper or a device or fixture."
"or a device or fixture." wasn't a part of your original post - a fixture was my point. Sorry that offended you by making what I thought was a helpful suggestion...
 
Last edited:
Thx for the feedback. With the other two options that basically split the cowl in half I can see how easily that makes the lower cowl easier to remove. By just removing the snorkel part, can you explain the process to remove the lower cowl after you remove the snorkel cutout piece ?
As a one man "band" I always had to remove/install the cowling on my Rocket by myself - believe me those extra two cylinders make the job more than just linear extension of a 4-cyl version. When I was younger I could do it with some "finagling" (sp?), but as Father Time caught up with me (76) I resorted to building my cowling "Puter-Oner" - just an adjustable angle lift customized for your situation ... Made all the pain and suffering go away along with the prospect of major damage when I dropped the cowl.

HFS
 

Attachments

  • Cowling “Puter Oner” - 4.jpg
    Cowling “Puter Oner” - 4.jpg
    2.4 MB · Views: 68
  • Cowling “Puter Oner” - 3.jpg
    Cowling “Puter Oner” - 3.jpg
    2.1 MB · Views: 65
  • Cowling %22Puter Oner%22 - 2.jpg
    Cowling %22Puter Oner%22 - 2.jpg
    2 MB · Views: 66
I could use some help understanding how the center split and cutting around the snorkel aids in removing the lower cowling.

The side with the snorkel still probably needs to drop down around the spinner because the nose wheel gear slot is still 100 percent complete.

Please help me understand that?
 
Back
Top