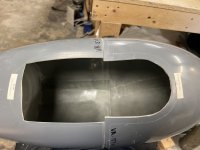
I’m starting work on the wheel pants. One of them does fit together so well. I flattened the edge of the forward piece and plan to fill the gap between the parts per Dan’s post from years ago. Before I do that, I was wondering if I should “open up” the forward piece. It fits kind of tight on the aft piece and I have to compress the aft piece a bit to be able to fit the forward piece over the flange. Is this normal or will this cause problems in the future? Is there a way to loosen it up a bit?

Van's Air Force
You are using an out of date browser. It may not display this or other websites correctly.
You should upgrade or use an alternative browser.
You should upgrade or use an alternative browser.
Opening up wheel pant
- Thread starter Ben Ellis
- Start date

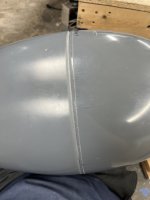
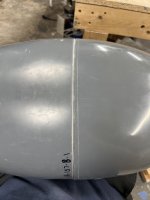
I can't remember what my pants looked like on the 10 (grey version), but usually they want you to take the parts down to the guide lines. Very possible that the front piece will fit better once you take off the 1/4" or so to get there. You can see the shell has a bit of an arc, tightening it up at the end. I think I would trim down vs add material to that front piece, as it is currently longer than designed, if I am correctly remembering the purpose of the guide lines. In the pic, you can see that the guideline is pretty parallel to the joggle. The cut off the mold is rough only because they don't expect you to use it.
Last edited:
Could you post the link to "Dan's post".........?I’m starting work on the wheel pants. One of them does fit together so well. I flattened the edge of the forward piece and plan to fill the gap between the parts per Dan’s post from years ago.
 Some peoples memory might not go back that far...........
")
Good point! Here it is: https://vansairforce.net/threads/tip-wheelpant-seam.16999/Could you post the link to "Dan's post".........?
I can't remember what my pants looked like on the 10 (grey version), but usually they want you to take the parts down to the guide lines. Very possible that the front piece will fit better once you take off the 1/4" or so to get there. You can see the shell has a bit of an arc, tightening it up at the end. I think I would trim down vs add material to that front piece, as it is currently longer than designed, if I am correctly remembering the purpose of the guide lines. In the pic, you can see that the guideline is pretty parallel to the joggle. The cut off the mold is rough only because they don't expect you to use it.
I'm not disagreeing with you guys but I didn't see anything in the instructions about trimming the pieces back to a scribe line, especially for the initial fitting. They do mention leaving a 5/8" gap between the fairing and the tire, but that's at the end of the instructions. I'm at the highlighted part of the attached instructions. I assumed they wanted you to focus on the seam between the two parts first before trimming to fit the wheel and axle.Expanding on Larry's suggestion because the Vans scribe line doesn't look perfect.
Use a compass with two scribe points. Pick a distance. Scribe a line parallel to the edge of the aft half around the forward half.
Attachments
The 8 instructions were written for back in the days when wheel pants didn’t have niceties like scribe lines.
Use the scribe line as a reference, you may still have to finesse the edge a bit for that perfect fit.
Use the scribe line as a reference, you may still have to finesse the edge a bit for that perfect fit.
I'm old enough to remember when a reference to "Dan" in RV building meant Checkoway.Good point! Here it is: https://vansairforce.net/threads/tip-wheelpant-seam.16999/
