I’m at the point of a 95% empennage and fuse is starting to come together. I’m beginning to wonder if some parts of the avionics package should be installed during these stages for easier install. I’m at section 27 firewall right now but with regard to AP and trim controls I don’t know when these optional items should be installed. I’m on the larger side so climbing into the tail after it’s buttoned up would be difficult. Any advice on the points of install to install items like this? I’m also considering if I should run conduit for easier wire install at a later time. Thanks.

Van's Air Force
You are using an out of date browser. It may not display this or other websites correctly.
You should upgrade or use an alternative browser.
You should upgrade or use an alternative browser.
Avionics components installed during empennage and fuselage build
- Thread starter Star Keeper
- Start date

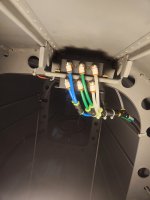
Do not install anything aft for now. Do run the needed wires in the tail cone for:
- Elevator trim. I use a single four conductor shielded wire for this (two motor power, two sense, one ground - the shield).
- Tail NAV/Strobe light. Just run the wire and leave enough in the last bay for final hook up.
Note, I run all the wires to the area aft of the baggage compartment. For the two above I run those toward the end as I’m ok sliding into the tail cone for this small job.
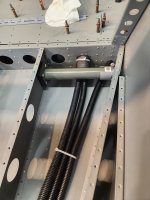
Do fabricate (or modify what Van’s sends you) the mount for the ADHARS modules if you are mounting them aft. This need to be done before the riveting on the final top skin. The modules need to be removed for riveting so make sure you plan on that. I made a two brass plates that each hold two brass #19 nuts, the module doubler plate drilled out to #19 to allow for allen cap nuts to go in from the bottom. It is way to hard too put a screw in from the top once the skin is riveted on.
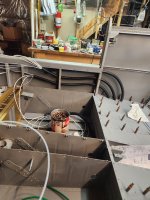
Yes - do run conduit for the stuff going aft. Most of this will be for battery cables, autopilot pitch servo and such. These wires can be run after you mate the fuselage to the tail cone. I run three conduits on each side and end up using 4 or 5, so at least on spare. The dual SkyView ADHARS module wiring takes up a lot of conduit space as well. This is especially true if you have pitot and static tubes going aft to them as well as to the panel for such things as a backup analog airspeed instrument or a G5.
I do mount the ELT and the SkyView ADS-b receiver outboard of the batteries (one on each side). Those are mounted to trays with stand off feet made by bending the tray edges. They get pro-sealed to the bottom of the tail cone skin. The ADS-b blade antenna is mounted a few inches away form the ADS-b receiver. This stuff comes later in the build but you can figure out now what you want to do.
Some photos attached.
Carl
- Elevator trim. I use a single four conductor shielded wire for this (two motor power, two sense, one ground - the shield).
- Tail NAV/Strobe light. Just run the wire and leave enough in the last bay for final hook up.
Note, I run all the wires to the area aft of the baggage compartment. For the two above I run those toward the end as I’m ok sliding into the tail cone for this small job.
Do fabricate (or modify what Van’s sends you) the mount for the ADHARS modules if you are mounting them aft. This need to be done before the riveting on the final top skin. The modules need to be removed for riveting so make sure you plan on that. I made a two brass plates that each hold two brass #19 nuts, the module doubler plate drilled out to #19 to allow for allen cap nuts to go in from the bottom. It is way to hard too put a screw in from the top once the skin is riveted on.
Yes - do run conduit for the stuff going aft. Most of this will be for battery cables, autopilot pitch servo and such. These wires can be run after you mate the fuselage to the tail cone. I run three conduits on each side and end up using 4 or 5, so at least on spare. The dual SkyView ADHARS module wiring takes up a lot of conduit space as well. This is especially true if you have pitot and static tubes going aft to them as well as to the panel for such things as a backup analog airspeed instrument or a G5.
I do mount the ELT and the SkyView ADS-b receiver outboard of the batteries (one on each side). Those are mounted to trays with stand off feet made by bending the tray edges. They get pro-sealed to the bottom of the tail cone skin. The ADS-b blade antenna is mounted a few inches away form the ADS-b receiver. This stuff comes later in the build but you can figure out now what you want to do.
Some photos attached.
Carl
Attachments
Aviation specific stuff or just general thin wall Smurf tubing?Generally impossible to push wires through corrugated conduit, suggest smooth stuff instead.
Is this level of info covered in the plans or documented somewhere? I’m really trying to prevent having to backtrack and screw up skins drilling out rivets. I don’t build the empennage as it was built by the previous owner. It does still have clecos on the top skin though. Are routing paths specified anywhere and which kit is an ADHARS bracket included in?Do not install anything aft for now. Do run the needed wires in the tail cone for:
- Elevator trim. I use a single four conductor shielded wire for this (two motor power, two sense, one ground - the shield).
- Tail NAV/Strobe light. Just run the wire and leave enough in the last bay for final hook up.
Note, I run all the wires to the area aft of the baggage compartment. For the two above I run those toward the end as I’m ok sliding into the tail cone for this small job.
Do fabricate (or modify what Van’s sends you) the mount for the ADHARS modules if you are mounting them aft. This need to be done before the riveting on the final top skin. The modules need to be removed for riveting so make sure you plan on that. I made a two brass plates that each hold two brass #19 nuts, the module doubler plate drilled out to #19 to allow for allen cap nuts to go in from the bottom. It is way to hard too put a screw in from the top once the skin is riveted on.
Yes - do run conduit for the stuff going aft. Most of this will be for battery cables, autopilot pitch servo and such. These wires can be run after you mate the fuselage to the tail cone. I run three conduits on each side and end up using 4 or 5, so at least on spare. The dual SkyView ADHARS module wiring takes up a lot of conduit space as well. This is especially true if you have pitot and static tubes going aft to them as well as to the panel for such things as a backup analog airspeed instrument or a G5.
I do mount the ELT and the SkyView ADS-b receiver outboard of the batteries (one on each side). Those are mounted to trays with stand off feet made by bending the tray edges. They get pro-sealed to the bottom of the tail cone skin. The ADS-b blade antenna is mounted a few inches away form the ADS-b receiver. This stuff comes later in the build but you can figure out now what you want to do.
Some photos attached.
Carl
Attachments
I have not had this problem - and I pull wires through using a string, not push. I do use smooth conduit in the wings, either 5/8” plastic water pipe or 3/4” plastic irrigation pipe. The conduit in the fuselage worked well for the complex path it takes.Generally impossible to push wires through corrugated conduit, suggest smooth stuff instead.
‘
Carl
I don’t think Van’s covers this other than saying “run wires” or such.Is this level of info covered in the plans or documented somewhere? I’m really trying to prevent having to backtrack and screw up skins drilling out rivets. I don’t build the empennage as it was built by the previous owner. It does still have clecos on the top skin though. Are routing paths specified anywhere and which kit is an ADHARS bracket included in?
The ADHARS bracket comes in the tail kit if memory serves. Routing paths are at builder discretion.
Carl
Generally impossible to push wires through corrugated conduit, suggest smooth stuff instead.
Maybe but pulling is the most common method of adding wires to conduit. Use a 1/16” nylon string twice as long as the conduit. Put a loop with a half hitch at the middle. On one end tie a cotton ball a little smaller than the conduit. Blow it through with a compressed air nozzle. Leave it in the conduit and you can pull stuff back and forth to capacity over the life of the airframe.
Vans uses nylon. It’s tougher and has a higher temperature rating than hardware store polyethylene. The corrugations keep the tubing from kinking in bends.
There is a blurb in this about using it in wings:

Wing Wiring: Routing Wires in the Wings - Van's Aircraft Total Performance RV Kit Planes
There are a number of installations that require routing of wires and tubes in the wing. These may include nav lights, strobe lights, landing lights, heated pitot, nav antenna, autopilot, AOA and maybe a stall warning device. Listed here, in no particular preference, are some ways to run wires...
 www.vansaircraft.com
Last edited:
OK, I'm going to try to give a comprehensive list of what you want to think about before you close up the top skin of the tailcone and/or attach it to the fuselage. Note that I'm talking about the furthest aft topskin. The tailcone topskin that goes immediately aft of the cabin top/cargo area should not be riveted until after final assembly. That means access to the battery tray is pretty easy later, as well as pitch and/or yaw AP servos. But it is still even easier to do those now.
Finally, conduit is a good idea and I used the corrugated stuff from Van's. I think it's impossible to figure out all of the wires you will eventually want/need to run back to the tailcone at this stage, so the conduit is nice to have. I pre-ran my 2AWG main electrical wire inside of one conduit (since it is very thick and will be hard to pull later) and I have three others that are empty except for pull strings already run through them. Note that I started the conduit close to the firewall and I ended it aft of the baggage floor so that I can get wiring from the avionics bay to the tailcone.
I really don't think this level of detail is necessary at this point especially if you run conduit, but here is what I will have wired to my tailcone when I'm done: CAN bus (for Garmin AP servos and GMU11), #2 and #8 AWG (for my two batteries/busses), static port tubing, wires for two master contactors, two wires for elevator trim, power for AP servos and GMU11, tail light wiring, two battery fault signal wires (for EarthX batteries), wiring for ELT. As I mentioned, I have the 2awg wire in one conduit, I plan to use a second one for all of the other power, and a third for all of the signal wires. I plan to have one empty conduit for future use.
- One or two static ports for your pitot-static system (I put mine on either side of the tailcone)
- If you are doing an overhead console, you'll need to cut NACA vents in the tailcone. You may also want a vent open/close servo.
- Some people do something in this area to facilitate battery charging on the ground
- As mentioned, AP pitch and yaw brackets are easier to do now
- Consider if you want to mount your ELT back in the tailcone -- it can be done later, but you could put a bracket in now
- Your magnetometer will typically be in the tailcone or wingtip -- if you want to go tailcone now's the time to install that bracket
- If you already have your rudder cables (F-1053) then you should go to page 38-8 and get the tailcone portion done now.
- If you want any antennas (e.g. GPS, VOR, etc) above or below the tailcone or even on the VS you could consider that now.
Finally, conduit is a good idea and I used the corrugated stuff from Van's. I think it's impossible to figure out all of the wires you will eventually want/need to run back to the tailcone at this stage, so the conduit is nice to have. I pre-ran my 2AWG main electrical wire inside of one conduit (since it is very thick and will be hard to pull later) and I have three others that are empty except for pull strings already run through them. Note that I started the conduit close to the firewall and I ended it aft of the baggage floor so that I can get wiring from the avionics bay to the tailcone.
I really don't think this level of detail is necessary at this point especially if you run conduit, but here is what I will have wired to my tailcone when I'm done: CAN bus (for Garmin AP servos and GMU11), #2 and #8 AWG (for my two batteries/busses), static port tubing, wires for two master contactors, two wires for elevator trim, power for AP servos and GMU11, tail light wiring, two battery fault signal wires (for EarthX batteries), wiring for ELT. As I mentioned, I have the 2awg wire in one conduit, I plan to use a second one for all of the other power, and a third for all of the signal wires. I plan to have one empty conduit for future use.
I tied a string around a wad of paper and sucked it through with a vacuum. You end up with a pull string. Easy to pull the wire with that. Pull another string through with the wire bundle for a spare.Generally impossible to push wires through corrugated conduit, suggest smooth stuff instead.
I spent time in the telecommunications business long ago, so using fish tape is second nature.
