Van's Air Force
You are using an out of date browser. It may not display this or other websites correctly.
You should upgrade or use an alternative browser.
You should upgrade or use an alternative browser.
Installing strobes
- Thread starter RA9A
- Start date

Probably the same long time ago, I installed Aeroflash power-packs with Nav, Position and Strobe combo wing lights, but they just keep going and going and haven't failed yet. And, used spare parts are very cheep on ebay! But, those LED's are very nice and bright!A looong time ago, I installed Whelens with a power pack in each wing. I have since removed the power packs and converted the bulbs to flashing LEDs in the Whelen frames.
I should do this. Which flashing LEDs did you use?A looong time ago, I installed Whelens with a power pack in each wing. I have since removed the power packs and converted the bulbs to flashing LEDs in the Whelen frames.
They all work. It all depends on what money you want to spend. So, if you want bright lights, great support, and inexpensive, I would recommend FlyLED. I have installed them in the last 6 RVs I have built. I have also installed their 7 Star landing lights in my own plane.

A few others have already recommended us, thank you! We have more than just strobes, and if you buy one of our kits then you get to add soldering to your accomplished skills list as well. It only takes a few hours and is a perfect winter project that can be done at home.
Oh and they're bright too!
Oh and they're bright too!
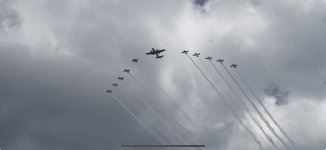
Ok this is not about strobes but FlyLeds makes some good products, including strobes. I installed their 4 light combo in each wing leading edge and as you can see in the attached picture they show up very well. I am the only one in the formation with FlyLeds and the RV-8 on the other side has the Duckworks lights which also seem pretty bright. Flying with the B-25 was pretty damn cool by the way.
Just buy all your lights from Paul and be done with it!
Just buy all your lights from Paul and be done with it!
Attachments

Would appreciate more info on the flashing LED's you used. Thanks.and converted the bulbs to flashing LEDs in the Whelen frames.
One advantage of FlyLeds is that you can do all the soldering in an evening or two in the comfort of your home, rather than a (presumed) cold Colorado hangar!I’m planning on installing strobes on my RV9A as a Winter project and I’m looking for suggestions as to what brand to install I’m open for suggestions
Seriously: no one has mentioned the real difference between FlyLeds and the others. All LEDs need some form of average current limiting to keep from burning them out. Paul uses simple resistors to limit the current (this is dissipated as heat). All the others (I think?) use an electronic ‘chopper’ circuit to rapidly (too fast for your eye to see) turn the LED on-off-on-off-… to keep the heat load in the LED within limits. Unfortunately all ‘chopper’ circuits generate some RF noise (technical: look up ‘Fourier series’). The circuits and the installations need careful design to keep these harmonics from getting out and into avionics. True story: During my build in the garage I tested a really cheap LED I had found on the internet. I had an FM radio (near aviation frequencies) playing in the garage. When I turned on this light, a huge amount of static came out of the FM radio. Made me a believer. Now, FlyLeds have one disadvantage: those dropping resistors turn alternator power into heat, so for equivalent brightness, the choppers draw a couple less amps than the FlyLeds do. If you’re right at the max output of your alternator, you may have to go with a chopper. Just check all the current specs.
I got "the works" package from FlyLEDS and we did everything in roughly 2 evenings. However, i opted to spend extra on having them solder everything.
Do you have any lights installed currently? I went with Whelen (Orion 550 on the tail, 650 on the wings) because they dropped right into the mounting provisions on my plane from the old Whelen fixtures. I still had to run all new wiring, but that's something to consider.
FlyLEDS are fantastic light and amazing value for money with outstanding customer support.
Hi Scott, I'm installing The Works kit into RV7 W715-1 tips and would love to know how much chopping was necessary to get the forward facing boards in with the 3 lamps assembled. The Flyleds cutting template for the out-facing boards is sufficient only to mount the board, not for the extended tang of the forward-facing boards to slide in. Might you have a pic of how yours looked by the time you were done?I got "the works" package from FlyLEDS and we did everything in roughly 2 evenings. However, i opted to spend extra on having them solder everything.
Hi Mike
This picture from the instructions shows the W-715-1 wingtip:

and this is the RV-10/14 wingtip which is narrower on the forward face, hence the cut marks going right to the outside edge in this customer's case:

Any RV-9 pictures will show that it's narrower again! We had to use smaller LEDs for the strobes on this board just to squeeze everything in.
This picture from the instructions shows the W-715-1 wingtip:
and this is the RV-10/14 wingtip which is narrower on the forward face, hence the cut marks going right to the outside edge in this customer's case:
Any RV-9 pictures will show that it's narrower again! We had to use smaller LEDs for the strobes on this board just to squeeze everything in.
For those with an old Whelen power pack system -
If/when it fails the Flyleds “The Works” kit ( including Nav/Strobe/ Landing lights) + Whelen adaptor using the existing Whelen strobe wiring + a new Flyleds Strobe/Tail light is less total cost than the Whelen power pack on its own, that’s a ‘no brainer’ decision IMO.
If/when it fails the Flyleds “The Works” kit ( including Nav/Strobe/ Landing lights) + Whelen adaptor using the existing Whelen strobe wiring + a new Flyleds Strobe/Tail light is less total cost than the Whelen power pack on its own, that’s a ‘no brainer’ decision IMO.
I have the fly leds on my 10, but no spot on the 6 for them. So i made some custom strobe lights that fit in the whelen glass and built a control box. Probably a hybrid between resistors and switching. I used mosfets. Coming out of the drain is a moderate resistor and there is a second resistor where that bridges back to the gate. By tweaking the two resistor sizes, you can get whatever current you want for the led and the mosfet actively throttles it, maintaining the desired current. I used one circuit for each of the 6 leds in the assembly. The mosfet controls flow out the drain based upon the input current on the gate. It is variable flow, not switching or pwm. Hope to get them installed soon and confirm no rf. Insanely bright. Went two blocks down the road one night and just as bright as in the garage. They literally light up the garage for the 150ms they are on. Leds are pretty bad a$$ -drawing 850mA each, with 6 in each assembly.. Used two 555 chips as I struck out trying to right code the other style chips.One advantage of FlyLeds is that you can do all the soldering in an evening or two in the comfort of your home, rather than a (presumed) cold Colorado hangar!
Seriously: no one has mentioned the real difference between FlyLeds and the others. All LEDs need some form of average current limiting to keep from burning them out. Paul uses simple resistors to limit the current (this is dissipated as heat). All the others (I think?) use an electronic ‘chopper’ circuit to rapidly (too fast for your eye to see) turn the LED on-off-on-off-… to keep the heat load in the LED within limits. Unfortunately all ‘chopper’ circuits generate some RF noise (technical: look up ‘Fourier series’). The circuits and the installations need careful design to keep these harmonics from getting out and into avionics. True story: During my build in the garage I tested a really cheap LED I had found on the internet. I had an FM radio (near aviation frequencies) playing in the garage. When I turned on this light, a huge amount of static came out of the FM radio. Made me a believer. Now, FlyLeds have one disadvantage: those dropping resistors turn alternator power into heat, so for equivalent brightness, the choppers draw a couple less amps than the FlyLeds do. If you’re right at the max output of your alternator, you may have to go with a chopper. Just check all the current specs.
Last edited:
Cannot say enough about the FlyLed’s. Simple to install, super bright and honestly just trouble-free.
 but I redid it with wires and all is well.
I recently bought and installed the Aero LED "Vans RV" kit with NAV, Strobe, Tail and Landing/Taxi lights and I couldn't be happier. The beauty is they dropped right into the Whelen mounting brackets on the wings and tail.

 www.aircraftspruce.com
AeroLEDs Vans RV Kits | Aircraft Spruce ®
AeroLEDs Vans RV Kits Four kit options, none of which require power supply.
A lot depends on what your wing tip configuration is. My tips are the Horner style and had the old whelen nav/strobe installed on “blisters” I glassed in on the original build. Made the decision an easy one for me.
If you have the wing tip style cut outs with the large lens, beware as some folks get glare off the strobe and have to install a “fence” on the wing to block the light. Just depends on wing tip type.

If you have the wing tip style cut outs with the large lens, beware as some folks get glare off the strobe and have to install a “fence” on the wing to block the light. Just depends on wing tip type.