Craig J
Member
Hello everyone, new RV-10 builder. A lot of great experience on here. Grateful for all your thoughts.
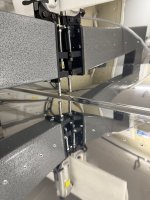
Had a slip when dimpling my Horizontal stab skins. Always grateful for a safe lesson in humility, but this one made me swear a little…lol. The correct hole is a full and proper dimple. The second hole just stabbed through the skin, didn’t misshape or dimple again off center.
I’ve read the technique about flattening/filling/ dimple and rivet on either side. That would work, assuming I have enough room on that rib. (Still need to check that.) However, what do you think about riveting as normal, then filling the extra stab hole with jb weld or the like? Not as strong with some missing material on the one side, but with the jb weld filling the hole after, I’m thinking that may work. What are your thoughts?
Thanks everyone!