Van's Air Force

The definitive Van's Aircraft support community! Buying, building or flying an RV? Join our exclusive family of mentors and enthusiasts!

Overhauling an IO360-C1E6 for a RV14

TASEsq

Well Known Member
Patron
This thread will chronicle my misguided journey in the overhaul of an IO360-C1E6 into my RV14 (taildragger).

I will be making updates here as links to my blog for more detail.

Post #1 goes into the reasons i chose to go for an overhauled IO360, as opposed to a new IO390 (cost, foreign currency and trade risks, and lead time), as well as picking up the engine and getting it home.

An index of posts is below:
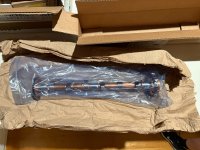
Post#1 - Engine Overhaul: I bought an engine!
Post#2 - Engine Overhaul: Some research / Initial Dissassembly
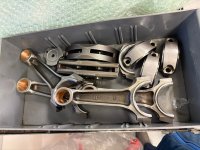
Post#3 - Engine Overhaul: Disassembly Day
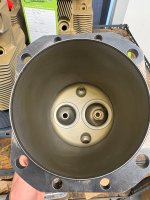
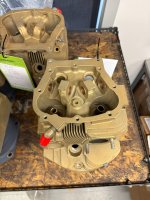
Post #4 - Engine Overhaul: Cleaning and Inspection Day
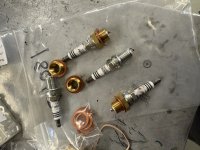
Post #5 - Engine Overhaul: More Cleaning & Sending Parts Away
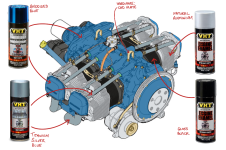
Post #6 - Engine Overhaul: Testing paint colors / Painting begins & An Expensive Parcel
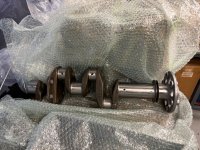
Post #6 - Engine Overhaul: Case Measurements / Camshaft Lubrication Mod / Making the engine Experimental
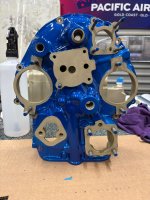
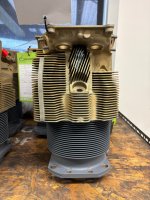
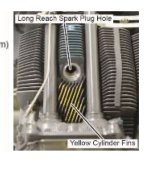
Post #7 - Engine Overhaul: Painting the Case and Cylinders
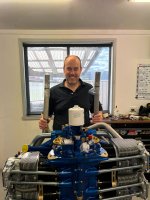
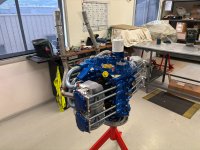
Post #8 - Build day #1! (Engine case)
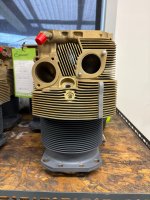
Post #9 - Build day #2! (cylinders and other little jobs)
Post #10 - Engine Overhaul: Debrief / Component Replace or Overhaul Decision$

Engine / Overhaul Reference Documents
 
Last edited:
Post #2 is some research into what this engine actually is, and confirms the model and the what the 'mystery sump' was which came with the engine. I also start to dissassemble the accessories on the engine, before taking it to the shop to begin the real work.

 
This should be a great and useful thread Trent - keep it going please! I really think that with the price of new engines going to the stratosphere, the future of homebuilding is going to be going back to its roots when it comes to engines - rebuilding cores into good, safe engines. When I first flew both the -14 and the -14A, one had a 390, one had a 360 (angle valve) and they were within two knots of each other in top speed….. there have been lots of angle valve 360’s built that are floating around!
 
This should be a great and useful thread Trent - keep it going please! I really think that with the price of new engines going to the stratosphere, the future of homebuilding is going to be going back to its roots when it comes to engines - rebuilding cores into good, safe engines. When I first flew both the -14 and the -14A, one had a 390, one had a 360 (angle valve) and they were within two knots of each other in top speed….. there have been lots of angle valve 360’s built that are floating around!
I have thought this for a while new, if I were doing this again I might go the rebuild 360 route. The savings would be immense, and as a flat land flier, I really never need the climb performance I have on tap with the 390 (although it does make me giggle like a kid regularly hahah).
 
Post #3 is all about the big disassembly day! The engine starts out as an engine and ends up and bits and pieces.

So far, the list of parts (in addition to the mandatory replacement parts) we will need to replace are:
  • Camshaft
  • 4 x Cylinders
  • Oil Pump Housing
  • Oil filter base assembly
  • The gear on the end of the crankshaft
  • and fingers crossed on 2 x conrods!
Have a guess before you read the blog post, how many special shop tools are needed to pull the engine apart? (in addition to normal hand tools etc).

 
Great updates! Keep it going. Am possibly going this way with an A1B6, so am watching this with interest!
 
I have thought this for a while new, if I were doing this again I might go the rebuild 360 route. The savings would be immense, and as a flat land flier, I really never need the climb performance I have on tap with the 390 (although it does make me giggle like a kid regularly hahah).
I have a rough budget going, and I wouldn’t say the savings were “immense” in the overall cost of the engine, but if my costings are close it will be around 20% cheaper than a new engine through Vans (with a 2+ year wait), or around 25% cheaper than an overhauled engine from Lycon or Barrett with a 6-11 month lead time.

My initial costings are just spruce pricing, so hopefully the savings will be a bit more once I order from superior and get a bit of a discount using the engine shop account etc.

I haven’t ordered any parts yet, so I don’t know if I will be caught up with an extended lead time as well due to parts, but I expect so.
 
man, you gotta be spending as much time working on this engine and the whole project, as you do nurturing your blog :ROFLMAO:
Very neat, well done, thanks for sharing.
 
man, you gotta be spending as much time working on this engine and the whole project, as you do nurturing your blog :ROFLMAO:
Very neat, well done, thanks for sharing.
Ha - I do it when at ‘work’ and not able to be in the shed! I’m hoping it adds value one day when I’m broke and have to sell the plane in order to eat.
 
I have a rough budget going, and I wouldn’t say the savings were “immense” in the overall cost of the engine, but if my costings are close it will be around 20% cheaper than a new engine through Vans (with a 2+ year wait), or around 25% cheaper than an overhauled engine from Lycon or Barrett with a 6-11 month lead time.

My initial costings are just spruce pricing, so hopefully the savings will be a bit more once I order from superior and get a bit of a discount using the engine shop account etc.

I haven’t ordered any parts yet, so I don’t know if I will be caught up with an extended lead time as well due to parts, but I expect so.

I overhauled the io-540 from my Lance this winter. I had about 22k in parts vs 55k quotes from overhaul shops. My engine only had 1200 hours, so everything was in pretty good shape, including the cylinders. The only new parts, other than the ones required, were pistons, cam/ tappets, crank gear, and a few pushrods.

I found airpower to be be consistently 20% cheaper than Spruce. They also have remarkably fast free shipping and tremendous inventory. The only things I got from Spruce were the various sealants and a couple tools.

I found it to be a lot of fun. So much so in fact that i decided to pursue an a&p certificate, as well as pull the trigger on a rv-14 build. I had about 500 hours logged on the 540 o/h, but at least half of that was research. The biggest frustration was waiting 4 months on a case that divco had told me would take four weeks.

I'm building a homebrew io-390 for my-14. I picked up a tio-360-c1a6d core, which has the heavy crank like the factory 390's. I'm hoping i can build it for around 25k, vs the 65-70 lycoming wants for a new one.

Do a good job staking the set screw for the governor drive idler shaft, and use loctite as called out in the manual. The o/h shop that did my 540 (now out of business) didn't, and I ended up with an oil covered windshield. Then Airworx did an IRAN and also didn't stake it, so it got loose again, which was why I overhauled it this time. You can bet I staked it good & deep.
 
Last edited:
Do a good job staking the set screw for the governor drive idler shaft, and use loctite as called out in the manual. The o/h shop that did my 540 (now out of business) didn't, and I ended up with an oil covered windshield. Then Airworx did an IRAN and also didn't stake it, so it got loose again, which was why I overhauled it this time. You can bet I staked it good & deep.
copy - thanks for the heads up. I’ll make a note of it. The shop here didn’t want to touch those gears - we’ve left them in the case (he said the case overhaul guy gets upset if he damages something trying to get that set screw out, so he leaves it for them).

This is the one you are referring? #8
 

Attachments

  • IMG_6413.jpeg
    IMG_6413.jpeg
    153.3 KB · Views: 106
  • IMG_6414.png
    IMG_6414.png
    585.7 KB · Views: 104
  • IMG_6415.png
    IMG_6415.png
    457.2 KB · Views: 103
copy - thanks for the heads up. I’ll make a note of it. The shop here didn’t want to touch those gears - we’ve left them in the case (he said the case overhaul guy gets upset if he damages something trying to get that set screw out, so he leaves it for them).

This is the one you are referring? #8
yep. If that set screw backs out, it will spin and eventually wear through the plug (the oil pressure is trying to force it out like a hydraulic cylinder). Then the shaft pops out the front and all the oil follows it over the next couple minutes. In other news, it turns out that a lycoming engine will run without oil pressure for at least 10 minutes without major damage. There's a service bulletin on it, and it has been incorporated into the overhaul manual. The aerobatic versions of the front-governor engines have an AD over it, and it has killed half a dozen pilots.

I documented my 540 overhaul on POA: https://www.pilotsofamerica.com/community/threads/ffs-i-need-a-new-hobby.149050/
Holy moly - now *that* is an epic thread.

I doom scrolled looking for your posts but couldn’t get through all of it.

I can’t believe you had to replace the cases for want of some bloody loctite in a set screw, and a harder whack with a punch. Unbelievable. I’ll be checking that little screw when the cases come back!
 
I have a rough budget going, and I wouldn’t say the savings were “immense” in the overall cost of the engine, but if my costings are close it will be around 20% cheaper than a new engine through Vans (with a 2+ year wait), or around 25% cheaper than an overhauled engine from Lycon or Barrett with a 6-11 month lead time.

My initial costings are just spruce pricing, so hopefully the savings will be a bit more once I order from superior and get a bit of a discount using the engine shop account etc.

I haven’t ordered any parts yet, so I don’t know if I will be caught up with an extended lead time as well due to parts, but I expect so.
Yeah great point, I maybe overstated the savings a bit. Still 60+k for an engine with a 2 year wait is hard to swallow....
 
Post #4 - Cleaning and Inspection Day.


We clean up the crank and measure it to find it needs to go away and be polised to minus 0.0030.

We find we need some rocker shafts, but find an oil pump housing and a oil filter base assembly in the dungeon!

We get gifted 4 cylinders which are in awesome condition and inspect and remove the valves.

Getting closer to sending the main parts away -
  1. The case will go away for overhaul, inspection and close and line boring. The case will be modified with an oil groove (see below)
  2. A new lycomng camshaft will be ordered, then sent to New Zealand to be drilled for oil journals to the lobes. (hence the case mod)
  3. The crankshaft will get polished to hopefult m0.003
  4. The conrods and counterweights will get inspected and overhauled
  5. The cylinders will go away for overhaul.
  6. I will send away my massive parts list of all the bits we will need to put this back together! (future post on that).
And as if Lycoming is mocking me, there is a $ cast into the crankshaft! Is this a bad omen?
 

Attachments

  • IMG_6529.JPG
    IMG_6529.JPG
    1.4 MB · Views: 62
Anyone know what the “-4 -5” stamps on the top spine of both case halves might mean?
 

Attachments

  • IMG_6702.jpeg
    IMG_6702.jpeg
    3.3 MB · Views: 87
  • IMG_6703.jpeg
    IMG_6703.jpeg
    3.2 MB · Views: 83
I have a rough budget going, and I wouldn’t say the savings were “immense” in the overall cost of the engine, but if my costings are close it will be around 20% cheaper than a new engine through Vans (with a 2+ year wait), or around 25% cheaper than an overhauled engine from Lycon or Barrett with a 6-11 month lead time.

My initial costings are just spruce pricing, so hopefully the savings will be a bit more once I order from superior and get a bit of a discount using the engine shop account etc.

I haven’t ordered any parts yet, so I don’t know if I will be caught up with an extended lead time as well due to parts, but I expect so.
If you are a veteran, ACS will give you a discount. I think it is around 10% on many parts. I have a LLC and use that instead, which has a better discount, I think.
 
More cleaning of the larger cases, sandblasting and alodining parts, then putting everything together to be sent away for overhaul or NDT.
Just curious - do you have the industry “on continent” to do case and steel parts overhaul, or do Lycoming parts have to come to the US (or elsewhere)?
 
Just curious - do you have the industry “on continent” to do case and steel parts overhaul, or do Lycoming parts have to come to the US (or elsewhere)?
It depends on what needs to be done. My crankshaft needs to be polished to m03. If it needs to go further to get the scratches out (m06) then it needs nitriding, so will have to go back to Tulsa.

🤞🏻🤞🏻🤞🏻

The case (and the case mod), conrods, counterweights, cylinders can all be done here. The new camshaft will get sent to NZ for the oil modification.

I think, DAILY, “if only I was in the states”
 
Nice write up with pictures!!
I really enjoyed reading them. Looking forward to your next post.
You may have seen this. If not, this gentleman has a multi part youtube engine overhaul series.
 
Nice write up with pictures!!
I really enjoyed reading them. Looking forward to your next post.
You may have seen this. If not, this gentleman has a multi part youtube engine overhaul series.
That’s a great series. I watched it before I started but it means a lot more now I’ve seen the engine apart. His video on the paperwork was very valuable!
 
It depends on what needs to be done. My crankshaft needs to be polished to m03. If it needs to go further to get the scratches out (m06) then it needs nitriding, so will have to go back to Tulsa.

Some of these processes require toxic chemical agents which are banned in Australia by our EPA or OSHA equivalents, so we get Americans to do them instead :)

The nitride case hardening is a very thin layer, and M003 will grind away most/all of it. When I had mine done in 2021 in Tulsa I had it nitrided at M003. Maybe consider that for yours if it doesn't add too much expense (or, at the very least, get some advice on it from before they send it back).

- mark
I was wondering about how thick the nitride layer was - came across this - which says the nitride layer is 0.0180-0.0260 thick. (Aka 18 - 26 thou).
IMG_6805.jpeg

The lycoming overhaul manual is a bit cryptic but i read it to mean you can polish to the minimum in-service limit minus 0.0030 (aka 3 thou). If you go to 0.0060 then it needs to be re-nitrided.

IMG_6804.png

I’ve tried to work out how much room we have in my post, and if I have it right, there is 2.4 thousandths (0.0024) on the main journals and 1.3 thousandths (0.0013) on the connecting rod journals - I.e. this is how much we have left from the worst measurement we took to the inservice min diameter minus 0.0030.

So fingers crossed the scratches come out - I could feel one with my finger nail. And these numbers are honestly a bit abstract. Especially since I’m a non-native imperial measurer! It’s hard to know what a scratch is in actual depth (hopefully less than 1.3 thousandths!). A human hair is only 1 thousandth thick ffs.

As always open to learning here!
 
Last edited:
So fingers crossed the scratches come out - I could feel one with my finger nail. And these numbers are honestly a bit abstract. Especially since I’m a non-native imperial measurer! It’s hard to know what a scratch is in actual depth (hopefully less than 1.3 thousandths!)

1" is exactly 25.4 mm. 0.0013" is 33 microns or about 1/2 a hair width (~0.003").
 
I'm also in the middle of disassembly with my IO-360. It was an Eagle Engine with 700 hours on it. At the last inspection metal fragments were found in the oil screen. The fragments were sent for analysis and found to be consistent with cam and lifter material.

I was hoping to not have to go though this process. It is definitely costly and slow.
 
Post number 6 - i finally choose what paint i want to use on the case and crack onto painting.

Some good news from the overhaul shop - the crankshaft polished up well at M03, so i have ordered bearings. They will take around 5 weeks, so once we have them we can get on with dimensioning the case, then painting that comes next.

Plus, i got an expensive parcel!


Attachments

  • IMG_7617.JPG
    IMG_7617.JPG
    3.7 MB · Views: 65
  • Lycoming-O-360-A-engine-line-drawing.png
    Lycoming-O-360-A-engine-line-drawing.png
    736.4 KB · Views: 65
  • IMG_7764.JPG
    IMG_7764.JPG
    3.1 MB · Views: 65
We have started getting parts back from the shop - it's hard to believe that these are the same cylinders. The case had to be sent back to have the groove machined into the forward oil gallery to support the oil mod being done to the camshaft (they missed doing it somehow, but thankfully did it free of charge including freight, which was good) - and we have sent the camshaft to New Zealand for drilling.
 

Attachments

  • IMG_7882.JPG
    IMG_7882.JPG
    4.6 MB · Views: 126
  • IMG_7880.JPG
    IMG_7880.JPG
    3 MB · Views: 131
  • IMG_7879.JPG
    IMG_7879.JPG
    1.6 MB · Views: 136
  • IMG_7878.JPG
    IMG_7878.JPG
    3.2 MB · Views: 113
  • IMG_7876.JPG
    IMG_7876.JPG
    3.3 MB · Views: 115
  • IMG_7877.JPG
    IMG_7877.JPG
    3 MB · Views: 122
WOW..........I would be much more careful of the way your handling those rod, rod caps and counter weights. There all steel, heavy and one little nick can really mess up the clearance on the bearing surfaces. Please don't stack the components like that.
 
WOW..........I would be much more careful of the way your handling those rod, rod caps and counter weights. There all steel, heavy and one little nick can really mess up the clearance on the bearing surfaces. Please don't stack the components like that.
I’ll put some bubble wrap between them next time I am in the shop. That’s the way they had been unpacked when I found them. Thanks for the heads up.
 
There are a lot of reference docuemnts for this overhaul, scattered all around the web.

I have decided to compile a reference list.

You can view it here.

If anyone has any other documents or sites they found a useful reference when overhauling, please let me know and i will add to the list.
 
Looking great! If you haven't already installed them, consider returning the Superior tappets and instead buying Lycoming ones. Lycoming ones have the DLC coating and this seems to solve the spalling issues. The cost difference is minimal. On the other hand there have been a number of Superior tappets fail after a short period of time.

Anyway good luck, nice job on the paint too.
 
Last edited:
Looking great! If you haven't already installed them, consider returning the Superior tappets and instead buying Lycoming ones. Lycoming ones have the DLC coating and this seems to solve the spalling issues. The cost difference is minimal. On the other hand there have been a number of Superior tappets fail after a short period of time.

Anyway good luck, nice job on the paint too.
Thanks!

We discussed this at length. We are using a lycoming cam, and the question was raised about whether to go with the DLC tappets, or use the superior ones. In the end it came down to cost - the DLC tappets were significantly more expensive (the delta was close to 3k!). In addition there have apparently been some bad batches of lycoming tappets which necessitated pulling the engine apart - this was from the engine shop I’m using, but they mostly do 6 cylinder, so could be a different tappet etc. In lieu, we have had the cam and case modified with an oil pickup at the front and weep holes at the cam faces, so the tappets will get a supply of oil to them. They also drill a hole at the thrust face so the crank gets oil there too.

Hopefully this isn’t a bad choice!
 
You did your research then, and yes the centrilube camshaft (or whatever it's called) is a good plan. Looking forward to seeing it go back together.

What's your plan for sealing the case halves? Silk thread or are you going left field with Loctite or RTV? I used Loctite 518, and had a couple small leaks, but this was solved by later applying Loctite 290 with a vacuum on the case. In hindsight I would use silk thread as it clearly works.
I think they go old school with the glue (not sure what it is) and thread.
 
Post #7 sees us get the case back and complete the inspection and measurement of the bearings and crankshaft end float. We also checked out the camshaft and case lubrication mod, and finally stamped the case as "experimental" - never to return to a Seneca again. Ready to live a life in more than straight and level!

 
Last edited:
Post #7 - details how i masked up the case and cylinders for painting.


I stood in the shed looking at these for longer than i care to admit.
IMG_9225.JPG

I am considering what do do with the baffles now - the order of operations, if i did intend to paint them. They will need refinement once the engine is together and i'm told they prefer the baffles installed to run it on the test stand. Plus i really need the baffles on to hold the SDS fuel block etc. So i figure just go ahead and put them together at home, then once the engine is built, fettle them as needed on the stand. I will have a heap of work on the stand anyway, to install all the SDS componentry for the run.

But do i paint them or not? I do like the look of the silver blue for the baffles. I have read the many threads and i know it's personal preference etc. I don't know if the VHT will hold up to scrathces, but i think it will be ok (hence my choice of this paint for the engine itself). I don't want to powdercoat nor anodize. I think it's either VHT paint, or bare aluminium (or maybe polished but that sounds pretty hard work).

LKRV8-FWF506.jpg

If i were to paint them, i was thinking of just priming the parts (with VHT primer) before riveting at home. Get them all assembled. Once at the shop, make any modifications / changes then spot prime any areas as needed. Then paint - you must do the color coats either within an hour of the primer, or after 7 days, so this works. This way at least, there is paint in between the faying surfaces, as a way to help prevent corrosion.

The other option would be to assemble up to the point of riveting. Then acid etch and clean at home, then take them to the shop and alodine all the parts. Rivet them all toghether at home, then back to the shop to final fitting etc. I could even dip again once all assembled to get any areas which had been modified etc? Then think more about painting etc later. Does anyone know if you can alodine an already riveted together assembly?

Anyway, as always, appreciate any feedback or advice. This forum truly is invaluable.
 
It's been a while between posts - the engine shop i am using operates a large fleet of twin pistons, and had a few engines needing to be done - and i am at the bottom of the list!

Anyhow, pleased to report that the engine has been built!

Post #8 covers day one of the build - where we get the case together. It was about 8 hours for 2 blokes and a thoroughly enjoyable day!

Day two will be getting the cylinders on and will be a seperate post (next time i am in the office and have some time to kill!)


Attachments

  • IMG_2753.JPG
    IMG_2753.JPG
    3.4 MB · Views: 63
  • IMG_2752.JPG
    IMG_2752.JPG
    2.8 MB · Views: 64
Last edited:
This should be a great and useful thread Trent - keep it going please! I really think that with the price of new engines going to the stratosphere, the future of homebuilding is going to be going back to its roots when it comes to engines - rebuilding cores into good, safe engines. When I first flew both the -14 and the -14A, one had a 390, one had a 360 (angle valve) and they were within two knots of each other in top speed….. there have been lots of angle valve 360’s built that are floating around!
Ooooh, a sticky for this thread please!
 
Last edited:
A question for the brains trust - being an angle valve Ross send me some NGK bkr8eix plugs, which are “long reach”.

Should I add some yellow paint to the top of the cylinders? Is this a common thing or only really from lycoming?
 

Attachments

  • IMG_2731.jpeg
    IMG_2731.jpeg
    2.4 MB · Views: 33
  • IMG_2807.jpeg
    IMG_2807.jpeg
    199.8 KB · Views: 30
Post #8 sees us complete the engine itself, including the installation of the cylinders, as well as all the sundry items such as intake tubes, exhaust, oil drainback lines etc.

The engine is basically complete, with the exception of the SDS components such as the fuel and ignition systems, as well as the electronic side of things (wiring and sensors). I have already been working on these, and will post next here when we actually run the engine on the truck!


Attachments

  • IMG_2753 (1).JPG
    IMG_2753 (1).JPG
    3.4 MB · Views: 16
A question for the brains trust - being an angle valve Ross send me some NGK bkr8eix plugs, which are “long reach”.

Should I add some yellow paint to the top of the cylinders? Is this a common thing or only really from lycoming?
Yours are not "long reach". The plugs maybe are called that, but that's to accommodate the overall length of the bronze adapter. Below are short-reach adapters vs long-reach (for thick-wall cylinder heads, like 390's, which have the yellow paint).

1779083187366.png1779083203792.png

Here's some background info: https://www.lightspeedaero.com/Products/Sparkplugs.htm
 
Last edited:
Back
Top