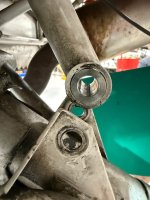
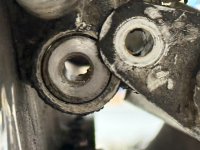
During the condition inspection I hoisted the nose using an engine hoist to work on the nose wheel and gave the original 2012 build nose gear leg a wiggle test. The nose gear leg moved left and right about an inch and wiggled up and down a few inches even though elastomeric pads were making contact with engine mount (tension was set properly on the gear link bolt). After closer inspection I found that the bushings had worn their races to the point light could be seen around the bushings. The bolt holes in the steel ears of the nose gear leg had also elongated allowing slop with the bolts as well. A quick call to Vans and I found out they had an upgrade kit that includes all the powder coated weldments, bolts, nuts, and cotter pins to accommodate the swap to the upgraded engine mount/gear link/nose gear leg. What was not included in the kit was the (4) elastomeric pads (EA J-11968-14) and the bushing located in the bottom of the gear link (VA-143). Aside from those items the kit was complete to upgrade a flying airplane. For the swap you could reuse your old elastomeric pads and VA-143 lower gear link bushing although I opted for new parts.
Of note, the new mount uses slightly different tubing geometry forcing my oil cooler to move an inch to the port side from its original location. 7ZK has a one off oil cooler mount so YMMV with an original Vans oil cooler mount. Additionally one of the firewall bolts required a slight reaming to get the bolt in.
Of note, the new mount uses slightly different tubing geometry forcing my oil cooler to move an inch to the port side from its original location. 7ZK has a one off oil cooler mount so YMMV with an original Vans oil cooler mount. Additionally one of the firewall bolts required a slight reaming to get the bolt in.