

Hello hive mind,
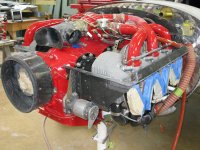
I am reworking my plenum cover and looking for material that's stiff enough to resist bowing/bending from the incoming air, yet flexible enough to span 4 cylinder heads and absorb their movement relative to each other. Pictures of the current plenum cover below.
I used Van's baffle sides, end walls, and front ramps. The cover is my own design and comprised of a single trapezoidal piece of 6061-T6 0.040" with 2024-T3 0.040" edge reinforcement to capture the rubber baffle material. The top edges are constructed of 2024-T3 0.040" 3/4 x 3/4" angle, with another 3/4" plate to capture the outside edges of the rubber baffle material. The whole affair is held in place with #8 screws front, back, and sides.
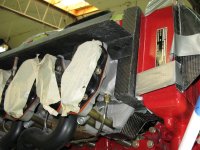
The rubber baffle material interfaces with the upper inlet ramps in a 3/4" wide, 3/32" deep step formed into the ramps. Operationally, I see CHT's in the high 200s - 300's and oil temps in the 185-190°F range. Plenty of margin for these hot Texas days, and extended holds at you know where. I am very happy with the cooling capability of this system. However, the flexing (ballooning) of the rubber side covers stresses the stiffeners along and under the top piece and causes them to crack.
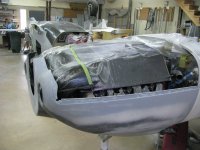
I'm thinking about replacing the aft 3/4 or so of the rubber top pieces with either aluminum sheet or perhaps fiberglass in the hopes the ballooning issue will be resolved. (aft of the green lines in the pics)
Will 6061-T6 0.040" be stiff enough but not too stiff?
Would fiberglass work just as well?
Maybe someone has access to some transparent aluminum?


I am reworking my plenum cover and looking for material that's stiff enough to resist bowing/bending from the incoming air, yet flexible enough to span 4 cylinder heads and absorb their movement relative to each other. Pictures of the current plenum cover below.
I used Van's baffle sides, end walls, and front ramps. The cover is my own design and comprised of a single trapezoidal piece of 6061-T6 0.040" with 2024-T3 0.040" edge reinforcement to capture the rubber baffle material. The top edges are constructed of 2024-T3 0.040" 3/4 x 3/4" angle, with another 3/4" plate to capture the outside edges of the rubber baffle material. The whole affair is held in place with #8 screws front, back, and sides.
The rubber baffle material interfaces with the upper inlet ramps in a 3/4" wide, 3/32" deep step formed into the ramps. Operationally, I see CHT's in the high 200s - 300's and oil temps in the 185-190°F range. Plenty of margin for these hot Texas days, and extended holds at you know where. I am very happy with the cooling capability of this system. However, the flexing (ballooning) of the rubber side covers stresses the stiffeners along and under the top piece and causes them to crack.
I'm thinking about replacing the aft 3/4 or so of the rubber top pieces with either aluminum sheet or perhaps fiberglass in the hopes the ballooning issue will be resolved. (aft of the green lines in the pics)
Will 6061-T6 0.040" be stiff enough but not too stiff?
Would fiberglass work just as well?
Maybe someone has access to some transparent aluminum?


")


