Van's Air Force

The definitive Van's Aircraft support community! Buying, building or flying an RV? Join our exclusive family of mentors and enthusiasts!

Orange Peel

mulde35d

Well Known Member
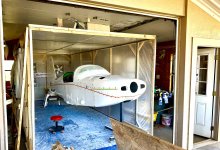
So after roughly 150 hours of sanding, cleaning, fairing, priming, a lot more sanding and waaaay more cleaning. I finally sprayed my first layer of paint. And what do I get, a very uniform layer of orange peel across both my left wing and my wheel fairings.

I am using Delfleet evolution paint series with 1 coat wash primer, 3 coats sanding surfacer (sanded smooth), and 2 coats paint. I figure it has to be a gun setup / mixture issue because the orange peel is incredibly uniform and I have good coverage (spraying 6-8 inches away from the material). I am using a Fuji Mini-mite 4 HVLP with an Apollo spray gun (1.3mm tip). My pressures and spray tips are per the specific paint chart recommendation and the temperatures were near optimal at 72 degrees and 37% humidity. Since I can't change the pressure on the HVLP spray system, my gun is set to maximum air, and I am spraying fairly thin (not quite covering with first coat), I am told I need to either thin the paint with additional reducer or reduce the spray tip to 1.0 to help with atomization.

I am going to try the additional reducer by about 20% and see how that works. Really looking forward to re-sanding the left wing and applying another coat of paint. Of note, I tried to wet sand and polish first, but i started sanding through in some areas so I figure re-sanding and re-spraying is my best bet.

For those wondering about how much paint to buy. Here is what I have used / think I will use for painting the exterior of the RV-10
Wash Primer (1 coat): 1:1 mixture = 1 gallon primer / 1 gallon hardener (aluminum parts only)
Sanding Surfacer (3 coats): 3:1:10% mixture = 3 gallons surfacer / 1 gallon hardener / 1 gallon reducer
Paint (2 coats): 4:2:1 mixture = 2 gallons paint / 1 gallon hardener / 1 gallon reducer

Feel free to offer other suggestions, I am all ears. (and yes, the pictures are the same parts and the same color, just different lighting.)
Paint 84.jpgPaint 86.jpgPaint 87.jpg
 
Oh man I can symphasize, I have just about finished painting my RV and in the process encountered many faults, including orange peel. See this thread for help from VAF:


In the pics it looks like your paint is going on too dry and not being atomized enough. Things to check: (edited after re-reading OP and seeing that you have checked the obvious)

Air pressure must be high enough at the gun and HVLP has its limitations. If it is too low it won't break up the paint droplets. I use a traditional medium pressure gun 65 psi into the air hose and the regulator at the gun is set for 35 psi dynamic pressure, for example.
Fluid needle may be too far out. Try opening 3 turns out to begin with and adjust in/out from there. Test on a sheet of paper mounted on the wall.
Paint is thinned enough (as you mentioned above)
Slow the gun down when painting so it is depositing a wet even band.
Overlap the gun strokes 50%
The opposite of orange peel and dry paint is runs and sags, so explore the boundaries on some test parts!

I sanded back and re-sprayed multiple times to get things right. The best result on the wing was spraying it flat, not vertical. I flipped it over on a rotisserie between spraying top and bottom surfaces.

Some orange peel is inevitable, even on a new car!

20250214_110558.jpg
 
Last edited:
I suggest you try smaller batches/parts, preferably flat parts until you figure it out. Unless you like sanding. Also keep in mind that extra layer is extra weight.
I hate painting for just this reason , it’s so disappointing after all the hard work. My last job turned out pretty good , then I noticed a hair in the middle of the part. Let cure , sand and then repaint. Luckily it was a gear leg fairing. For myself, one wing is enough for one session at a time. I always start on the opposite end and work towards the exhaust fan. Less overspray.
 
I do not understand your setup, so hard to advise. I agree with other poster that this is an atomization problem.

I use a compliant gun now , but have used hvlp guns in the past. Need to be careful as the pressure recommended by the paint makers are tip pressure and the gun makers don’t correlate inlet pressure to tip pressure.

My first experiment would be increasing pressure. The gun maker gives a recommendation for pressure, but this is limited by what will meet govt regs. You always need more if you don’t want peel. I generally used 28-35 psi on hvlp guns, depending upon what was being sprayed and its viscosity.

If you can’t up the pressure, the next best thing is to reduce viscosity. Reducing tip size really just lowers volume and won’t help much with atomizing.

Thin coats are a bad idea with this type of set up. A thicker coat will flow out better. Dry thin stuff tends to stay where it hit the panel. Medium wet coats is what you are shooting for.
 
Last edited:
Orange peel is basically a failure of individual droplets to flow out level. True, better atomization (smaller droplets) can help, but flow still requires time before the paint freezes into place.

Instead of increasing the reducer percentage, try a slower reducer...shoot with at least one step more than indicated.

I tend toward PPG, so I'll use it as an example. If it's 70 in the shop (in theory calling for DT870), I'll use at least DT885:


Other contributing factors include too much airflow, or surface heating, again flashing off the solvents before the coat can flow out.
 
Refine your paint settings on an old refrigerator or car door. I also use PPG Delfleet products (primer, base, clear) but in an LVLP gun.
 
I have seen the vendor's of these types of paint system at Airventure, demonstrating them by spraying colored water on paper. They make it look very appealing to buy one! Never saw one in use at a body shop though. That alone steered me away from buying one. You-Tube "Paint Society" for educational tips and demo's for painting.
 
Orange peel is basically a failure of individual droplets to flow out level. True, better atomization (smaller droplets) can help, but flow still requires time before the paint freezes into place.

Instead of increasing the reducer percentage, try a slower reducer...shoot with at least one step more than indicated.

I tend toward PPG, so I'll use it as an example. If it's 70 in the shop (in theory calling for DT870), I'll use at least DT885:


Other contributing factors include too much airflow, or surface heating, again flashing off the solvents before the coat can flow out.
What he ^ said. I use the warmest reducer so the paint has more time to flow. Also means it takes more time to flash.
Get another coat on and cut & buff. It will look nice.
 
Couple things HVLP like the name implies High volume low pressure. Hvlp guns really responded well to big high flow air line fittings, couplers, hoses and filters. If you have a 1/4" hose and a filter setup with little 1/4" npt fittings it will effect it.
Gun psi and set up. Get a small PSi gauge on the gun. I run all my gun setting wide open on the gun. Wide open fluid. Wide open psi. Wide open pattern. Now regulate psi at the wall on the big regulator. My SATA 5500HVLP run 29psi at the gun. That is 54psi at the wall. Lots of psi drop threw a 50' hose.

Be sure your mixing ratio is correct and proper induction times are met.
 
Download and print the spec sheet for your paint then follow it to the letter. Tip size, pressures, airflow volume, thin to viscosity in seconds, ect ect. 3/8” air hose with high flow air fittings then practice-practice-practice on scrap parts until you have the learning curve down. I’m in the paint process now and getting very good results with a Spectrum Black Widow gun 1.3 tip and PPG AUE Commercial Line activated urethane. Check out Paint Society on YouTube for numerous clips on almost everything you need to know.

Don Broussard
RV9 Rebuild in Progress
57 Pacer
 

Attachments

  • IMG_4382.jpeg
    IMG_4382.jpeg
    4.1 MB · Views: 41
Last edited:
Are you planning on a clear coat? On a single stage paint job the cut and buff approach is a life saver when you are not a professional painter, for both orange peel and paint runs. Also allows easy touch up in the future. Also talks a bit of the pressure off when painting. Did it on the -7 with PPG paint and Dan's instructions and about to do it on my fabric covered Champ project with Stewart Systems paint. Seems like orange peel is fairly common as I even noticed it on my Boxster when you looked real close.
 
I avoided all the headache and irritation of learning a skill set I may only use once on my aluminum airplane. It was money well spent having it professionally painted, and it still looks like it came out of the paint booth yesterday. Randy Hayes in Akron can be proud of his workmanship 36 years ago.
 
Was the first coat of paint allowed to dry before applying the second coat? That can cause orange peel. I used PPG polyurethane paint and applied the second and third coats when the previous coat was tacky. The paint felt like touching masking tape at that point. I never had any orange peel. Be careful applying too much paint as that can cause runs. You want to apply just enough paint to maintain a wet edge, i.e. smooth and shiny. I always sprayed the first coat very light, not trying to get complete coverage. The first coat gives the subsequent coats something to stick to.

For an HVLP gun, PPG recommended 10 psig tip pressure. The PPG paint expert told me 23 psig at the gun would result in 10 psig at the tip. PPG data sheets also say that if the pressure is too high you will get "dry spray". Other paint brands my differ. Best to read the data sheets. Good luck.
 
Last edited:
So after reading many of your suggestions (thank you by the way) and talking with the paint shop I am going to first try a slow reducer as it is the easiest change to control. I was using a fast reducer due to the lower temperatures, so if the new slow reducer runs too much then I can try a 50/50 mix of slow and fast reducer to find a happy medium.

Will see how it goes next warm spell here in TN when I can paint again.
 
If my memory serves me correctly the air coming from the Fuji Mini-mite 4 HVLP is already 100degrees, does this not cause a fast reducer to be very very fast ?
 
If my memory serves me correctly the air coming from the Fuji Mini-mite 4 HVLP is already 100degrees, does this not cause a fast reducer to be very very fast ?
It is definitely warmer at the turbine. It cools a bit by the time it gets to the gun through the 20' hose, but that is probably part of my issue as well. Definitely a learning experience.
 
Couple things to consider to get the air temperature down coming out of your turbine is to increase the length of hose and/or run the hose through a plastic kiddie pool full of water.
 
So after reading many of your suggestions (thank you by the way) and talking with the paint shop I am going to first try a slow reducer as it is the easiest change to control. I was using a fast reducer due to the lower temperatures, so if the new slow reducer runs too much then I can try a 50/50 mix of slow and fast reducer to find a happy medium.

Will see how it goes next warm spell here in TN when I can paint again.
As long as your reducer is slow enough not to evaporate before it hits the panel (dry spray) it is unlikely that your problem will be solved with a slower reducer. IMHO what you have here is beyond avg orange peel and a little more flow out time is not going to fix it.. My suggestion would be to invest some time and paint with more experimentation. Need to play with the gun settings, gun spacing from panel travel speed, tip size, etc. As long as the ambient temps are within the range specified for your reducer speed, it should be possible to get quality results. If you cannot, something is wrong with either your equipment or its setup or your technique. A slower reducer is just a bandaid and unlikely to provide quality results. Probably worth $200 to go buy that black widow gun from HF. Seems many people really like it. The inability to change things on your setup could be an issue holding you back.
 
Last edited:
The HF Black Widownis a copy off the SATA 5000. I recommend the HTE version. Be careful. It's High Transfer Efficiency. It really throws a lot of paint with very little overspray.
 
Back
Top