

I’ve only spent a few days tinkering around with this, but it’s got me a bit stumped - maybe someone has a clever idea for a different attack!
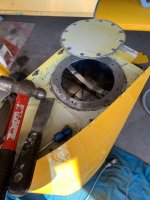
I have to remove one of the factory-installed tank close-outs on the F1 because this twenty-something year old tank (which has never had fuel in it, but is tight as a drum) has a twenty-something year old rubber flop tube in it- and I’d a lot rather change it out now, before mounting the wings than afterwards, when it cracks, leaks, or falls off inside the tank!
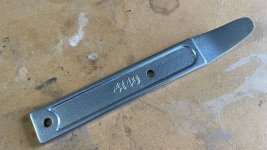
I have opened up tanks, changed fuel quantity senders, and repaired tanks many times with pro-seal, so I am not a rookie at working with this stuff….but this one has me stumped! The factory did an incredible job of sealing the plate with pro-seal, and the pro-seal was REALLY GOOD STUFF. Add to this that skin flanges, spar, tank rib flange right at the spar, and the forward tank attach fitting all conspire so that you can’t get a tool in at a shallow angle to try and wedge between the plate and the rib. The screws came out fine, and I have been able to cut away the pro-seal build-up around the edge with a razor knife. I have used PolyGone on the Pro-seal I can get to, and it converts it to goo very well, and quickly.
But I figure I’ve got a ring of Pro-seal that extends from the outer diameter of the plate in towards the center probably an inch, and I can’t get the PolyGone in there to do its work. I’m actually considering just cutting a round hole in the middle of the plate with a fly-cutter or hole saw, and then closing it again with a second plate on top! But I’d rather get the plate off if anyone has any ideas.
I just hate opening up this well-built, factory sealed tank, but that flop tube is just too old…..

I have to remove one of the factory-installed tank close-outs on the F1 because this twenty-something year old tank (which has never had fuel in it, but is tight as a drum) has a twenty-something year old rubber flop tube in it- and I’d a lot rather change it out now, before mounting the wings than afterwards, when it cracks, leaks, or falls off inside the tank!
I have opened up tanks, changed fuel quantity senders, and repaired tanks many times with pro-seal, so I am not a rookie at working with this stuff….but this one has me stumped! The factory did an incredible job of sealing the plate with pro-seal, and the pro-seal was REALLY GOOD STUFF. Add to this that skin flanges, spar, tank rib flange right at the spar, and the forward tank attach fitting all conspire so that you can’t get a tool in at a shallow angle to try and wedge between the plate and the rib. The screws came out fine, and I have been able to cut away the pro-seal build-up around the edge with a razor knife. I have used PolyGone on the Pro-seal I can get to, and it converts it to goo very well, and quickly.
But I figure I’ve got a ring of Pro-seal that extends from the outer diameter of the plate in towards the center probably an inch, and I can’t get the PolyGone in there to do its work. I’m actually considering just cutting a round hole in the middle of the plate with a fly-cutter or hole saw, and then closing it again with a second plate on top! But I’d rather get the plate off if anyone has any ideas.
I just hate opening up this well-built, factory sealed tank, but that flop tube is just too old…..

")


")


