I just bought a new cowling from Vans. After getting over the fact that it is shorter and I needed a new prop spacer I now find that the top contour is different and it doesn't match the firewall. It is about 1" high in the center. Ordinarily with a part that is just glass and epoxy you can heat it and deform it to a certain extent. But this has a large piece of honeycomb covering much of the top center piece and is therefore incredibly stiff. It seems incredible to me that this could come out of the mold and then warp, so it makes me think the mold is wrong, but how could this be??? The old vinylester parts could do that but not these epoxy honeycomb parts. I checked the contour of my firewall and it is as per drawing, so the part is much more curved. The laminate is so thin at the firewall edge that if I just try to force it into place it will bulge up between the skybolt fasteners that I have chosen to use. It's never a good idea to have to force composite parts into place. They should fit. For the money I paid I shouldn't have to rework this parts to that extent i.e. slice the inner skin on the honeycomb etc etc. I bought this cowl because I was sick of fighting the old gelcoated vinylester cowling from the late 80s. But in terms of fit this one is worse! Has anyone else run into this? Any suggestions?

Van's Air Force
You are using an out of date browser. It may not display this or other websites correctly.
You should upgrade or use an alternative browser.
You should upgrade or use an alternative browser.
new cowling fit
- Thread starter sblack
- Start date


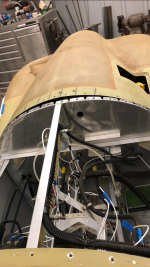
 Top is my project so I thought perhaps my firewall was off so I cnc’d a ply template based on the drawing coordinates and I get the same thing. The idea here was to heat it and clamp it in place but it’s so stiff that I think this will be a waste of time. It’s very puzzling
My finish kit/cowling was circa 1995 and of the same materials by the looks. I don't recall having any such gap and it may have been slightly "proud" but nothing that dramatic. At some point, they went to the Pink colored ones, but that appears exactly the same as mine. Does it have an MFG date on it? I would certainly send something to Vans with pics, and if you have the full size DWG sketch (my plans had one I believe) of the firewall curve, overlay it on the template to help justify. That much mismatch is going to be hard to work around. There were 2 different lengths when I ordered mine as I do recall. Perhaps that's NOS Vans had from years past?
My RV-4 cowl is of the pepto pink era, (although it was just fit about 2 years ago) and over-curved like you show. Despite efforts to mitigate this while it was being fit/drilled, it puckers up between the fasteners as you suspect it would. In fact, that's the reason my cowl is still pink because I haven't had a chance to come back and clean it up (to much fun flying it ") But I've thought about how I'd do it when I have a chance...
But I've thought about how I'd do it when I have a chance...
The resulting pucker/pillows are about 1/64 to 1/32 tall at their highest points. I've thought about a couple ways to remedy... The easiest being add a couple layers of glass with some thickened epoxy to the inside of the flange, then gently clamp it down to set. Ideally this extra material would take out the ballooning/puckering, and when cured it would hold its shape so it doesn't want to balloon anymore. I realize the new thickness would sit proud of the top deck skin slightly. I figure if its slight and uniform, it'll be almost unnoticeable.
The other option, would be to cut a bunch of longitudinal slits in the cowl (maybe 3 or 4 inches long), clamp it down tight, and patch with cloth from the inside (while smoothing from the outside).
But I've thought about how I'd do it when I have a chance...The resulting pucker/pillows are about 1/64 to 1/32 tall at their highest points. I've thought about a couple ways to remedy... The easiest being add a couple layers of glass with some thickened epoxy to the inside of the flange, then gently clamp it down to set. Ideally this extra material would take out the ballooning/puckering, and when cured it would hold its shape so it doesn't want to balloon anymore. I realize the new thickness would sit proud of the top deck skin slightly. I figure if its slight and uniform, it'll be almost unnoticeable.
The other option, would be to cut a bunch of longitudinal slits in the cowl (maybe 3 or 4 inches long), clamp it down tight, and patch with cloth from the inside (while smoothing from the outside).
This is how I would correct it, but the cuts would only be in the area with core material and I would only cut the inner layer and the core (not cut through the outer layer). I would adjust the cut lengths until it was flexible enough to easily change to the shape needed.The other option, would be to cut a bunch of longitudinal slits in the cowl (maybe 3 or 4 inches long), clamp it down tight, and patch with cloth from the inside (while smoothing from the outside).
With it upside down, I would then clamp the cowl into the shape I wanted. After properly prepping the surface by sanding, vacuuming, and solvent cleaning, I would squeegee some cabosil thickened epoxy into the cuts, and then apply one layer of 8.7 oz cloth and peel ply.
I guess this is the direction I will have to go, but I just bought this in October. It is brand new. Why on earth would it be so far out? I can't imagine them making the plug wrong. Fitting a cowl is challenging enough without having to do this. Ironically the old gelcoated one fit fine.This is how I would correct it, but the cuts would only be in the area with core material and I would only cut the inner layer and the core (not cut through the outer layer). I would adjust the cut lengths until it was flexible enough to easily change to the shape needed.
With it upside down, I would then clamp the cowl into the shape I wanted. After properly prepping the surface by sanding, vacuuming, and solvent cleaning, I would squeegee some cabosil thickened epoxy into the cuts, and then apply one layer of 8.7 oz cloth and peel ply.
I agree, it should not have to be done.I guess this is the direction I will have to go, but I just bought this in October. It is brand new. Why on earth would it be so far out? I can't imagine them making the plug wrong. Fitting a cowl is challenging enough without having to do this. Ironically the old gelcoated one fit fine.
Have you reached out to anyone at Van's?
Not yet. I guess in the end it won’t accomplish much but I am bewildered by it. It’s actually a very nice moulding. Very light and stiff. Minimum of pin holes if any. But it fits as though it was for a different airplane.I agree, it should not have to be done.
Have you reached out to anyone at Van's?
2 different lengths? There's nothing to indicate that in the vans store and when I communicated with their support people it wasn't mentioned. I wonder if that's the issue? I've sent them a note but I suspect I won't hear back until the holidays are over. Thanks to you and the other responders for the input. Happy New Year.My finish kit/cowling was circa 1995 and of the same materials by the looks. I don't recall having any such gap and it may have been slightly "proud" but nothing that dramatic. At some point, they went to the Pink colored ones, but that appears exactly the same as mine. Does it have an MFG date on it? I would certainly send something to Vans with pics, and if you have the full size DWG sketch (my plans had one I believe) of the firewall curve, overlay it on the template to help justify. That much mismatch is going to be hard to work around. There were 2 different lengths when I ordered mine as I do recall. Perhaps that's NOS Vans had from years past?
Many years ago there were two lengths. One for fixed pitch props and one for constant speed. the fixed pitch was discontinued a long time ago which is why you have to change to a different spacer.2 different lengths? There's nothing to indicate that in the vans store and when I communicated with their support people it wasn't mentioned. I wonder if that's the issue? I've sent them a note but I suspect I won't hear back until the holidays are over. Thanks to you and the other responders for the input. Happy New Year.


The 3 and 4 definitely use different cowls. That is why they have different part #'s.Same issue with the cowl for my 3B, I did 3 cuts and needed to go into the honeycomb to get it to go down sufficiently. I think it's the same cowl for both 3 & 4, with the 3 needing to shortened by about 3 inches. This is a circa 2012 finish kit.
Russell
View attachment 77419View attachment 77421
I am starting to wonder if there is some level of post cure happening that I haven't previously been aware of, that changes the shape slightly in the strongly curved area.
If I have to shorten it that much I wonder what my CG will end up like. I'm using a wood prop.Same issue with the cowl for my 3B, I did 3 cuts and needed to go into the honeycomb to get it to go down sufficiently. I think it's the same cowl for both 3 & 4, with the 3 needing to shortened by about 3 inches. This is a circa 2012 finish kit.
Russell
View attachment 77419View attachment 77421
On an older kit I finished with a newer cowl, I had the same issue.. made several cuts shorter than shown above, shrunk it down to fit, Glassed and then ran a 2 inch strip a fiberglass tape over the back, over the cuts, and feathered that into the cowling.
I have 0320 with wood prop and using a 4" spacer. I did think that the 3 & 4 used the same cowl, hence the shortening for fitting a 3 but I defer to Scott's knowledge on this. You shouldn't need to be as drastic.If I have to shorten it that much I wonder what my CG will end up like. I'm using a wood prop.
I’m having the same issue-I thought it would go down on its own with the piano hinges and it does to some degree but it puts the cowling into kind of a compressed spring situation and is making it difficult to fit in other places. Did you cut all the way through and how did you mate it back together on the top? On the inside of the cowl I can see how it could be patched since it’s hidden. This cowling is my first experience with fiberglass.On an older kit I finished with a newer cowl, I had the same issue.. made several cuts shorter than shown above, shrunk it down to fit, Glassed and then ran a 2 inch strip a fiberglass tape over the back, over the cuts, and feathered that into the cowling.
Yes, made several cuts until it shrunk down to a nice fit and shape, with the hinge fully secured to the fire wall side. When I got it fitting right, then Cleko the hinge it into place on the cowling and removed the cowling and riveted the hinge half to the cowling. I then put the cowling back on and with a resin, floss or balloons filled in the gaps, sanded down. Then I ran a 2 inch tape over top, back edge side to side to reinforce and capture/ cover the rivets and “cuts” and the feathered it forward to smooth shape. Did all that while attached to firewall (packing tape on firewall side to keep it clean and resin out of the hinge) to match the shape.I’m having the same issue-I thought it would go down on its own with the piano hinges and it does to some degree but it puts the cowling into kind of a compressed spring situation and is making it difficult to fit in other places. Did you cut all the way through and how did you mate it back together on the top? On the inside of the cowl I can see how it could be patched since it’s hidden. This cowling is my first experience with fiberglass.
picture is marking for the cuts
Attachments
Last edited:
Did you use resin or glue on the hinges as well? And it looks like you cut just up to the honeycomb and not through it correct? Did you take any additional material out at the cuts or was the width of the cut itself from the grinder enough? Thanks BTW, this is very helpfulYes, made several cuts until it shrunk down to a nice fit and shape, with the hinge fully secured to the fire wall side. When I got it fitting right, then Cleko the hinge it into place on the cowling and removed the cowling and riveted the hinge half to the cowling. I then put the cowling back on and with a resin, floss or balloons filled in the gaps, sanded down. Then I ran a 2 inch tape over top, back edge side to side to reinforce and capture/ cover the rivets and “cuts” and the feathered it forward to smooth shape. Did all that while attached to firewall (packing tape on firewall side to keep it clean and resin out of the hinge) to match the shape.
picture is marking for the cuts
you really don't want the cowling to be under stress to hold its normal position. If you cut the bottom skin the top will lose most of its rigidity. It's the fact that you have a top and bottom skin separated by the core that makes it so stiff. It really is sh**ty of vans to be selling something like this which doesn't fit their own airplane. In addition it's for a constant speed prop (larger spinner) but there was nothing on the Vans store to indicate that. I believe that the people who are there now are not even aware of it. When you spend all that money you are kind of expecting it to fit. It's unfortunate that you have to deal with this if it's your first fibreglass.I’m having the same issue-I thought it would go down on its own with the piano hinges and it does to some degree but it puts the cowling into kind of a compressed spring situation and is making it difficult to fit in other places. Did you cut all the way through and how did you mate it back together on the top? On the inside of the cowl I can see how it could be patched since it’s hidden. This cowling is my first experience with fiberglass.
It is frustrating and I should have addressed it before I got this far with the fitting of the cowl. After screwing around with it for hours yesterday I started looking up costs to buy a James cowl-but this morning I am taking a fresh look. What did you end up doing on yours?you really don't want the cowling to be under stress to hold its normal position. If you cut the bottom skin the top will lose most of its rigidity. It's the fact that you have a top and bottom skin separated by the core that makes it so stiff. It really is sh**ty of vans to be selling something like this which doesn't fit their own airplane. In addition it's for a constant speed prop (larger spinner) but there was nothing on the Vans store to indicate that. I believe that the people who are there now are not even aware of it. When you spend all that money you are kind of expecting it to fit. It's unfortunate that you have to deal with this if it's your first fibreglass.
I have set the project aside for the moment. I have cut the inner skin and it fits now but I haven't completed the fitting. I saw the James cowl at Oshkosk and I was not impressed with the quality at all. With all things fibreglass anything can be made to work with enough effort. In the old days of homebuilding guys would wrap their engine with plastic and then cover it with plaster or spray foam and then glass it. So the James cowl is a huge step ahead of that. But the vans cowl is still better. I just don't understand how they could make it so far out of shape. Did it warp in some post curing step or is their mold wrong, which is unforgiveable.It is frustrating and I should have addressed it before I got this far with the fitting of the cowl. After screwing around with it for hours yesterday I started looking up costs to buy a James cowl-but this morning I am taking a fresh look. What did you end up doing on yours?
Definitely seems like a fiberglass part should have any spring back after removal, unless it shrinks during cutting and that contributes to it -but you’d think the mold would take that into account during development.I have set the project aside for the moment. I have cut the inner skin and it fits now but I haven't completed the fitting. I saw the James cowl at Oshkosk and I was not impressed with the quality at all. With all things fibreglass anything can be made to work with enough effort. In the old days of homebuilding guys would wrap their engine with plastic and then cover it with plaster or spray foam and then glass it. So the James cowl is a huge step ahead of that. But the vans cowl is still better. I just don't understand how they could make it so far out of shape. Did it warp in some post curing step or is their mold wrong, which is unforgiveable.
Cut was just width of blade. Correct, just shy of honeycomb.Did you use resin or glue on the hinges as well? And it looks like you cut just up to the honeycomb and not through it correct? Did you take any additional material out at the cuts or was the width of the cut itself from the grinder enough? Thanks BTW, this is very helpful
I can’t recall if I used epoxy or glue on the hinge, but yes, did some form of adhesive also.
Not to change the sublect but I had the same problems with fitting as everybody else, my 4 cowl had about a 3/4 gap which after a cut along the center to relieve some of the stress I did get a good fit. The problem I had is Vans says its a cowl for a O360 but after fitting it is so tight a fit I believe its a O320 cowl as Im going to make some blisters to relieve the smashed down plug wires. Will glass over a clay plug for the fairing.
Attachments
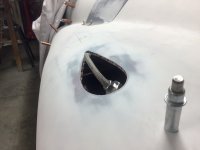

So when they say it’s an O360 cowl that accounts for the fact that it is several inches shorter. It has nothing to do with the fact that the contour doesn’t even come close to matching the top of the firewall. An O360 powered aircraft does not use a different firewall shape. It’s very bizarre that something made in a mold is that far off.
All this easily fits under the standard RV-4 cowl without "smashing" anything. Besides mine pictured, I've worked on a ton of RV-4's including an 0360 Angle valve engine in one. I've never seen the need for a blister. Something seems very wrong with what you have going on. What kind of leads do you have? The O320 and O360 cowl are the same shape in the cheek area.
Attachments
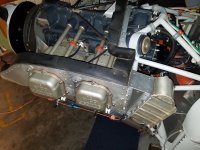
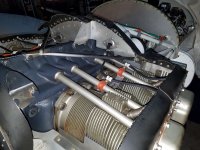
Maybe its just as simple as a badly mfg cowl and not anything I did wrong, careful with the accusations…All this easily fits under the standard RV-4 cowl without "smashing" anything. Besides mine pictured, I've worked on a ton of RV-4's including an 0360 Angle valve engine in one. I've never seen the need for a blister. Something seems very wrong with what you have going on. What kind of leads do you have? The O320 and O360 cowl are the same shape in the cheek area.
FlyingDutchman257
Active Member
Use a polystyrene plug. after lay-up you van desolve it with avgas.Not to change the sublect but I had the same problems with fitting as everybody else, my 4 cowl had about a 3/4 gap which after a cut along the center to relieve some of the stress I did get a good fit. The problem I had is Vans says its a cowl for a O360 but after fitting it is so tight a fit I believe its a O320 cowl as Im going to make some blisters to relieve the smashed down plug wires. Will glass over a clay plug for the fairing.
