
Van's Air Force
You are using an out of date browser. It may not display this or other websites correctly.
You should upgrade or use an alternative browser.
You should upgrade or use an alternative browser.
RV4 Cowling Fit
- Thread starter Sanch627
- Start date

")
A quick note.. you may already know this. It looks like you have the cowling set so that the spinner centerline will be slightly above the cowling centerline, ie, engine will be sitting just a touch "high" in relation to the cowling. This is the correct way to do it as it allows for the rubber in the lower engine mounts to compress and settle just a little. As they do, the front of the engine will drop very slightly, bringing the spinner into exact alignment with the rest of the cowling. This shifting can take a few hours/months. Keep up the good work - you will love flying Van's best design.
No problem I have taken that into consideration..A quick note.. you may already know this. It looks like you have the cowling set so that the spinner centerline will be slightly above the cowling centerline, ie, engine will be sitting just a touch "high" in relation to the cowling. This is the correct way to do it as it allows for the rubber in the lower engine mounts to compress and settle just a little. As they do, the front of the engine will drop very slightly, bringing the spinner into exact alignment with the rest of the cowling. This shifting can take a few hours/months. Keep up the good work - you will love flying Van's best design.
Chris
Nice pics. And if anyone doesn’t appreciate the beauty of the RV4 cowl, then they are missing the beauty of that wonderful design. There is nothing more pleasing then sitting behind that perfectly designed aerodynamic minimalist cowling while doing your gentlemanly smooth acro at your own pace. Doesn’t matter, it all works out, and you’re never in trouble. This airplane flys itself.
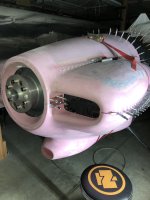
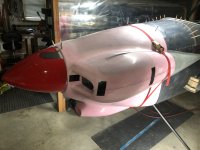
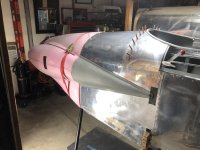
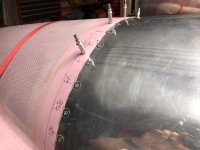
Just starting mine-first thing I am seeing on mine is that the horizontal fitting line is pretty straight until the last 8" or so before it meets the firewall, at that point it has a pretty large upward "curve".Just finished the initial cowl fit after about 6+ hours, still have some edge sanding to do, but it came in better that I expected..
Ricksrv4
Member
Nice, you will love the 4, they are truly a sports car of the sky.Moving along with the cowl, making a few changes as I go .
Attachments
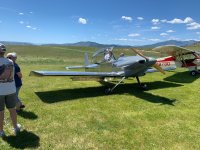
Wow! Nice looking -4!! Yes, they ARE a sports car of the Sky!! Is that a PA-11 in the background? Best of both worlds.......Nice, you will love the 4, they are truly a sports car of the sky.
")
Ricksrv4
Member
Thanks for the comment, the grass strip is visible in the background. The PA 11 belongs to my former neighbor across the lane.Wow! Nice looking -4!! Yes, they ARE a sports car of the Sky!! Is that a PA-11 in the background? Best of both worlds.......
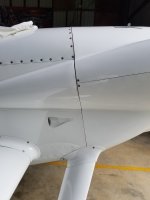
When I built my -4, I added 2 screws at the aft end of the cowl, 1 above and 1 below the cowl split with nutplates in the fairing extension. I have seen many RV-4s, where there is gap and wear issues at this point and the hinge pin extended into the aft fairing gets worn and hinge eyelets start to fail. I install these screws last after setting the hinge pins and the cowl is fully installed.
Attachments
Dean Pichon
Well Known Member
Hi Bill,When I built my -4, I added 2 screws at the aft end of the cowl, 1 above and 1 below the cowl split with nutplates in the fairing extension. I have seen many RV-4s, where there is gap and wear issues at this point and the hinge pin extended into the aft fairing gets worn and hinge eyelets start to fail. I install these screws last after setting the hinge pins and the cowl is fully installed.
That is an interesting idea. Do your hinge pins install from the front of the cowl or the cockpit? On my -4, I insert the pins from the cockpit. After some months of flying, I sometimes find the hinge pin has sheared exactly at the point between the cheekpiece and the first eyelet of the hinge. I believe this may happen as the area of the cowl where you have added screws bulges and flexes which fatigues the pin. I hate to add more fasteners to the cowl, but the broken pin is a pain to remove...
Mine are inserted from the front and retained by a screw in a small recess. I had looked at the cockpit forward method, but I felt that would be harder to do install/removal alone. I did a lot of looking at others when I was building and seemed to notice this area was under a bit of movement and stress, The screws seem to minimize outward expansion from the cowl being under pressure internally and all the other dynamics that eat away at that joint.Hi Bill,
That is an interesting idea. Do your hinge pins install from the front of the cowl or the cockpit? On my -4, I insert the pins from the cockpit. After some months of flying, I sometimes find the hinge pin has sheared exactly at the point between the cheekpiece and the first eyelet of the hinge. I believe this may happen as the area of the cowl where you have added screws bulges and flexes which fatigues the pin. I hate to add more fasteners to the cowl, but the broken pin is a pain to remove...
Dean Pichon
Well Known Member
Thanks. I think I will add fasteners, too. Did you a quarter-turn fastener or a fixed or floating nut plate?Mine are inserted from the front and retained by a screw in a small recess. I had looked at the cockpit forward method, but I felt that would be harder to do install/removal alone. I did a lot of looking at others when I was building and seemed to notice this area was under a bit of movement and stress, The screws seem to minimize outward expansion from the cowl being under pressure internally and all the other dynamics that eat away at that joint.
Regular 8-32 screw and floating nutplate. All my screws are 8-32, but they are reduced head titanium. Same head size as a 6-32. I used small diameter skin washers.Thanks. I think I will add fasteners, too. Did you a quarter-turn fastener or a fixed or floating nut plate?
