Is there any drawing that shows where the cutouts should be for the flap pushrods? My wings aren't on so I can't really tell where to cut the holes. I stared at the drawings for quite a while but I don't see the holes anywhere. I guess I have to wait until the wings are on and custom cut the holes?

Van's Air Force
You are using an out of date browser. It may not display this or other websites correctly.
You should upgrade or use an alternative browser.
You should upgrade or use an alternative browser.
flap pushrod cutouts
- Thread starter sblack
- Start date

Nope. You gotta hook up the wings and move the flaps. The holes are quite odd in shape unless you choose to cut them larger then needed. The push rods don’t move straight in and out but kind of in an arc.
Ah ok. I kind of expected that answer. It’s an old school kit I guess. Thank youNope. You gotta hook up the wings and move the flaps. The holes are quite odd in shape unless you choose to cut them larger then needed. The push rods don’t move straight in and out but kind of in an arc.
On my RV-3B, the connection points to the flap tube are pretty close to the skin. I plan to put it as close as it'll probably go, then drill a #40 pilot hole there. That'll give me a known reference point on the outside to work from. Of course not being an RV-4, this might not be applicable to you.
So please post what you do and how it works out. Thanks!
Dave
So please post what you do and how it works out. Thanks!
Dave
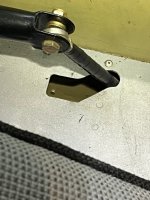
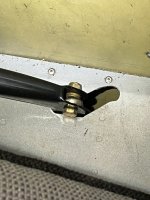
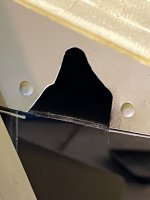
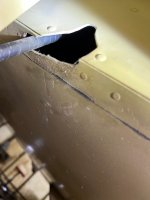
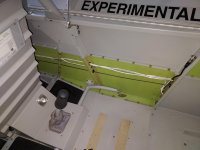
I don't have an external picture handy, but here is the inside floor trim out of my -4 that I built. As mentioned, it's a guess and cut, but as the flap lowers and the weldment moves up and down the rod takes a non-linear path. The cut out in the fuselage skin is partially in the belly skin, and partially in the side skin, so it takes a bit longer to get correct. I have looked at many RV-4's, and some have huge cut-outs, and others minimal...take your time and don't look for a template in the plans. Wings need to be installed and flaps on for this task.
Attachments
In my case it did...not much. You'll find it can be a smaller cut, but you won't be able to remove/install the pushrod with fittings on it.so the cutout removes material from the lower longeron? That’s not ideal but I guess they’re all like that. Thanks.
There are things you can start before the wings and flaps are on. Do you have the front seat in? Does it have the stops in place for the flap handle for 20 and 40 degrees of flaps? Is your flap control bar in?Is there any drawing that shows where the cutouts should be for the flap pushrods? My wings aren't on so I can't really tell where to cut the holes. I stared at the drawings for quite a while but I don't see the holes anywhere. I guess I have to wait until the wings are on and custom cut the holes?
OK: Here are some pictures of mine, dirt and all. You can start the hole in the cockpit by lowering the flap control bar down to the floor. Trace around the welded-on "U" bracket that bolts onto the flap control rod. As you (maybe) can see in that photograph, it goes actually through the square part of the hole in the floor, stopping about where the weld is. You can start there. Once you get the flap on, you can run a long drill up from the bottom of the fuselage where the flap control rod hooks onto the flap and aim it at that square hole. Then it is a matter of munching a little at a time until the two holes allow the flap pushrod to operate the flap. This will make more sense once you get there. Yes, it is FREAKY

 to be making holes in your floor and fuselage but a necessary evil. I made mine as small as possible. Sounds like you will be getting to this this Spring when it warms up and you can get the wings on.......... You will have more questions then....
Interior pictures are the starboard rod hole; exterior pictures are the port rod hole. Yes, there is a minimal amount of that stringer that is nibbled at.....
Attachments