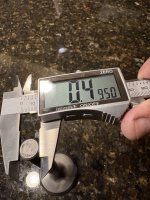
There are several threads proposing that the correct reamer for a 1/2” exhaust valve is the McFarland VGR-LC4. I suspect the better choice is the -LC3. My valve stem measures at 0.495 or slightly less depending on location and technique. According to the McFarland chart the LC3 is the better choice with a maximum cut of 0.499. Slightly undersizing the guide. It seems safer to slightly undercut at 0.4995 rather than overcut at 0.5005 as the LC4 does.
Polishing the pins...correct reamer depends on the valve stem diameter, which is why McFarlane offers two sizes.
Valve stem diameter is given as .4955 min, .4965 max.
Clearance is given as .0035min, .0055 max.
LC3 cuts .4985~.4995
LC4 cuts .4995~.5005
So, for new valves...
Fat valve stem: .4965 + .0035 = .5000
Exceeds the LC3 finish diameter of .4985~.4995, thus a .4965 valve requires an LC4
Skinny valve stem: .4955 + .0035 = .4990
In theory, an LC3 is undersize for a .4955 valve,
if it resulted in a finished diameter of .4985. At a finished diameter of .4995, clearance is .0005.
On the flip side, .4955 valve in a hole reamed to the LC4 max is still within the .0055 max clearance given by Lycoming
.5005 guide - .4955 stem = .0050
Ahh, but about used valves? Note Marvin's choice is entirely correct,
if the stem is worn. The wear limit is .4937. Let's assume an LC3 results in a middle of the range finish of .4990, and the stem is worn to .4945, like Marvin's. Clearance is .0045, smack in the middle of the desired clearance range.
Measure carefully,
then pick.


 There are several threads proposing that the correct reamer for a 1/2” exhaust valve is the McFarland VGR-LC4. I suspect the better choice is the -LC3. My valve stem measures at 0.495 or slightly less depending on location and technique. According to the McFarland chart the LC3 is the better choice with a maximum cut of 0.499. Slightly undersizing the guide. It seems safer to slightly undercut at 0.4995 rather than overcut at 0.5005 as the LC4 does.