Van's Air Force

The definitive Van's Aircraft support community! Buying, building or flying an RV? Join our exclusive family of mentors and enthusiasts!

Dimple suitability

STARGATE

Member
I dimpled and backriveted these 3-3 rivets, using the dies I purchased. They looked relatively smooth and flush, but I've recently seen an RV with rivets that don't seem to have as much of a radius ring around the rivet. Instead, the one I saw didn't seem to have any transition between rivet and flat skin.

Would any of the experienced folks care to weigh in on if the dimples look correct? I'm using a compression dimpler (for noise consideration), and I've already tried adjusting the ram to press harder. Thanks.
 

Attachments

  • 20240803_161433.jpg
    20240803_161433.jpg
    274 KB · Views: 164
  • 20240803_161345.jpg
    20240803_161345.jpg
    511.9 KB · Views: 167
Can we get a picture of your dimple dies? Those look deep to me. ( might just be the picture)
Who makes the dimple dies?
A
 
Last edited:
Hard to tell without a larger group of dimples but I don't see a witness ring.

Hold the part up so you can see the reflection. Lines reflected in the surface like a garage door rail, should be straight with no distortion. Almost like a mirror. Distortion in the reflection means the surface isn't flat.
I'm a C-frame builder. Maybe someone will chime in with advise to adjust.
 
They are Clevealand Tool 426-3 dimple dies. I wiped off the smudges after I riveted. Here is an unriveted dimple, empty, and with a rivet sitting in it but not set.
 

Attachments

  • 20240803_172739.jpg
    20240803_172739.jpg
    317.4 KB · Views: 156
  • 20240803_172658.jpg
    20240803_172658.jpg
    320.1 KB · Views: 149
  • 20240803_172600.jpg
    20240803_172600.jpg
    776.6 KB · Views: 155
  • 20240803_173129.jpg
    20240803_173129.jpg
    61.7 KB · Views: 157
  • 20240803_173154.jpg
    20240803_173154.jpg
    22.1 KB · Views: 162
That little ring around the dimple in pic 1 and 4 is the witness ring that Larry is referring to above. The 5th pic looks good to me. Using the DRDT I presume? Same as me.
The markings on the dimple dies should read 3/32 on both dies. Cleaveland also makes structual dies and tank dies that dimple deeper.

Note: I just went to the site and it looks like you have the correct dies. Make sure your DRDT is secure to a bench when you squeeze your dimples to get crisp dimples. You are looking for that witness mark, the round halo when you squeeze them.
A
 
Last edited:
Thanks for the replies. Do these look to deep, or wide? My original question is the shiny halo around set rivets (highlighted in picture) seems much thicker than in some flying RVs I've seen.
 

Attachments

  • 20240803_185725.jpg
    20240803_185725.jpg
    78.7 KB · Views: 88
Post a photo from the end of a row of dimples looking across. You're on the right track.
 
Thanks for the replies. Do these look to deep, or wide? My original question is the shiny halo around set rivets (highlighted in picture) seems much thicker than in some flying RVs I've seen.
I think it's the lighting. I use a DRDT dimpler, when set-up there is that circular witness mark that is showing on an image. I think by design that device cannot over-dimple, but can under-dimple if not set-up correctly. I think MR. DRDT can pipe in. So if the Cleaveland dies are the 426-3 then I would say this is a "lighting issue" on your images. The -3 rivets sit slightly shallow of the surface.

Here is some image from my Rudder or something I did....Dimpled rivets.jpeg
 
those rivets are not structurally correct. I'm sure I'll get flamed here, but very simply, the visible air gap around the head of the rivet, into the dimpled hole is not okay. This condition implies that the rivet body is swelling in the hole and the countersunk head ( the underside of the flat head, is not seated in the dimple. In most cases, this is from squeezed rivets, rather than bucked rivets. Bucking is far superior for rivet seating. Now, when guys back drive...meaning put a 1/8" universal rivet set on the shop head and drive from the shop head side...you see this same result many times.

Is your airplane going to fall apart?? probably not...but you should not see an air gap around your rivet head. The dimple is too deep, if you do. Technically...which no one wants to hear is that the rivet should not be flush. It should be fully seated and raised .001-.003 above the skin surface to ensure full seating.

Are those few rivets, worth drilling out and replacing...I wouldn't.

But...if your dimple die dimples such that the head of the rivet can sit below the surface BEFORE bucking or squeezing...you WILL NOT have a structurally sound rivet. The body will swell into the hole, but there will be a void under the head, which in many cases the rivets manufactured head will squeeze out and expand enough to hide the condition, which is why the dimple depth is inspected and rivets test fit dry.

A well seated rivet, either driven or squeezed needs to seat the full countersunk portion of the manufactured head firmly against the dimpled countersink...This is primary structure of the physical connection and the best way to ensure that is to buck your rivets. It takes far less skill to buck good, structural rivets, than to squeeze.

A 2x gun at 20psi produces beautiful, nearly perfect rivets every time with a little patience and practice.

I hope that helps.


Steve.
 
It’s super hard to really tell from the photos but yeah it looks to me like those aren’t properly formed dimples.
I’ve built 2 RVs and helped on countless others over 30y and used both C frame and non impact dimpling methods a lot.
Dons flame suit:
IMHO you can just get away with no c frame up to 025. Any thicker than that you will never be able to convince me that you can get a perfectly formed dimple using the other method.
But I do concede it’s a lot quieter and I’ll use it myself for thin skins. Also the squeezer where convenient.

Does this really matter? Probably not unless you want to build an award winner.
 
I think it's lighting, the picture from post #8 looks good to me (so get a few wider shots so we can see reflection). From my understanding a perfect dimple does result in a paper thin recess from the skin to the top of the rivet after riveting. It's not much, so if you feel a hole then yes it's too much, you feel a slight "paper thin" difference, that's almost not there, then it's just right. I have the DRDT and Cleveland dies, and they are very good.
 
"...IMHO you can just get away with no c frame up to 025. Any thicker than that you will never be able to convince me that you can get a perfectly formed dimple using the other method..."

Hmmm, there are numerous award winners that would disagree; properly setup DRDT will give perfect dimples, time after time in materials to .032. Anything greater than .032 is likely to be machine countersunk.
 
I think it is lighting. We need more crisp images from OP. My image submission was DRDT dimpled with back riveted -3’s. The lighting makes a gap appear. IA said they are good. That piece is on the wall now and has not fallen apart……..yet.
 
I'll throw in my $.02 -- It "looks" like the rivet might be the problem, not the dimple. Almost like a NAS1097AD3-x instead of AN426AD3-x is being used...
 
Additional pictures as requested. On one of them I lined up the crease of a file folder on the line of rivets, and shined a light down the line of rivets on another. Hopefully more clear, had issues with the focus jumping around.

This is another practice kit I started to refine some skills, using Van's supplied rivets and parts. I looked hard at the rivets, they appear to have good contact underneath as far as I can tell, but I'll look closer for what Steve mentioned, because the dimples may be too deep based on his description.

Thanks everyone who responded.
 

Attachments

  • 20240804_143502.jpg
    20240804_143502.jpg
    719.7 KB · Views: 142
  • 20240804_143543.jpg
    20240804_143543.jpg
    493.3 KB · Views: 139
  • 20240804_144615.jpg
    20240804_144615.jpg
    456.7 KB · Views: 142
  • 20240804_144630.jpg
    20240804_144630.jpg
    373.4 KB · Views: 138
That is so weird. My money is on photo weirdness. You might ask a local builder to look at them. I don't see anything in the photos other than the rivets look like they are deeper than flush. Could be a 1097 rivet, but unlikely. I tend to favor the easiest answer first. Occams Razor.
 
I'll throw in my $.02 -- It "looks" like the rivet might be the problem, not the dimple. Almost like a NAS1097AD3-x instead of AN426AD3-x is being used...
I sense the same. The diameter appears smaller than a AN426AD3-X. Also, the latest images do not show dimple witness marks..
 
Dimples look too large in diameter and also too deep. Is the top of the rivet below the rim of the demple ? Can you put a straight edge across it where I drew the black line and see if there’s any gap? Looks like there might be. They certainly don’t look as crisp as they ought to be.
Maybe you got some miss labeled substructure dies
51AF121D-712E-4375-9A59-737C9F99729E.jpeg
 
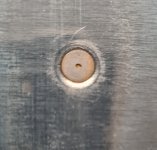
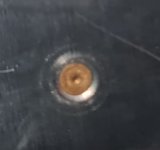
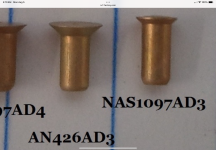
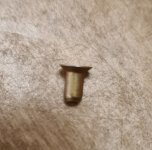
Those have to be thin skin rivets, not AN426. Please check your rivets. There is absolutely no way I would consider those structurally sound.

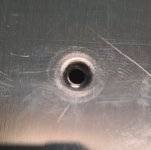
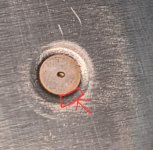
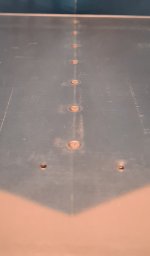
I'm not trying to pick here, but to answer straight forward. The air gap is extremely important. There should be none. The rivets head has to sit, metal to metal into the countersink or dimple.

I own an aerospace parts and assemblies manufacturing company building machined and sheet metal parts and mostly complex assemblies for Boeing military aircraft and over the last 40 years, we've done something like 180 million rivets...long and short of it is there are rigid specifications for rivet fit. And yes, I've built a bunch of RV's.

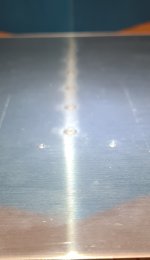
In our world, dimpling is not used, other than for non-structural items like nut plates. As far as primary structure is concerned, you just can't have rivets with the head mushroomed out, the body swelling into the hole and a beautiful looking shop head...those are scrap. Period.

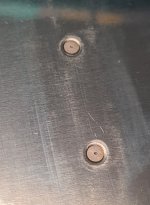
Countersinks, produce exacting fit, for rivets to nearly perfectly seat into...a flush AN426 rivet, or any flush mechanical fastener, is required to have the manufactured head, proud of the surface, by .001-.003 and I have seen specs requiring .005 high, then shaving a few thou off.


Again, if you squeeze or back buck...the first action that occurs, is to un-seat the rivet, then the body swells and then the shop head forms. I don't believe it is a satisfactory practice and I don't advocate using it. It is definitely a little harder at first to learn the proper technique for bucking, but in a matter of a week, you will have developed a solid skill to produce high quality structural rivet joints.

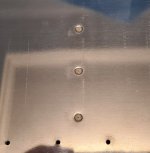
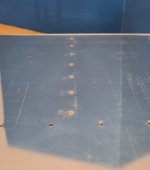
Rivets joints that allow systemic air gaps, begin to fret and you see lines of smoked rivets in short order. If you're pulling g on your plane now and then and twisting and turning...those rivet lines are working hard to keep their respective connections intact.

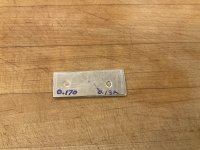
The pictures you sent are great examples of how this can all go wrong if we don't ask these kinds of questions, so I applaud you for doing so.

I don't know where you live, but I would get with an EAA technical counselor as a good first step, but even more so..an RV builder local to you who can offer an hour of hands on supervision, identification and camaraderie in this process. I'm south of Seattle an hour and happy to help.

You're asking great questions, giving great examples and I think totally headed in the right direction to nip this problem in the bud quickly. Let's get to the bottom of the rivet in question. You need AN426AD3 or 3.5's most likely. Those are the rivet that will fit your dimple die.

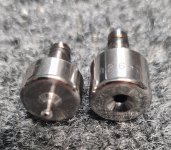
The radius on the external periphery of the head, looks way too pronounced to be a 426 rivet. They are much sharper all the way to the corner of their countersink head.

The Thin skin rivet is for use in machine countersink applications, in skins, generally considered too thin for traditional depth machine countersink.

Please keep posting pics and asking questions, till we can get to the bottom of this.


Respectfully,


Steve.
 
I think it’s the rivet and not the dimple. I think Steve hit it dead on. It looks like you used NAS 1097 rivets instead of AN426 rivets. The NAS 1097 head is smaller than the head diameter of an AN426.

If so, you will be getting practice drilling out rivets since the 1097’s should not be used for tension. Hopefully there won’t be many.

I found this pic from another RVer.
 

Attachments

  • IMG_1798.png
    IMG_1798.png
    3.8 MB · Views: 1,604
Last edited:
Check if your dies have an SS stamped on the side. That would indicate a sub-structure die. It's also entirely possible that you got a die that is not made to spec. Borrow one from someone else and see how it looks. I purchased a set of dies from Cleaveland that had the shaft misaligned from the die. So I know these things do slip through QC occasionally.
 
Curiosity got the best of me. Using a squeezer, I dimpled two pieces of aluminum and set 2 rivets to see if your problem could be repeated by someone else.

Head diameter is written below each rivet. One is a AN4276 and the other is a NAS1097.
 

Attachments

  • IMG_1799.jpeg
    IMG_1799.jpeg
    4 MB · Views: 3,541
Curiosity got the best of me. Using a squeezer, I dimpled two pieces of aluminum and set 2 rivets to see if your problem could be repeated by someone else.

Head diameter is written below each rivet. One is a AN4276 and the other is a NAS1097.
I thought this might be the case (see #14) but...the marking on the head doesn't look like a 1097, more like a 426.
 
I thought this might be the case (see #14) but...the marking on the head doesn't look like a 1097, more like a 426.
I squeezed it pretty hard. Guarantee you the smaller is a 1097 (out of my oops rivet box by Avery).
 
This Is classic VAF. A new builder posts pictures of dimpled holes asking for advice. Half the responses say it’s over dimpled, half says under. Half say build on, half say start over. Flush rivets are not photogenic. For kicks I dimpled a hole with the Cleveland substructure dies. It doesn’t look much different in the photo but your finger will immediately sense the head is below the surface BEFORE you drive the rivet. The 1097 looks comically small with your eye and forms a crater. With standard Cleveland dies the 426 heads sit perfectly flush.
 
Last edited:
It truly is a VAF classic. It could be the rivet, the die, the dimpler, the technique, etc…

I would check the easiest first and put a caliper on the rivet head of some unused rivets. If he doesn't have one , now would be the time to add to his tool box. Perhaps measure other rivets he has on hand for comparison. If the rivet size is correct, move on to the next thing to check.

The one thing I think everyone would agree on is to do some scrap metal testing to get it corrected before proceeding. Hopefully he will report back on what he discovered and it will be of help to the next person.
Agree. Find a local Mentor and figure it out before the kit assembly begins. It's very weird.
I was going to suggest putting the dies into someone elses C-Frame and wacking some scrap to see if there's any difference. Maybe use someone elses dies and rivets.
Occam's Razor. Simple solution is usually right
 
#40 drill bit, but likely near end of life, to match drill prepunched holes. I measured the (allegedly) 426AD3-3 rivets head, 0.168 diameter, compared with a 426AD3-4 from a different set of rivets, measured almost exactly the same.

Next step is a local tech counselor or A&P/IA, to see if my rivets, dimples, the pictures, or my inexperienced judgement is the issue. I'll update the post when I know more.

Again, thank you all.
 

Attachments

  • 20240805_200751.jpg
    20240805_200751.jpg
    271.4 KB · Views: 42
Back
Top