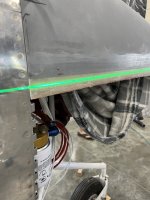
Started on the stock cowl today. Top went very well. I’m using Skybolts for the firewall and hing for the horizontal split. Set up the bottom cowl and trimmed it to fit. I thought there was supposed to be excess material to remove for the split. Not so with my cowl. The right side is just barely going to make it but the left side I have a 1/2” gap at the aft end. Not sure what the best move fwd is. Install the hinge and lay some flow between hinge and cowl scarf a slice into the lower cowl and then cut the line? The front corners all fit quite well.
Any advice appreciated .


Keith

Any advice appreciated .
Keith