What's new
Van's Air Force

Don't miss anything! Register now for full access to the definitive RV support community.

RV-10 fell off the jack!

jahoosafat

Active Member
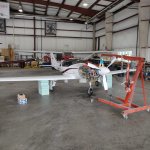
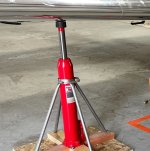
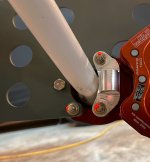
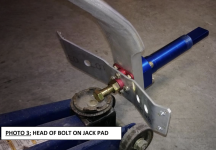
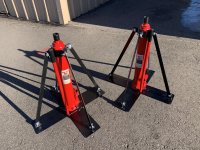
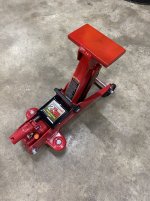
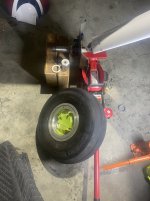
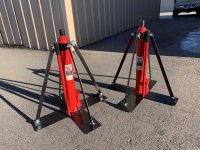
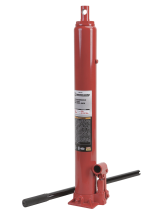
I have an A&P do my condition inspection. Generally, she's quite good, but today my RV-10 fell off of the jack and the wing was punctured. We're starting a discussion with Vans engineering to determine the recommended repair, but I was interested in what the community thought the best route would be. The tank was not involved in this perforation. See the images here:

https://www.screencast.com/t/HJdSRzWeCLx
https://www.screencast.com/t/VHfgHnqPYzE
https://www.screencast.com/t/0TV1AO5dVG

Any feedback is appreciated!
 
Same thing happened to my old RV-4, way back when, except that I think it caught a rib, too. Replaced the rib and the bottom skin.
 
Dang... Sorry Jeff. I've seen that once before that looked very similar- did not damage anything but the skin (but TBD on yours). They just pulled out as much of the dent as possible and then a small patch. Bummer for sure, but unless you were looking for it, you'd never know.

Do you know what kind of jack point (that screws into the wing) she was using?
 
Oh ****, that's a shame and I feel for you man. On the flipside, you can be sure your engineer is also feeling really bad too as I can imagine how I would feel if that happened to me. I'd be gutted.

The great thing about the later Vans designs is that you have easy options when it comes to repairs like this. Purely from a technical perspective (ignoring your insurance/rules/liability issues etc.) the two choices are to repair the skin or replace the skin. If you choose to repair the skin it will be a very easy repair to complete and the downtime will not be long. Painting will be the biggest drama. If you decide to replace the skin, the job will be reasonably easy as the pre-punch technology will ensure a very easy replacement and you'll not have any alignment problems. Painting will again be the biggest drama but there is no doubt your TAT (turn around time) will be longer. The decision on which route to take would be more about your willingness to accept the timeline for the repair. The skin itself is not expensive in the grand scheme of things.

As a perfectionist I would want the skin replaced but the downside of doing that is the likelihood of larger or elongated holes in the structure underneath. As the TAT is going to be weeks and not days (I can only imagine the time required to get a new skin out of Vans at present), I would probably be tempted to accept the repair option and just go fly the thing and accept you can't see the repair from the cockpit so therefore it doesn't exist. The repair will be minor and have no affect on performance or sex-appeal.

Good luck - and don't be too hard on your engineer. No doubt she'll be pretty upset about it all.
 
Last edited:
Sorry to hear about that. I never use the wing for jacking for fear of exactly this scenario. I put a towel over a 2x4 and put it between the jack and the wing spar area of the fuse. Much safer.

I would think a patch would be just fine in this area, as there is no cosmetic downside to doing so. HOWEVER, you need to get in there and observe the internal damage. The tie down support is rivetted to the spar and it is possible that the spare could be bent from the incident or the support cracked. That must be dealt with if that is the case.

Larry
 
Last edited:
Auto dent repair

I know one builder used one of those mobile Auto Dent Repair shops. Amazing. Can't tell where the dent was.

I also use a motorcycle jack on the center section and two adjustable jack stands near the gear legs. It's so stable, I can work inside.
 
Any feedback is appreciated!

I hate jacking up an airplane, it’s my most dreaded maintenance task and I can’t wait until it’s on its feet again. Especially RVs. If something goes wrong the consequences are too high.

Robbie Grove of Grove Aircraft once told me they jack up everything by lifting as Larry has described using a large piece of styrofoam to spread the load. That sounds much safer than teetering on a single point or two.

None of that helps you in your situation except to say, it could have been worse.

Good luck
 
Bummer. Don’t want to derail your thread, but also don’t want it to turn into “don’t jack by the factory jack points”. There is no way an RV can “fall off” the jack if proper equipment is used.
May we ask how it fell off?
 
Bore scope

If you have access to a bore scope that takes photos perhaps you could post some images of the spar area around the tie down and the damaged skin. Assuming no internal damage you have a couple of options.

1. A skin patch. Fortunately the access panel is right there. Designed properly it would be structurally sound and with paint almost not visible (it is on the bottom of the wing.)

2. If you want to replace the skin you might be waiting a long time for a replacement. You could complete the patch and keep flying until the new skin arrives. Replacing the skin means drilling out a lot of rivets, you will want someone with great sheet metal skills. As with all aspects of aviation some A&Ps have sheet metal experience, many do not. I relied on my turbine flying experience to pass the turbine part of powerplant portion, but I have never worked on one.

3. If there is damage to the internal structure.... its going to be grounded for awhile. If you brought it to me before ordering a new wing I would; pull the wing, remove the bottom skin to get a close inspection of the damage to the structure and repair / paint and remount the wing.

Good luck. Based solely on your supplied photos I think you will get by with 1 or 2 above.
 
Thanks for all of the helpful replies. Regarding how it happened, apparently the jack was simply not seated exactly on the correct point. The wheels weren't even off the ground before the "unseating" happened. Because there's no structural damage to the spar or the ribs, Vans doesn't have a specific engineering recommendation. So I have the option of either 1) sandwiching a 3"x4"ish plate on the interior and exterior and (I think) bonding and countersink riveting to join OR 2) an interior plate only that will be bonded and then the pierced skin smoothed and painted. The latter will be weaker but after painting should be almost not visible. Because the damage is toward the outer part of the wing, I'm leaning toward #2. Anyone think that's a terrible decision?
 
I was afraid of jack points and the 2x4 technique mentioned above. These are 4x8 sheets of insulation from Lowe's cut into 8 pieces per sheet. Very stable, low risk...
 

Attachments

  • IMG_20200606_121016_compress88.jpg
    IMG_20200606_121016_compress88.jpg
    385.3 KB · Views: 301
Sooooo, probably a dumb question.... How and where can you jack the plane? When I was installing the landing gear during construction, I built a frame out of 2x4s that supported the plane under the main spar, right next to the fuselage. That was convenient at the time, but won't be easy to replicate quickly if I need to change a tire, conduct inspection, etc.

Per some of the above comments, as well as the OP who suffered the injury to the wing, can we jack at the tie down eyelet point? I had thought that might put a lot of concentrated stress on a single part of the wing, but based on the comments I've seen, I'm inferring that is what people do.

Any guidance for the safest and most common way to jack up an RV-10 to get at a main wheel would be helpful. Thanks!
 
Last edited:
Bummer. Don’t want to derail your thread, but also don’t want it to turn into “don’t jack by the factory jack points”. There is no way an RV can “fall off” the jack if proper equipment is used.
May we ask how it fell off?

I disagree. IMHO, this thread screams out: "Is there a better and safer way than the factory jack points?" Not sure what you mean by proper equipment, but this thread pretty much proves that this can happen, even with a professional who does it for a living; Have to assume she was using "proper equipment." Using the tie down points creates a HUGE arm for leverage.
 
Last edited:
Mothership advice:
https://www.vansaircraft.com/faq-technical-builder-items/how-to-jack-up-an-rv/

Thanks. I guess I'm simply too obtuse to remember to check the Van's website before asking questions!

If jacking at the tie down point is approved, and their example is a tower of 2x4s, I think I will blend my old idea and this "new" one - build a tower of 2x4s that I can jack under the tie down ring, with an indent for the ring to avoid the OP's problem with the jack slipping out, and lift it with my floor jack. Once off the ground, slip more 2x4s under the lifted pile to make it a stable base.
 
Last edited:
I disagree. IMHO, this thread screams out: "Is there a better and safer way than the factory jack points?" Not sure what you mean by proper equipment, but this thread pretty much proves that this can happen, even with a professional who does it for a living; Have to assume she was using "proper equipment." Using the tie down points creates a HUGE arm for leverage.

I trust the factory procedure and we still don’t know why the 10 fell off. So, we can agree to disagree. You couldn’t knock my 6 off the jacks if you tried, well, you would have to try really hard.

However, none of this helps the OP. Lots of prior discussions on jacking RV’s.
 
I was afraid of jack points and the 2x4 technique mentioned above. These are 4x8 sheets of insulation from Lowe's cut into 8 pieces per sheet. Very stable, low risk...

Yes, very stable once the airplane is sitting on the insulation, but I'll ask the obvious question, how did you get the airplane up high enough that you could slip the insulation sheets under the wing?
 
Yes, very stable once the airplane is sitting on the insulation, but I'll ask the obvious question, how did you get the airplane up high enough that you could slip the insulation sheets under the wing?

Get under the wing on all fours and push up with my back.
 
I fabricated 4” x 6” metal pads topped with 1/4” rubber. They are attached to my HF long ram cylinders with a bolt and can articulate. I lift on both ends of the bottom under the carry through spars catching both. I have permanent aluminum shims between spar flanges and the wing skin bonded in place with tank sealant where the pads lift. This is a very stable lifting setup. No way will those pointed wing lift points ever be used on my plane. I’ll carry a ball and socket like Walt uses for emergency during travel.
 
Jacking

I bought my -10 and the seller had an aluminum dowel that slides into the axel for jacking. It works well and stays in the plane for flats. I was surprised nobody else mentioned this technique.
 
This is a typical repair and can be found in AC 43.13-1A (or later).... if you want to do it properly.
 
I bought my -10 and the seller had an aluminum dowel that slides into the axel for jacking. It works well and stays in the plane for flats. I was surprised nobody else mentioned this technique.

Great, but how do you then get the wheel off?
 
Get under the wing on all fours and push up with my back.

You must be young. I used to things like that. Not anymore but not because I don't want to, because the calendar catches up with you quicker when you do things like that.
 
I bought my -10 and the seller had an aluminum dowel that slides into the axel for jacking. It works well and stays in the plane for flats. I was surprised nobody else mentioned this technique.

Great, but how do you then get the wheel off?


It works the same way as the item now sold by Aircraft Spruce but originally sold way back in the day by Avery Tools:

12-00634.jpg


Remove the axle nut (the wheel won't come off the axle), insert the shaft into the axle halfway, jack up the wheel with a floor jack, slide the wheel out onto the shaft, put a block under the axle and remove the shaft with the wheel. Reverse for installing the wheel.
 
This type accident is why I use the device in Sam's post to jack the RV-6 and use a different fixture mounted to the brake caliper when I jack the RV-10.

My home field has a repair station that specializes in composites. I visit a day or two every month. You'd be surprised how many Cirri they see which dropped off of jacks. Scares the **** out of me when I consider that every one of those airplanes was being jacked in a pro shop with decent tools...
 
Welded a bolt to a gas line cap. No way the jack is coming out.
 

Attachments

  • jack.JPG
    jack.JPG
    92.5 KB · Views: 185
Fly Boys

I prefer to leave my tiedowns in and like these for a 10: (Plus easy to carry in my repair kit)
 

Attachments

  • Screenshot 2023-09-15 194352.jpg
    Screenshot 2023-09-15 194352.jpg
    104.3 KB · Views: 86
  • Screenshot 2023-09-15 194237.jpg
    Screenshot 2023-09-15 194237.jpg
    8.8 KB · Views: 64
I'd do option #2 if it were me

As to jacking options- I just added the flyboy alu jack points at my last condition inspection. I also have the bogart screw in jack point and cup should I need to use a real jack. They seem less likely to come off.
 
It works the same way as the item now sold by Aircraft Spruce but originally sold way back in the day by Avery Tools:

12-00634.jpg


Remove the axle nut (the wheel won't come off the axle), insert the shaft into the axle halfway, jack up the wheel with a floor jack, slide the wheel out onto the shaft, put a block under the axle and remove the shaft with the wheel. Reverse for installing the wheel.
Gotcha. Thank you.
 
It works the same way as the item now sold by Aircraft Spruce but originally sold way back in the day by Avery Tools:

12-00634.jpg


Remove the axle nut (the wheel won't come off the axle), insert the shaft into the axle halfway, jack up the wheel with a floor jack, slide the wheel out onto the shaft, put a block under the axle and remove the shaft with the wheel. Reverse for installing the wheel.

I have one of these in my hangar, never used it. I'd sell it if anyone is interested.

I have the Flyboy jackpoints installed and keep the lift arm doo-dad and a Phillips screwdriver in my plane in case I turn up with flat on the ramp and at remote airport, but I want a solution in my hangar that doesn't involve removing the wheel pants, so wing jacks are my choice. I exchange my tie down on each wing for a polished grade five 3/8 carriage bolt and use the old Harbor Freight pump jacks I built myself following some Kitplanes article I read somewhere. Between the two solutions, that's what works best for me. I suppose slipping off the jack is a possibility.

..
 

Attachments

  • IMG_8454.jpg
    IMG_8454.jpg
    818.6 KB · Views: 101
  • DIY-Airplane-Jack-006.jpg
    DIY-Airplane-Jack-006.jpg
    302.1 KB · Views: 138
Last edited:
Depends where you need it

https://www.aircraftspruce.com/catalog/topages/bogertcirrus-12-05132.php?clickkey=6724
I use the Bogert jack points and a HF jacks with 4 legs.

I have seen some other options in this thread especially the Fly Boys attachment to the gear legs seem to be an excellent choice.
This method seems especially suitable when you are in need of wheel maintenance on the road. Everybody has a car jack but not necessarily a 24" floor jack mounted on a solid platform such as the one needed to jack up at the wing tie down points.

For maintenance at home, I prefer to have the jack out of the way of the wheel assembly, it's hard enough to crawl around on the floor without the jack in the way.
However, when I prepare to take a main wheel off, I loosen all the hardware, axle nut, brake parts etc before I lift the plane. Then and only then, I jack up the wing, remove the wheel, place a padded block under the axle and let it back down. Too often folks stop to chat at the hangar and lean on the wing
or otherwise distract you and that is when things go wrong.

There are not a lot of excuses from a "professional" to drop an airplane off the jacks. As a professional AP she ought o have insurance to cover such "accidents"
 
Welded a wide pad to a $30 HF jack. Works great. Wood blocks placed for safety.
 

Attachments

  • IMG_0980.jpeg
    IMG_0980.jpeg
    553.7 KB · Views: 143
  • IMG_1340.jpeg
    IMG_1340.jpeg
    440.9 KB · Views: 190
Centering the load

I think one thing to keep in mind with all these jacking options is that good jacks have the ability to “ move “ and center themselves as the load is lifted and travels through an arc. We can have the load ( our precious airplanes ) lifted off the floor but if the weight isn’t centered on the jack or jackpoint it’s not really secure. Especially if we get inside or start pushing and shoving on the airframe. I hate jacking an airplane and can’t wait until the task is complete.:eek:
 
I've watched nervously as my HF jack on a 4-legged cross pedestal leans inward on two legs as the wing is raised. It helps to pre-position the jack to allow for this, but then it leans the other way on the way down! Cup and ball jack fixtures are definitely your friend - and no horsing around with the airframe until things are lowered onto safety blocks for the duration of the repair.
 
i easily made a clamping attachment to the gearleg that has a pocket for a bottle jack. at least if it slips the jack will probably do no damage .
 
The only reason I can think of to jack the aircraft is to work on the wheels - is there another reason that I'm missing? I certainly am careful when it's on the jack - even though I have a real wing jack and the proper adapter, it's kind of nerve wracking.

I would never get in the cockpit when it's on a jack, and I keep everyone out of my hangar when it's on a jack.

I hope you can get that wing repaired!
 
T
I would never get in the cockpit when it's on a jack, and I keep everyone out of my hangar when it's on a jack.

Not applicable to RVs but every time you do a gear swing test, someone must enter the cockpit while the aircraft is on jacks.
 
Not applicable to RVs but every time you do a gear swing test, someone must enter the cockpit while the aircraft is on jacks.

When you swing the gear on a large aircraft/airliner with hyd mules hooked up the whole airplane shakes, it's definitely not for the faint of heart :eek:
If you ever witness the operation, it becomes evident that jumping of the jacks is a real possibility if everything isn't set perfectly.
 
Last edited:
...I'll ask the obvious question, how did you get the airplane up high enough that you could slip the insulation sheets under the wing?

Get under the wing on all fours and push up with my back.

...the old Harbor Freight pump jacks I built myself following some Kitplanes article I read somewhere. Between the two solutions, that's what works best for me. I suppose slipping off the jack is a possibility.

I bought a used set of aircraft jacks and Bogert RV Jack Pads. I also have to get under the wing and lift my RV-7 with my back to slip the jack into position (I realize this thread is discussing the RV-10). Without doing so, the jack is a couple of inches too tall.

I went to Harbor Freight and measured their flat-bottom ram to see if budling my own set would net more clearance, but it seems like it would end up nearly the same height as what I have.

I assume those of you with ram style aircraft jacks have to lift the wing as well?

AC Jack.jpg
 
I bought a used set of aircraft jacks and Bogert RV Jack Pads. I also have to get under the wing and lift my RV-7 with my back to slip the jack into position (I realize this thread is discussing the RV-10). Without doing so, the jack is a couple of inches too tall.

I went to Harbor Freight and measured their flat-bottom ram to see if budling my own set would net more clearance, but it seems like it would end up nearly the same height as what I have.

I assume those of you with ram style aircraft jacks have to lift the wing as well?

View attachment 48080

Harbor Freight no longer sells the 3-ton long-ram jacks that I used to build these wing jack as was detailed in the Kitplanes article. I believe that they are sold by Northern Tool (at twice the price)

https://www.northerntool.com/produc...-hydraulic-jack-single-piston-flat-base-46210

That particular jack fits under the wing of my airplane just fine...no need to do any manual lifting.


..
 

Attachments

  • jack.jpg
    jack.jpg
    181.5 KB · Views: 68
  • Screenshot 2023-09-16 at 10.30.47 PM.png
    Screenshot 2023-09-16 at 10.30.47 PM.png
    537.4 KB · Views: 47
Back
Top