Saddened to hear.....
That so many people gave up on the swivel head rivet set, and then today to hear that Cleveland tool has stopped carrying it.
Here is why I think that is a mistake -
I have had, and used one for 30+ years. In my 26+ years at Van's Aircraft I have always recommended it to new builders. People have heard it be recommended during the building tips forums that Van's Aircraft has given at Oshkosh.
Many say it is a solution looking for a problem, or, if you cant learn to rivet with a traditional rivet set maybe you shouldn't be (lots of egos in airplane building

)
Give me a couple of minutes to explain why I think it should be in every builders tool box.
Lets first start with what it does -
Consider it an insurance policy.
It allows an inexperienced builder (or riveting helper); to right from the very first rivet they set, to have a safety net that pretty much 100% will prevent skin dents that are caused by a misaligned rivet gun when using a traditional mushroom rivet set. (Note I said "caused by a misaligned rivet gun"... many skin dents are caused by bucking bars... that is a totally different issue, but is still relevant to this discussion...I'll get to that in a minute).
This is especially true as a new builder begins to solo rivet increasingly difficult rivets that require a long arm reach with the gun and the bucking bar. Controlling both the gun and the bucking bar when at maximum arm reach can be difficult enough for someone with a lot of experience, but a disaster just waiting to happen for someone less experienced.
As riveting gets more difficult, or maybe the small percentage of the time where it is just plain impossible to do solo, a builder gets a helper involved. More times than not, this ends up being someone with little to no experience.
The natural thing is for the builder to decide that they will operate the gun (because that is the thing that can cause all of the damage, right?), so they give the bucking duties to the helper. This often times involves someone totally new to the process, needing to learn to work totally blind and by feel only. This is another recipe for disaster because a slipped bucking bar can do far more damage than a tilted rivet gun can.
So what are its benefits?
It is pretty much 100% insurance against skin dents caused by a misaligned rivet gun. That is what makes it beneficial to everyone regardless of their level of experience (everyone has a bad day every once in a while). Even with 35+ years of experience riveting on light aircraft structures, I still use one. Particularly any time I have much of a reach while holding the gun.
It allows for teaching just about anyone to be a riveting helper.
Show them how to center the rivet set on the rivet while pushing moderately against the skin, rest the palm of there non trigger hand on the skin and grasp the rubber cup of the rivet set between the thumb and index finger, and check the alignment of the gun using the reflection in the skin (though as already discussed, all they need to be is close), and be able to activate the trigger for a consistent 3 seconds each time (musicians are generally very good at this because they have developed a good sens of time/rhythm). This leaves all of the critical work to the bucker.
How is it suppose to work?
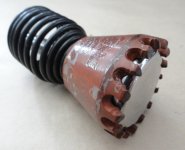
There is a ball joint in the rivet set that allows the flat face to pivot so that the face of the set can always stay flush against the skin, even if the rivet gun is not aligned perfectly. The rubber cup exists to induce some friction / grip on the skin so that if the gun is tilted slightly, the small amount of lateral force vector wont cause the rivet set to start scooting across the skin surface. Having an inexperienced helper grasp the rubber cup is an additional amount of insurance that that wont happen.
So why doesn't it work?
For reasons unknown (to me at least), even though it was a very creative design idea, the cup has always been sized such that it required far too much pressure on the gun to get the rubber to fully compress and allow the face of the rivet set to remain flush with the skin surface and rivet head.
No matter... it only takes about 90 seconds and a disk sander to modify it so that it works perfectly.
How to modify the tool
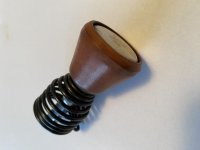
I didn't take the time to make a dimensioned drawing, but the photos should provide the extra detail needed.
You basically just remove material from the end of the rubber cup using a sanding disk.
The change doesn't need to be super precise, but what I have found works very well (besides mine I have modified quite a few of these for other builders), is to sand the outside corner of the rubber cup at about a 45 degree angle until the thickness of the cup has been reduced to about 1/3rd it original thickness (you could mark a thin pen line of where you want to stop if you feel the need).
That is it!
Doing this will reduce the thickness of the cup at the end by enough that it will become much more compressible so that the typical amount of pressure applied to the gun will be more than enough to keep the face of the rivet set flush against the skin, but there will still be some grip from the cup to keep it from sliding.
Hopefully other suppliers will continue to carry it (or maybe Mike at Cleveland Tool will see this post and decide to continue to do so Mike, feel free to contact me if you would like to discuss anything about it)
The close up photo of my tool below is an attempt to show with lines what the original unmodified shape of the cup was compared to what its modified shape currently is. Note that the very end of the cup is now only about 1/3rd as wide as it originally was, and the tapper in thickness is at about a 45 degree angle. Make yours look like this and it will work perfectly.
If a moderator thinks it would be of value, could someone sticky a copy of this post to the Tools section of the forum so others might be able to find it in the future?