
Van's Air Force
You are using an out of date browser. It may not display this or other websites correctly.
You should upgrade or use an alternative browser.
You should upgrade or use an alternative browser.
vinyl wrap
- Thread starter Flash
- Start date

Anyone know of any vinyl wrap companies that are still wrapping planes? I searched the forums and called/emailed all of the named companies and yet to hear one response. Looking to get a quote on my RV8. Any assistance is greatly appreciated.
Flash
Maybe consider doing it yourself? Even if you have to replace a few pieces, that’s cheaper than hiring someone. There are lots of threads here and videos on YouTube about how to do it.
I’m planning to use vinyl. Never did it before. But I also never riveted before. Or sanded carbon fiber. So, lots of new skills to learn!
fixnflyguy
Well Known Member
I know a guy
My next door hangar neighbor does wraps, although he doesn't do a bunch. His business is more signs and logos, ect. I saw a -9A he did with 100% 3 color coverage here in NC that I had to double take on to validate it was vinyl. He also trimmed out his Zenith and several RV's. Really looks good, wheel pants and all. I could probably get you in touch with him about details if your interested.
My next door hangar neighbor does wraps, although he doesn't do a bunch. His business is more signs and logos, ect. I saw a -9A he did with 100% 3 color coverage here in NC that I had to double take on to validate it was vinyl. He also trimmed out his Zenith and several RV's. Really looks good, wheel pants and all. I could probably get you in touch with him about details if your interested.
Maybe consider doing it yourself? Even if you have to replace a few pieces, that’s cheaper than hiring someone. There are lots of threads here and videos on YouTube about how to do it.
I’m planning to use vinyl. Never did it before. But I also never riveted before. Or sanded carbon fiber. So, lots of new skills to learn!
Thanks, I am looking into it. Not 100% sure I want to do vinyl so was looking for quotes to see the overall cost.
My next door hangar neighbor does wraps, although he doesn't do a bunch. His business is more signs and logos, ect. I saw a -9A he did with 100% 3 color coverage here in NC that I had to double take on to validate it was vinyl. He also trimmed out his Zenith and several RV's. Really looks good, wheel pants and all. I could probably get you in touch with him about details if your interested.
Thanks for the offer! PM sent
Vinyl wrap
Just had the unpainted portion of my RV6A wrapped. My painter said it looks better than silver paint would have. You may need to find someone that does vehicles and be their first. I was their second. I haven’t flown it yet as I am changing over from EFII to the new system 32 upgrade, doing conditions inspection and I wasted unneeded effort of removing flight controls.
Just had the unpainted portion of my RV6A wrapped. My painter said it looks better than silver paint would have. You may need to find someone that does vehicles and be their first. I was their second. I haven’t flown it yet as I am changing over from EFII to the new system 32 upgrade, doing conditions inspection and I wasted unneeded effort of removing flight controls.
Just had the unpainted portion of my RV6A wrapped. My painter said it looks better than silver paint would have. You may need to find someone that does vehicles and be their first. I was their second. I haven’t flown it yet as I am changing over from EFII to the new system 32 upgrade, doing conditions inspection and I wasted unneeded effort of removing flight controls.
Great advice! Thanks
TraderDoc52
I'm New Here
Had same experience with no reply from 3 supposed airplane wrap companies. Contacted TNJ engravers in Kerrville who said they would do it. They do cars but haven’t done any airplanes but we’re willing. Still waiting on a quote. I may do it myself. Considering doing invasion strips on the wings for a trial and if it works I may do whole plane. 3M makes vinyl wrap as well rvinyl. Cost starts at about $6 a square foot for material. 3M quality vinyl about $16 sq ftAnyone know of any vinyl wrap companies that are still wrapping planes? I searched the forums and called/emailed all of the named companies and yet to hear one response. Looking to get a quote on my RV8. Any assistance is greatly appreciated.
Flash
steve murray
Well Known Member
3M makes vinyl wrap as well rvinyl. Cost starts at about $6 a square foot for material. 3M quality vinyl about $16 sq ft
I just finished vinyl wrapping my RV10, try "Metrostyling.com" for 3M vinyl, it is about $3 sq-ft for 3M 2080 Gloss (multiple colors) 5' x 60" piece is just under $60.
Steve
jssaylor2007
Active Member
So what's the consensus on wrapping vs painting? Do most people wrap or vice-versa?
Frank Smidler
Well Known Member
Fellers.com has good vinyl prices
I just finished wrapping my RV-6 in 3M 2080 vinyl that I bought from Fellers at approximately $550/roll of 5 ft x 75 ft with free shipping for orders over $100. It will cost more if you order less than a full roll. With a few re-do's from learning curve I used 2 rolls and still need to buy a little more for my wheel pants. Overall I am pleased with the results.
I just finished vinyl wrapping my RV10, try "Metrostyling.com" for 3M vinyl, it is about $3 sq-ft for 3M 2080 Gloss (multiple colors) 5' x 60" piece is just under $60.
I just finished wrapping my RV-6 in 3M 2080 vinyl that I bought from Fellers at approximately $550/roll of 5 ft x 75 ft with free shipping for orders over $100. It will cost more if you order less than a full roll. With a few re-do's from learning curve I used 2 rolls and still need to buy a little more for my wheel pants. Overall I am pleased with the results.
There's no consensus... It's like priming.So what's the consensus on wrapping vs painting? Do most people wrap or vice-versa?
A lot of people paint a single-colour base first, then use vinyl for decorations on top. A few people have wrapped the bare aluminum without issues, but there hasn't been any done for long enough to gauge whether there are any long-term issues. I think 4-5 years old is the oldest i've heard of.
but there hasn't been any done for long enough to gauge whether there are any long-term issues. I think 4-5 years old is the oldest i've heard of.
I think many of the quality wrap material is stated as good for around 8 years in vertical applications and 2-3 years in horizontal. I speculate that the majority of the aging is related to UV exposure and to a lesser degree airborne contaminants. I presume that a hangered airplane would net a pretty long lifetime for wrap material. Vynal is notorious for degradation from UV exposure.
Larry
Bill Boyd
Well Known Member
I just finished vinyl wrapping my RV10, try "Metrostyling.com" for 3M vinyl, it is about $3 sq-ft for 3M 2080 Gloss (multiple colors) 5' x 60" piece is just under $60.
Steve
Any numbers you can post up on material cost and weight gain for your vinyl wrap on the -10? Asking for a very close friend.

Wrapping my 9A next week. A local company who wraps cars, trucks and boats is designing and doing the installation. It's their first airplane and they are excited. My vinyl installer called their standard supplier Avery. Apparently, Avery has an aviation product for wrapping large jets, etc. They said for a small aircraft the standard vinyl will suffice. For the complex design I've chosen it's much cheaper than paint, weighs less, and is installed in less than a week in my hanger with me there every day. Plus the vinyl can be printed with any design you can imagine and the ink is UV coated.
My friend built a Sling, had to fly to a paint outfit, have someone shuttle him back and forth, and waited 3 months to get it finished.
My friend built a Sling, had to fly to a paint outfit, have someone shuttle him back and forth, and waited 3 months to get it finished.
wcalvert
Well Known Member
Wrap it up
Just completing the wrap on my -7 this week.
Following are some thoughts and observations that may help someone get started or make the plunge... no vinyl wars intended, just the facts. You choose for yourself.
I've used about 125' of Avery Dennison Supreme to do the base colors, and it'll take another 25 or so to do the accents. The overall time spent was about 40 hours (so far) and I'll say it's about 95% right. There are a few spots (elevator horns and the like) where the film is not laying as well as it could, so those will be redone in time. Gonna let it age to see how it does in the field.
I chose Avery, but there are films by 3M, Vivvid and others. The Avery is a 3.2mil film, 3M is 3.5. Colors are available in gloss, mat, color changing, carbon fiber etc. Lots to choose from. I plan to use on 3M film as an accent since Avery doesn't have the right shade in their lineup.
I used Fellers as my supplier, there is a local outlet in Seattle or they ship for free over $100. Fast, usually two day shipping. There are others and most ship free over a $ amount. Fellers has treated me well so far.
Every technique I used was taken from the Internet. CW Wraps and the The Wrap Institute are two good YouTube references. The manufacturer has their own instruction sheets online, and combined with the videos provide a lot of technique examples to copy if you watch closely. A warm, clean work area is a must. Cold vinyl isn't friendly and dust under your wrap looks like rocks under a carpet. Keep it clean!
Planning ahead for sequence of application and seam orientation is a must!
All of the vinyl seams are aligned with a panel seam and overlapped so the lap edge is either down or aft, then seam sealed with 3M 3950 edge sealer. The overlap is not required (there are methods that produce almost no overlap) and it does detract from the "seamless" look, but I prefer the solid bond between layers that it creates (vinyl stick to vinyl very well). The seam sealing likewise may not be required, but it was recommended as a bulletproof insurance policy by a local wrapper, and is used on all of his boat wraps. You can barely see the sealer line as I used a 3/16" wide brush to minimize the excess and took my time doing the applying (don't use the applicator in the can! ... huge)
All cuts in the finish vinyl were done with 3m Finish line knifeless tape. This stuff is expensive, as is the sealer, but the quality is excellent and the tape keeps the knife off the aluminum skin. There are many videos out there about how to use this product, and it really works well.
All aluminum surfaces were cleaned of any adhesive or oils with lacquer thinner, then two cleanings with 70% IPA (isopropyl alcohol) in a spray bottle, wiping with micro fiber towels. I chose not to use any primer on the aluminum, and after some discussion with others, have decided to do an inspection in the future by pulling a small section to see how it is holding up. Adhesion is not an issue on clean shiny aluminum. I did a test to see if scuffing with Scotchbrite would improve performance, but it appears to stick less well.
When applying the film, it's important to "lock in down" with firm pressure from you squeegee as you go. Light pressure will likely allow bubbles to stay behind and cause headaches later. You'll learn to keep the correct tension on the free film and work the edges of the unlocked film along as you go along. Speed is not important. Also pay attention to "adhesive printing" where the vinyl is pulled hard over an edge, causing the adhesive to roll up, and then laid down again. This will print through the finish.
I have applied the vinyl to fiberglass that was primed and prepped for paint. The vinyl adheres just fine with no issues. Be sure you primer is sanded smooth as defects will print through.
All seams and field areas in the wrap were post heated. The seams and any areas where there was much stretching were heated to the full 90 degrees +C (90 - 105 is recommended by Avery) and the fields were heated to a lower temperature to check for entrapped air bubbles. This process is vital. Where the film has not been post heated, it retains its memory and will try to return to its original flat shape. Once the film is heated to over 90 degress, it looses all memory and stays in place. The heating also activates the adhesive.
During application, any folds or wrinkles in the film can be removed with a quick shot of heat. Also, before stretching, adding heat will relax the film and it will stretch easier. Most wraps recommend not stretching more than 10% to prevent gloss or color changes.
When heating be careful of any rivet or gap that may have a bubble. It is critical that all wrap be adhered well before post heating, as the bubble with "burn" because it doesn't have the heat sink of the aluminum to temper the hot air.
Tools are pretty simple. A good heat gun (mine is a Dewalt that goes to 1100 degrees F), hard and medium squeegees, a couple more with felt edges, extra felt edges, a good break blade knife, microfiber towels, spray bottle, small brushes, IR thermometer, work apron and a Snitter (slitting hook knife). I also used a soft rubber roller (RollerPro Heat Resistant Vinyl Application Tool, $50) and a rivet brush, both to smooth rivets. Build yourself a vinyl cutting station that allows the film to be rolled out and cut to length.
All of the work I did on the fuse was done on the rotisserie. Doing this job on a flying aircraft would be a whole 'nuther challenge. With the roto, gravity can help hold the vinyl and I could work at the best body angle possible. Just be prepared to need more help when you're doing the bottom of anything. I have a new found respect for the "skinny kids" doing these wraps online, it's hard work no matter how you do it!
A second set of hands will occasionally be helpful. I did the top of the wings solo, and the sheet was 60" x 10'. It can be done but would have gone faster with help..
As far as advice goes, be prepared for some frustration and a steep learning curve. Now that the project is almost done, I've found a few places where I could do better. That's what I expected.
Overall I'm very happy with the result. Cost will be around $1300 all in, no spray booth, minimal solvent exposure, and done in a week. Just what I was looking for!
Last edited:
steve murray
Well Known Member
Any numbers you can post up on material cost and weight gain for your vinyl wrap on the -10? Asking for a very close friend.
https://photos.google.com/share/AF1...?key=WDRDdGpJU3VlVXUwdG4ydzFCeUxab0RWeG5ZdFpB
Hey Bill
I have not yet weighed the plane. The wings are all vinyl and all the striping is vinyl, most of the fuselage is paint. I would guesstimate I have $1200 in material for the wings\striping. I probably used $150 of 3m "knife tape" in the process.
Learned a lot, had fun and my wife helped out as well. It is a 20 foot paint\vinyl job and I am OK with that. (Scheme was shamelessly copied from gentlemen in Australia)
Steve
Learned a lot, had fun and my wife helped out as well. It is a 20 foot paint\vinyl job and I am OK with that. (Scheme was shamelessly copied from gentlemen in Australia)
Steve
Fine job, turned out very nice. Congratulations.
Steve, lookin' nice.
I tried to post a few pics but they all came out upside down on the forum page?!
Wrap on!
Taken on an iphone? There's a known thing with iphones where if you take the picture with the physical volume buttons on the top side, thats technically taking the photo "upside down". On all Apple devices the EXIF data gets read and the photo is orientated correctly. On any system that doesn't read EXIF data, the picture is displayed in its original orientation, which changes based on how you hold your phone. For upright pictures, hold your phone with the physical buttons on the bottom, or use software to rotate your library so everything is "up" without having to look at EXIF data.
TraderDoc52
I'm New Here
RV-6 Wrap
Flash this is Rhino at T82. Just had my newly completed RV6 wrapped by TNJ engraving in Kerrville. They have done detail work on other planes but I think mine was their first total plane wrap. Job was around 6K. Took about two weeks in my hangar. But their work schedule is sketchy and interrupted. Should take about 4 days 2 people. If you want to check it out contact me by text or leave message. 830-456-3781
Flash this is Rhino at T82. Just had my newly completed RV6 wrapped by TNJ engraving in Kerrville. They have done detail work on other planes but I think mine was their first total plane wrap. Job was around 6K. Took about two weeks in my hangar. But their work schedule is sketchy and interrupted. Should take about 4 days 2 people. If you want to check it out contact me by text or leave message. 830-456-3781
Attachments
pjoshyjosh
Well Known Member
\Just completing the wrap on my -7 this week.
Following are some thoughts and observations that may help someone get started or make the plunge... no vinyl wars intended, just the facts. You choose for yourself.
I've used about 125' of Avery Dennison Supreme to do the base colors, and it'll take another 25 or so to do the accents. The overall time spent was about 40 hours (so far) and I'll say it's about 95% right. There are a few spots (elevator horns and the like) where the film is not laying as well as it could, so those will be redone in time. Gonna let it age to see how it does in the field.
I chose Avery, but there are films by 3M, Vivvid and others. The Avery is a 3.2mil film, 3M is 3.5. Colors are available in gloss, mat, color changing, carbon fiber etc. Lots to choose from. I plan to use on 3M film as an accent since Avery doesn't have the right shade in their lineup.
I used Fellers as my supplier, there is a local outlet in Seattle or they ship for free over $100. Fast, usually two day shipping. There are others and most ship free over a $ amount. Fellers has treated me well so far.
Every technique I used was taken from the Internet. CW Wraps and the The Wrap Institute are two good YouTube references. The manufacturer has their own instruction sheets online, and combined with the videos provide a lot of technique examples to copy if you watch closely. A warm, clean work area is a must. Cold vinyl isn't friendly and dust under your wrap looks like rocks under a carpet. Keep it clean!
Planning ahead for sequence of application and seam orientation is a must!
All of the vinyl seams are aligned with a panel seam and overlapped so the lap edge is either down or aft, then seam sealed with 3M 3950 edge sealer. The overlap is not required (there are methods that produce almost no overlap) and it does detract from the "seamless" look, but I prefer the solid bond between layers that it creates (vinyl stick to vinyl very well). The seam sealing likewise may not be required, but it was recommended as a bulletproof insurance policy by a local wrapper, and is used on all of his boat wraps. You can barely see the sealer line as I used a 3/16" wide brush to minimize the excess and took my time doing the applying (don't use the applicator in the can! ... huge)
All cuts in the finish vinyl were done with 3m Finish line knifeless tape. This stuff is expensive, as is the sealer, but the quality is excellent and the tape keeps the knife off the aluminum skin. There are many videos out there about how to use this product, and it really works well.
All aluminum surfaces were cleaned of any adhesive or oils with lacquer thinner, then two cleanings with 70% IPA (isopropyl alcohol) in a spray bottle, wiping with micro fiber towels. I chose not to use any primer on the aluminum, and after some discussion with others, have decided to do an inspection in the future by pulling a small section to see how it is holding up. Adhesion is not an issue on clean shiny aluminum. I did a test to see if scuffing with Scotchbrite would improve performance, but it appears to stick less well.
When applying the film, it's important to "lock in down" with firm pressure from you squeegee as you go. Light pressure will likely allow bubbles to stay behind and cause headaches later. You'll learn to keep the correct tension on the free film and work the edges of the unlocked film along as you go along. Speed is not important. Also pay attention to "adhesive printing" where the vinyl is pulled hard over an edge, causing the adhesive to roll up, and then laid down again. This will print through the finish.
I have applied the vinyl to fiberglass that was primed and prepped for paint. The vinyl adheres just fine with no issues. Be sure you primer is sanded smooth as defects will print through.
All seams and field areas in the wrap were post heated. The seams and any areas where there was much stretching were heated to the full 90 degrees +C (90 - 105 is recommended by Avery) and the fields were heated to a lower temperature to check for entrapped air bubbles. This process is vital. Where the film has not been post heated, it retains its memory and will try to return to its original flat shape. Once the film is heated to over 90 degress, it looses all memory and stays in place. The heating also activates the adhesive.
During application, any folds or wrinkles in the film can be removed with a quick shot of heat. Also, before stretching, adding heat will relax the film and it will stretch easier. Most wraps recommend not stretching more than 10% to prevent gloss or color changes.
When heating be careful of any rivet or gap that may have a bubble. It is critical that all wrap be adhered well before post heating, as the bubble with "burn" because it doesn't have the heat sink of the aluminum to temper the hot air.
Tools are pretty simple. A good heat gun (mine is a Dewalt that goes to 1100 degrees F), hard and medium squeegees, a couple more with felt edges, extra felt edges, a good break blade knife, microfiber towels, spray bottle, small brushes, IR thermometer, work apron and a Snitter (slitting hook knife). I also used a soft rubber roller (RollerPro Heat Resistant Vinyl Application Tool, $50) and a rivet brush, both to smooth rivets. Build yourself a vinyl cutting station that allows the film to be rolled out and cut to length.
All of the work I did on the fuse was done on the rotisserie. Doing this job on a flying aircraft would be a whole 'nuther challenge. With the roto, gravity can help hold the vinyl and I could work at the best body angle possible. Just be prepared to need more help when you're doing the bottom of anything. I have a new found respect for the "skinny kids" doing these wraps online, it's hard work no matter how you do it!
A second set of hands will occasionally be helpful. I did the top of the wings solo, and the sheet was 60" x 10'. It can be done but would have gone faster with help..
As far as advice goes, be prepared for some frustration and a steep learning curve. Now that the project is almost done, I've found a few places where I could do better. That's what I expected.
Overall I'm very happy with the result. Cost will be around $1300 all in, no spray booth, minimal solvent exposure, and done in a week. Just what I was looking for!
Great write up. I also just did my 9A a few months ago. QUite happy. A few 'mistakes' that can be fixed easily. The vinyl is very forgiving. Get more then just one helper when doing large surfaces/etc. When doing wings/horizontal surfaces - don't work from one end to the other. Start on the long center line and go back first (from middle of wing to back of wing) and then do middle to leading edge. This helps reduce any pulling affect.
I used 3M 2080 from metrorestyling.com or rvinyl.com as well as knifeless tape and made in Oregon RapidTac cleaning solution. I put a writeup on the facebook site for Vans Aircrarft builders with pictures/etc..
David Paule
Well Known Member
Might as well post it here because a lot of us don't use Facebook. Me, for example.
Dave
Dave
pjoshyjosh
Well Known Member
Might as well post it here because a lot of us don't use Facebook. Me, for example.
Dave
if I could figure out the pictures easily?? Facebook I'm able to do from phone.
And - i do this site mostly from work computer
(Can't do image uploads)David Paule
Well Known Member
Let me know when you're going to post the notes and email the photos to me and I'll do it for you. Click on my name above and select email, send me an email and I'll send you the email address to send them to (you can't through the click-on link).
There are two ways. One way is to post them to a third-party site like imgur.com, click on the photo there and select "copy image location." Then in your email, click on the yellow landscape box above the text window and paste it into that. Do this for each photo, one by one.
The other way is to click on the paperclip above the text window, select "browse" and then "upload" in the pop-up window that appears, place the cursor where you want the photo in the text window, click on the paperclip again, and your photo will be placed where you wanted it. (I inserted the photo below while trying to remember how to do this one. usually I do the other).
In both cases you won't see the photo until you press "preview post" below the text window adjacent to the "submit" button. But while the text window is open you can cut and paste it to another location in the post if you want.
Dave
Attachments
Last edited:
Flash this is Rhino at T82. Just had my newly completed RV6 wrapped by TNJ engraving in Kerrville. They have done detail work on other planes but I think mine was their first total plane wrap. Job was around 6K. Took about two weeks in my hangar. But their work schedule is sketchy and interrupted. Should take about 4 days 2 people. If you want to check it out contact me by text or leave message. 830-456-3781
Did you remove the control surfaces for wrapping?
TraderDoc52
I'm New Here
Vinyl wrap control surfaces
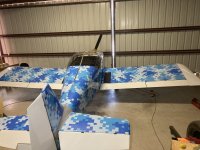
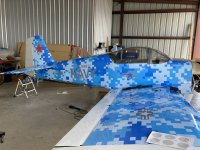
Took all control surfaces off to wrap. Much easier . Used one piece of wrap for each. Overlapped seam on posterior edge. Started about 1/2 inch from posterior edge on bottom surface .came around posterior edge then around leading edge and trimmed at posterior edge even with it. Small 1/2 inch border layer. on the bottom posterior edge under the top layer provides good adhesion and all seams are downwind and shouldn’t be lifted up by airstream.
Took all control surfaces off to wrap. Much easier . Used one piece of wrap for each. Overlapped seam on posterior edge. Started about 1/2 inch from posterior edge on bottom surface .came around posterior edge then around leading edge and trimmed at posterior edge even with it. Small 1/2 inch border layer. on the bottom posterior edge under the top layer provides good adhesion and all seams are downwind and shouldn’t be lifted up by airstream.
TraderDoc52
I'm New Here
Wrapping an RV
I finished wrapping my RV6 in Sept and passed my DAR inspection. Started my test program with about 10 hours completed and have been up to 190 mph straight and level 180 horse Lycoming carbureted fixed pitch with no wheel paints. Wrap is slick as snake snot and lighter than paint. It is certainly cheaper than paint and can be completed in several days. ( A buddy is still waiting on his 6 from the paint shop after 9 months). You can do it yourself but would advise watching a car wrap in person or viewing the how to videos. It’s not rocket science, heavens you’re building an airplane which is much more complex than doing a wrap job. You save even more money on a wrap if your paint scheme is complex. The wrap vinyl is printed out by a computer design on a digital printer up to 5 feet wide. The colors and designs are endless. The vinyl adheres very well and I have had no issues with delamination. It seems to smooth out the transition step off of metal seams, ergo more speed. Oil wipes right off and avgas doesn’t affect it either. The only challenge so far is multiple compound curves can be wrapped but excessive stretching can sometimes distort shapes or colors . Solid colors no problem. If I had not hired a wrap company to help me do mine I would have saved 50-60%. The product mark up and labor cost me $4k out of a $6.5 K job but I was a newbie to it. I would not hesitate to do it by myself again and buy the vinyl off the internet.( It helps to have one or two assistants hold large pieces in place while you squeegee.) Hangared I expect it to last 7-10 years and if I need to I can strip it off with a detach or chemical and put on a new design. The air show birds do it all the time. Hope that helps.
I finished wrapping my RV6 in Sept and passed my DAR inspection. Started my test program with about 10 hours completed and have been up to 190 mph straight and level 180 horse Lycoming carbureted fixed pitch with no wheel paints. Wrap is slick as snake snot and lighter than paint. It is certainly cheaper than paint and can be completed in several days. ( A buddy is still waiting on his 6 from the paint shop after 9 months). You can do it yourself but would advise watching a car wrap in person or viewing the how to videos. It’s not rocket science, heavens you’re building an airplane which is much more complex than doing a wrap job. You save even more money on a wrap if your paint scheme is complex. The wrap vinyl is printed out by a computer design on a digital printer up to 5 feet wide. The colors and designs are endless. The vinyl adheres very well and I have had no issues with delamination. It seems to smooth out the transition step off of metal seams, ergo more speed. Oil wipes right off and avgas doesn’t affect it either. The only challenge so far is multiple compound curves can be wrapped but excessive stretching can sometimes distort shapes or colors . Solid colors no problem. If I had not hired a wrap company to help me do mine I would have saved 50-60%. The product mark up and labor cost me $4k out of a $6.5 K job but I was a newbie to it. I would not hesitate to do it by myself again and buy the vinyl off the internet.( It helps to have one or two assistants hold large pieces in place while you squeegee.) Hangared I expect it to last 7-10 years and if I need to I can strip it off with a detach or chemical and put on a new design. The air show birds do it all the time. Hope that helps.
Attachments

M5fly
Well Known Member
Maybe consider doing it yourself? Even if you have to replace a few pieces, that’s cheaper than hiring someone. There are lots of threads here and videos on YouTube about how to do it.
I’m planning to use vinyl. Never did it before. But I also never riveted before. Or sanded carbon fiber. So, lots of new skills to learn!
As someone who has worked in the sign industry and helped wrap my fair share of vehicles and race cars, I definitely don't recommend installing it yourself, especially considering all the curved and sloping surfaces on an airplane. You'll end up with tons of wrinkles, ruined vinyl, or both. Even with my experience I wouldn't wrap my own plane.
I'm not saying builders aren't capable of wrapping their own plane, but it'd be incredibly easy to spot the differences in that and a professional job. Some things are worth the additional cost and it's still saving you tons over professional paint.
ResidentStranger
Active Member
FAA rules on wrapping
I'm getting some quote locally to get my RV-12 wrapped I'm currently building and the wrapper told me the FAA requires they use 3M and he can't even buy it so they won't do it. That sounds off to me reading this thread - anyone have any specifics on what's allowed/not allowed in terms of wraps for and E-LSA?
I'm thinking maybe he's referencing wraps for certified planes - doubt they're experts since this is all usually pretty complicated.
Thanks!
How do you know that the wrap is lighter than paint? I would love to know what vinyl actually weighs.
The specs for it are on the 3M site... Google for 3M 1080, and you should find the weight per square foot or square meter somewhere. I think the OP said how much he used, so that times the weight/area should tell you what it weighs.
jconard27
Member
Thanks Snowflake,
But- No Joy, 3M doesn't list the weight anywhere on its page-
https://www.3m.com/3M/en_US/graphics-signage-us/1080-wrap-film-series/
I was hoping that since "TraderDoc52" made the assertion, he might "weigh in" on the issue with some data (see what I did there).
I looked at this in 2008, and it was really heavy compared to paint. I see that it is still 3.5 mil vinyl. But I am hoping that there is some new advance that makes it lighter--OR-- now that there are some installations, there is a real world measurement of the weight penalty.
The truth is that it's just a guess when it comes to the weight. A valid comparison would involve the exact same color and prep work applied to the same airplane in paint and vinyl with a weight comparison of each. Anything else is people making guesses to justify their choice one way or the other.
Thanks Snowflake,
But- No Joy, 3M doesn't list the weight anywhere on its page-
https://www.3m.com/3M/en_US/graphics-signage-us/1080-wrap-film-series/
I was hoping that since "TraderDoc52" made the assertion, he might "weigh in" on the issue with some data (see what I did there).
I looked at this in 2008, and it was really heavy compared to paint. I see that it is still 3.5 mil vinyl. But I am hoping that there is some new advance that makes it lighter--OR-- now that there are some installations, there is a real world measurement of the weight penalty.
LouFly
Well Known Member
weight
150 g/m^2 for 3M 1080
https://multimedia.3m.com/mws/media/767410O/3m-scotchprint-car-wrap-film-series-1080.pdf
150 g/m^2 for 3M 1080
https://multimedia.3m.com/mws/media/767410O/3m-scotchprint-car-wrap-film-series-1080.pdf
Ralph Inkster
Well Known Member
Flash this is Rhino at T82. Just had my newly completed RV6 wrapped by TNJ engraving in Kerrville. They have done detail work on other planes but I think mine was their first total plane wrap.... Took about two weeks in my hangar. But their work schedule is sketchy and interrupted. Should take about 4 days 2 people.
Sounds similar to our wrap job on a 6A. Total newbies, including learning curve took 4 days with 2 people. Used empennage surfaces to figure it out. Oh, doesn't include many hours of watching Youtube instructional vids...
wirejock
Well Known Member
So, doing the math based on the weight above,
It’s about 21 pounds of vinyl based on the previous post of two rolls of 5 x 75 feet.
21 pounds seems like a lot of paint. But- not more than half so it seems like a pretty neat option!
Not all of that is used. In fact, there's quite a bit of waste.
I calculated square feet on my 7 to figure out paint quantity. It's not Vans figures but a reasonable attempt using a tape measure.
If my math is right it works out to 12lbs of vinyl.
Feel free to play with the numbers. Here is the spreadsheet.
https://drive.google.com/file/d/1k28OG3TpF0ll3elYOLhVlsQz8yyutMGE/view?usp=sharing
Look for the "square footage" tab.
No idea what primer and paint weigh per square foot. Maybe someone has some figures.
No idea what primer and paint weigh per square foot. Maybe someone has some figures.
Color matters. A good yellow paint job weights up to 4X more than white. This is why I mention above that it's just a guess unless someone took the same plane and weighed it with matching prep and color.
wcalvert
Well Known Member
Weight by color and how "smooth" the finished paint appears can have a big effect on weight. Some paint jobs really pile on the paint to smooth over issues. Add extra primer to the finish color coat and you can easily go over the manufacturer specified finished film thickness.
Wrap may not be as sparkly shiny as high end paint, but you'll always have the same thickness over the entire surface, and a very predictable sheen (except in high stretch areas where you can overpull the material if you're not careful).
Overall a lot of benefits, not to mention that the harshest solvent used is ISO alcohol.
Cheers
At least vinyl comes in a pre-set thickness, with a known weight per square meter. So a vinyl estimate is pretty easy to get, as someone above has done.Color matters. A good yellow paint job weights up to 4X more than white. This is why I mention above that it's just a guess unless someone took the same plane and weighed it with matching prep and color.
The people who weighed their painting supplies ahead of time and again afterwards probably have the best estimates for added paint weight... If you consumed 10lb of paint while painting, that'll be an upper limit of how much went on the plane...

