Van's Air Force

The definitive Van's Aircraft support community! Buying, building or flying an RV? Join our exclusive family of mentors and enthusiasts!

My air filter wore thru my airbox

Dean Pichon

Well Known Member
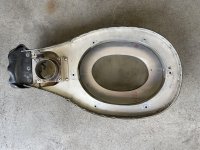
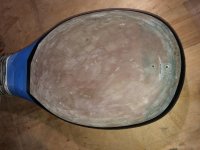
For the second time in almost 20 years the K&N air filter in my -4 has worn thru the fiberglass bottom. The first time this occurred, I replaced the airbox assembly and repaired the old one to keep as a spare. The spare will now be pressed into service while I repair this one.

Has anyone found a solution to keep this from happening? (I assume I'm not the only one experiencing this issue.)

Thanks,

Dean
 

Attachments

  • IMG_0295.jpg
    IMG_0295.jpg
    391.1 KB · Views: 486
  • IMG_0294.jpg
    IMG_0294.jpg
    465.3 KB · Views: 484
I didn't see the filter, but can you mold in a grove that the ring on the filter will fit, trapping it so it dosen't vibrate?
 
Many builders have had good success by incorporating an aluminium plate into the bottom of the FAB. That's what I did.... 520 hours and performing like a champ. Without the metal plate it is only a matter of time before the bottom of the composite FAB wears excessively. Vans should change their design....if they haven't already.
 
Yes - easy fix.

Add a piece of 0.032” aluminum to the bottom of the air box. Add four pieces of aluminum to help prevent the filter from going conical while you are at it.

Carl
9-CABEF06-B5-E6-4125-BE9-E-6-B4-B0-C00-E28-B.jpg

F09-D63-C4-6-A0-C-4-A96-9-E22-931-B29249-A28.jpg
 
Very common issue.

Fix is put an aluminum plate in so it gets the wear instead of the fiberglass.
 
I reinforced the bottom of the -7 FAB with several layers of carbon fiber after it showed wear at about 150 hours. An additional 700 hours showed little to no wear. In the 10, I put in an aluminum plate.
 
I've repaired mine 3 times in 1700 hours. The first two times were by grinding down some thickness and laying new glass and epoxy in the bottom. The third time was about 2 years ago. I ground down some of the thickness again, but this time I used kevlar cloth. So far, so good, but I do not have many hours on this latest repair.

Aluminum is a good solution, but keep a keen eye on it for fatigue cracks. Loose pieces of aluminum would not be good there...
 
Thanks all. It sounds like an aluminum plate is the way to go. A couple of questions:

Is the geometry of the plate such that it can be installed in a completed airbox or does the "top" have to be removed to get it in place?

Once installed, is it bonded or riveted to the fiberglass?

Thanks,
 
Thanks all. It sounds like an aluminum plate is the way to go. A couple of questions:

Is the geometry of the plate such that it can be installed in a completed airbox or does the "top" have to be removed to get it in place?

Once installed, is it bonded or riveted to the fiberglass?

Thanks,

I installed the plate as Carl suggested. It fits through the existing hole in the top. I used both rivets and PRC to bond it in. A few hundred hours and ok so far.
 
It shouldn't touch it

Built per plans, the filter should have an aluminum bottom plate, and the fiberglass FAB is a good 1/4 inch below it. The FAB has been over trimmed on may and is too close to the filter and lower plate.
 
O-360 engines = filter sits against fiberglass bottom of FAB.
O-320 engines = filter has an aluminum plate on bottom of filter. Space in-between filter bottom/plate and FAB fiberglass

On the 360 FAB's I have had filters rub thru the bottom of the FAB and repaired/reinforced them with kevlar.

I also have a DXF file to CNC a new top plate out of 1/8". Haven't had any problems with cracking top plates as I have with the stock thickness.

I do not like anything riveted to the inside of the filter....have seen too many things disappear into engines without a trace.
 
Built per plans, the filter should have an aluminum bottom plate, and the fiberglass FAB is a good 1/4 inch below it. The FAB has been over trimmed on may and is too close to the filter and lower plate.

O-360 engines = filter sits against fiberglass bottom of FAB.
O-320 engines = filter has an aluminum plate on bottom of filter. Space in-between filter bottom/plate and FAB fiberglass

Not really correct on either of the above posts. While this was true on early versions of the O-320, FWF plans post-2006 or -2007 used the same style as the O-360, where the filter just sits on the bottom of the FAB.
 
Built per plans, the filter should have an aluminum bottom plate, and the fiberglass FAB is a good 1/4 inch below it. The FAB has been over trimmed on may and is too close to the filter and lower plate.

That’s the O-320 airbox you’re talking about. The others are different.
 
Not really correct on either of the above posts. While this was true on early versions of the O-320, FWF plans post-2006 or -2007 used the same style as the O-360, where the filter just sits on the bottom of the FAB.

How is it not true if every RV I've worked on with an O-320 has the bottom plate?
 
This happened to my -8 not long after I bought it. It has an O-360 and the air filter sits on the fiberglass. For this time I just rebuilt it with fiberglass. I may consider Kevlar cloth if it happens again. I suspect that the K&N air filter shrinks over time and is able to move around between the tabs on top of the airbox causing the fiberglass to wear. I now plan to replace the air filter at each annual instead of washing and oiling it.

I know the filters shrink as it happened with the -6A I previously owned. We had two filters and switched them out at each annual. One year, the spare filter would not fit easily. My mechanic at the time spent a couple of hours working it into place.
 
How is it not true if every RV I've worked on with an O-320 has the bottom plate?

Don’t know. I’m sure you’ve worjked on a bunch but maybe you’ve not worked on O-320s RVs built after mid 2000s? At least not mine. I don’t have my FWF plans handy to give you the drawing number but can assure you that my RV9 O320 does indeed sandwich the filter between the carb plate and the fiberglass bottom of the FAB. As noted above, earlier versions did use the 2 aluminum plate connected by long bolts method but Vans changed that for some reason sometime around 2007 or earlier. Just did a quick search—see thread below, particularly posts 3, 4, and 6 for confirmation that I’m not the only one...

https://vansairforce.net/community/showthread.php?t=182023&highlight=320+airbox
 
Last edited:
Fuel tank sealer

I cleaned mine up and put a layer of fuel tank sealer only on the wear/sealing area. Been fine ever since.

FYI my filter shrunk over 1 inch in diameter in 14 years! Yes, it has a new one now and the old was still good, just smaller....
 
I cleaned mine up and put a layer of fuel tank sealer only on the wear/sealing area. Been fine ever since.

FYI my filter shrunk over 1 inch in diameter in 14 years! Yes, it has a new one now and the old was still good, just smaller....

Good continued luck with your solution.
I would caution anyone else employing this method to vigorously clean up & properly prepare the wear/sealing area before applying sealant as if the rubbing motion breaks it loose, it is going to be sucked up through the engine.
Also, if there are grooves in the affected fiberglass area, it should be built back up to compensate for the thin parts.

I have found air filter grooved FAB units numerous times in the RVs I've serviced. Seems to show up most in planes where owners prime (or over prime) during start, excess fuel drains back & creates a damp grit with dust & dirt and wet sands the fiberglass through. I advise those owners to prime less, which seems to help in extending the time between airbox rebuilds. This is just one of the FAB maintenance concerns I regularily inspect for.
 
Last edited:
Thanks all. It sounds like an aluminum plate is the way to go. A couple of questions:

Is the geometry of the plate such that it can be installed in a completed airbox or does the "top" have to be removed to get it in place?

Once installed, is it bonded or riveted to the fiberglass?

Thanks,

You'll need to remove the aluminum top section to install the plate. I used a nice fat layer of ProSeal to bond the plate to the fiberglass airbox. Good luck!
 
My RV-6A was built per plans with the filter being compressed against the bottom of the airbox and top plate mounted to the updraft RSA fuel servo. Every year I’ve had to work on this airbox and remedy many issues over the past 11 years of flying. This last time it’s managed to rub through the bottom plate that I had installed in the air box. I’ve also had rivets pull out they were holding the alternate air plate to the outside bottom of the box. The filter is definitely shrunk both in diameter and in hight. The filter has definitely shrunk both in diameter and in hight. This results in a lot of fretting. I’m about to do a full rebuild this year with a new filter and two metal plates on the bottom of the FAB, one inside and one outside in bottom surface sandwiching the bottom, riveted and prosealed . Also, I thought I put four bolts through the bottom of the box to the top plate on the servo so that I can put proper pressure to hold the filter in place and also help keep the filter from shrinking in diameter. Has anyone else tried this or have a more permanent solution than the stock system? Marty
 
I've repaired mine 3 times in 1700 hours. The first two times were by grinding down some thickness and laying new glass and epoxy in the bottom. The third time was about 2 years ago. I ground down some of the thickness again, but this time I used kevlar cloth. So far, so good, but I do not have many hours on this latest repair.

Aluminum is a good solution, but keep a keen eye on it for fatigue cracks. Loose pieces of aluminum would not be good there...

Yeah, I just put more glass on. Easy to do now. Will try Carbon or Kevlar next time.
 
My RV-6A was built per plans with the filter being compressed against the bottom of the airbox and top plate mounted to the updraft RSA fuel servo. Every year I’ve had to work on this airbox and remedy many issues over the past 11 years of flying. This last time it’s managed to rub through the bottom plate that I had installed in the air box. I’ve also had rivets pull out they were holding the alternate air plate to the outside bottom of the box. The filter is definitely shrunk both in diameter and in hight. The filter has definitely shrunk both in diameter and in hight. This results in a lot of fretting. I’m about to do a full rebuild this year with a new filter and two metal plates on the bottom of the FAB, one inside and one outside in bottom surface sandwiching the bottom, riveted and prosealed . Also, I thought I put four bolts through the bottom of the box to the top plate on the servo so that I can put proper pressure to hold the filter in place and also help keep the filter from shrinking in diameter. Has anyone else tried this or have a more permanent solution than the stock system? Marty

I have seen many FAB air boxes with same issues you describe.
Those missing alt air plate rivets, do you wonder where they go? I once had a spark plug mysteriously short out (knocked flat), replaced it, than had to overhaul that cylinder shortly after. I fully suspect the lost rivets from my alt air plate (discovered when I pulled the cylinder) were the culprits to these failures.
My fix - I modified my FAB box with an aluminum plate (glued to the lower fiberglass floor with nutplates & AN507 screws to lock the alt air plate in place. I solved the filter wear, loose alt air plate, and errant pulled rivet problems in one shot and 500hrs later is still holding.

The 4 bolt arrangement you describe is very similar to what FAB 320 uses.

Also - I would be wary of using carbon fiber in that location, grinding carbon dust might not be a good thing being sucked through the engine.
 
I made a template in SolidWorks. It's for the FAB-320-1. If it's useful I could make a template for the for the FAB-360/540.

I put wings on it to keep the filter from swelling outward at the bottom.

PDF here
 

Attachments

  • FAB-320-1 bottom plate.jpg
    FAB-320-1 bottom plate.jpg
    152.5 KB · Views: 209
If you rivet a aluminum plate into the bottom of the airbox, ensure that if the rivets/hardware should come loose they are either held in by the filter itself, or sit outboard of the filter.
We don't want any loose stuff being sucked up the carb / servo and thru the engine. Or just getting stuck in the butterfly...

And, my 0-320 has the filter element sitting on the bottom of the housing, built per the plans circa 2012.

I don't want to get started on my opinion of the bottom "alt air door". Suffice to say it lost rivets in under 100 hours.
 
I had a similar problem with one of mine - sorry I can’t find the pictures, but I bonded an aluminum “donut” to the area where the filter was making contact. I used a structural epoxy adhesive with a wide temperature range to bond the aluminum donut to the airbox. I drilled a few holes in the donut to act as epoxy rivets to keep it from trying to move around. The filter element pretty much clamps it in place, but the epoxy secures it. I haven’t done it yet to my current RV6 (O-360), but I will as soon as I see any wear on my airbox.
 
I have found air filter grooved FAB units numerous times in the RVs I've serviced. Seems to show up most in planes where owners prime (or over prime) during start, excess fuel drains back & creates a damp grit with dust & dirt and wet sands the fiberglass through. I advise those owners to prime less, which seems to help in extending the time between airbox rebuilds. This is just one of the FAB maintenance concerns I regularily inspect for.
Priming with actual primer... or the pump the throttle method?
I'd expect the pump the throttle method to drop more fuel into the 'box.
 
There is nothing wrong with adding an aluminum plate to the bottom of the airbox if people choose that as a remedy, but the root cause is from using an air filter that has shrunk, and should have already been replaced.
If built per the instructions, the filter is under a slight compression between the top plate, and the bottom of the airbox, so it cannot move around and wear through the bottom.
If the filter shrinks excessively, it is obvious that this compression will no longer exist, and the filter is then rattling around in the airbox.
If it does that a long enough period of time, it is obvious that wear is likely to occur.
 
Priming with actual primer... or the pump the throttle method?
I'd expect the pump the throttle method to drop more fuel into the 'box.
In Lycomings, the electric primer (or manual, if you are so inclined) feeds directly into the intake manifold on usually two or more cylinders. The pump on the carburetor, if used without the engine cranking, will drip raw fuel into the airbox through the air filter. I would imagine, however, being fuel, it would vaporize quickly. Perhaps it's the grit picked up by the oil in the filter that would act as a grinding substance. Moral to the story: Don't use the throttle primer pump without the engine cranking. :rolleyes:

Another subject: Is this more common in certain models? The box on my -4 looks pretty much like it did the first day I put it on; a little dirtier, perhaps. 😊 
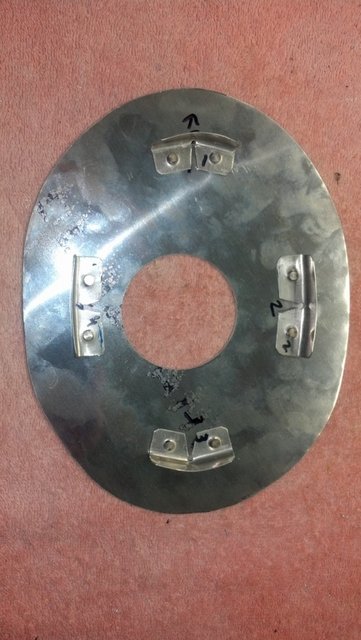
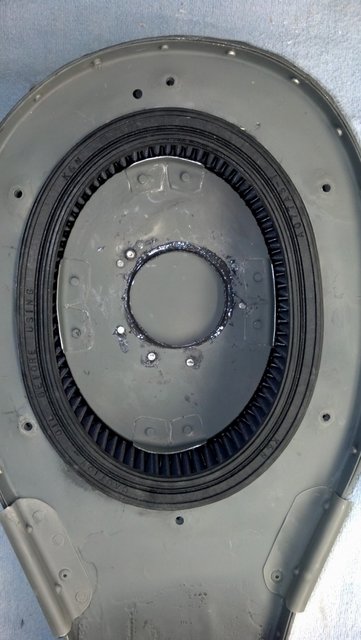
I do have a small dab/line of silicon where it might get rubbed on but nothing going through like the above pictures.
 
Priming with actual primer... or the pump the throttle method?
I'd expect the pump the throttle method to drop more fuel into the 'box.
One owner’s procedure was to press the primer for the count of 4, than turn it over. Usually there was a 10 second pause between prime & turning engine over. A good portion of that prime fuel would be draining out & thru the carb.
Another owner was pumping the throttle accelerator pump priming, than also pausing before turning the engine over. Same result, primed fuel was flowing out the bottom of the carb.
Both scenarios results with an ugly grimy mess in the air cleaner.
 
Many builders have had good success by incorporating an aluminium plate into the bottom of the FAB
Same here... my ride's approaching 20 years and 2,000 hours, and the filters dug some grooves over time. Used 1mm alu sheet and epoxied this "ring" in.
At the price those FABs do retail now (FAB-360/540, $656.25 😲), I sure hope being good for another time period.
 

Attachments

  • fab.jpg
    fab.jpg
    2.3 MB · Views: 7,628
In 2020, at the suggestion of some Posters above, I bonded an aluminum plate in the bottom of my airbox to prevent/minimize wear by the air filter. To date, this fix has worked well. During the current annual, however, I noticed a couple of cracks in one of the aluminum filter "retainers". See below. The fear of this small part breaking free from the base and being ingested by the engine has motivated me to drill out the failing part install a new one. I will use polysulfide in addition to rivets with the hope of getting a bit more life from the part. One more item for the Condition Inspection checklist...thumbnail_IMG_0255.jpgthumbnail_IMG_0256.jpg
 
Last edited by a moderator:
Honestly Dean, that picture is a great example of why I don’t personally like to have anything at all (rivets, clips, nuts, bolts) “inside” the filter element. I like your aluminum floor (although I have had the edges of one wear through the FAB fiberglass as well), and I like the retention on the inside of the filter to keep its shape, but maybe you can come up with a clever way of not having anything small or loose inside the filter. My mind is thinking of a billet-machined plate with the rivets underneath the filter flange itself….but such is the way that people spend thousands of dollars on “the better mousetrap…..). 😉
 
Honestly Dean, that picture is a great example of why I don’t personally like to have anything at all (rivets, clips, nuts, bolts) “inside” the filter element. I like your aluminum floor (although I have had the edges of one wear through the FAB fiberglass as well), and I like the retention on the inside of the filter to keep its shape, but maybe you can come up with a clever way of not having anything small or loose inside the filter. My mind is thinking of a billet-machined plate with the rivets underneath the filter flange itself….but such is the way that people spend thousands of dollars on “the better mousetrap…..). 😉
I wish I had gone the billet route and had a machined flange for filter shape retention. I could still model such a part and have it made, but I would have to sandwich it over the existing floor as that plate has been ProSealed to the airbox and will not come apart without significant damage to both.

Shortly after my previous post, I found a similar crack at the aft retainer. Now, I may remove both the fore and aft (cracked) retainers and not replace them. The port and starboard retainers show no damage. In the meantime, I'll model up a billet-based design.
 
As many others above, I used aluminum for my IO-540 airbox. I don't recall the thickness, but I was trying to address two issues. The first was wear, as you're experiencing. The seccond was that either the FAB "top" left it just a touch too deep, or the filters are slightly less that the specified height. I found that I could just slip a thin plastic ruler between the top of the filter and the base of the throttle body. It didn't seem to cause a problem--silicon levels in oil analyses were always fine--but I didn't like it.

No need to disassemble the FAB, just cut it slightly larger than the outer dimensions of the filter when installed. I didn't bother putting "retaining angles" on it--those on the top of the FAB were more than adequate to keep the filter in place and properly shaped. My alternate air door is not perfectly centered in the bottom of the FAB. Because of it's thickness and that fact that that opening needed to be mirrored in the plate, getting the right shape and dimensions for the aluminum took a little bit of effort, but was pretty easy overall. I used proseal rather than riveting it down, largely to avoid the risk of a broken rivet being sucked into the engine or needing to increase the plate dimension so that they would be "outside" the filter. With an occasional flooded start or ???, I figured that a little fuel would get in there now and then, and that if proseal holds up on fuel tanks it should be fine in the FAB.
 
I modeled and printed a "quick and dirty" billet option for eliminating any fasteners that could be ingested by the engine. The part would have to hogged from 1/4" plate. It would leave more chips than parts, but could be nice. I may try on on-line parts quoter to see what it would cost in aluminum.
thumbnail_IMG_0261.jpgthumbnail_IMG_0263.jpg
 
I modeled and printed a "quick and dirty" billet option for eliminating any fasteners that could be ingested by the engine. The part would have to hogged from 1/4" plate. It would leave more chips than parts, but could be nice. I may try on on-line parts quoter to see what it would cost in aluminum.
View attachment 75935View attachment 75936

I foresee cracks forming in this part where the stiffness abruptly changes...
 
I foresee cracks forming in this part where the stiffness abruptly changes...
How about if he left the internal “ridge” continuous all the way around? Reduces the stresses at the “ends” of the segments because there are no segments….. Of course, now when the filter starts to shrink, what happens? Stress somewhere….
 
I foresee cracks forming in this part where the stiffness abruptly changes...
Interesting thought. For me at least, nuisance cracking (of anything) has probably been the single biggest maintenance issue for the 23 years my -4 has been flying. The CAD model for this part has .030" radii where the segment joins the plate. My thought was between these radii and the fact that the entire face of the plate would be bonded to the airbox, it would be resistant to cracking.

As Paul suggested, the model started as a continuous ring. I added the segments to reduce weight and allow for some air filter tolerance and shrinkage. A continuous ridge would be cheaper to make as less chips would be generated. I just queried the model to determine the weight delta with and without segmenting of the ring - 4.5 grams. :)
 
I modeled and printed a "quick and dirty" billet option for eliminating any fasteners that could be ingested by the engine. The part would have to hogged from 1/4" plate. It would leave more chips than parts, but could be nice. I may try on on-line parts quoter to see what it would cost in aluminum.
View attachment 75935View attachment 75936
What am I missing? With the tabs at the top of the FAB, even with the ridges omitted, realistically, where could a filter squeezed between two plates go?
 
What am I missing? With the tabs at the top of the FAB, even with the ridges omitted, realistically, where could a filter squeezed between two plates go?
See the photo in post #33. For better or worse, I have brackets on the intake side of the air filter. The recent discussion and posts has been on how to eliminate them while still maintaining some control of the filter shape.
 
Not to be too nitpicky, but maybe just a little… it’s a “condition inspection”, not conditional.
Well at least he did the inspection and found the possible problem.
Not to be to picky, But, Yes, you are being picky for sure.
But my luck varies FIXIT
 
Who cares if the filter shrinks a bit? The only requirement for the filter in my aircraft is that it not move and block the drain hole which is inside the filter. For that, I put an AN-3 bolt from the inside, with a small washer inside under the head, and a large washer on the underside (fender washer - don't recall the AN description). The bolt is secured by a castle nut and cotter pin on the underside. The bolt is positioned such that the filter cannot move forward to block the drain hole. I carefully inspect the fiberglass around the big washer at my yearly annual conditional condition inspection 🤣
 
I put an alternate air door on the bottom of this box. The door assembly is screwed to an interior aluminum baseplate with nutplates. The baseplate, nutplates, and the nutplate rivets are all encapsulated under a kevlar wear ply, which was placed with a fuel proof epoxy. Photo taken during layup.

Encapsulation.jpg
 
I put an alternate air door on the bottom of this box. The door assembly is screwed to an interior aluminum baseplate with nutplates. The baseplate, nutplates, and the nutplate rivets are all encapsulated under a kevlar wear ply, which was placed with a fuel proof epoxy. Photo taken during layup.

View attachment 75983
That looks nice. What did you use for fuel proof resin - vinyl ester?
 
See the photo in post #33. For better or worse, I have brackets on the intake side of the air filter. The recent discussion and posts has been on how to eliminate them while still maintaining some control of the filter shape.
Thanks. I see the pic, but still don’t get it. If the filter is blocked on the outside at tabs at the top, in multiple places around the sides, it basically can’t move. Any force applied on the side would try to make it longer, but would be blocked from doing so. Similar result if force were applied on an “end”—it would be blocked from getting “wider” by the tabs on the top. The aluminum bottom plate I added to prevent wear through the fiberglass has no tabs, and I don’t think they are needed. If the filter has shrunk somuch that it can move enough to create a problem, it’s long past the condition where it should have been replaced.
 
Back
Top